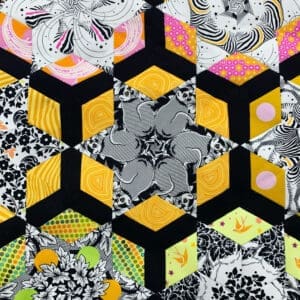
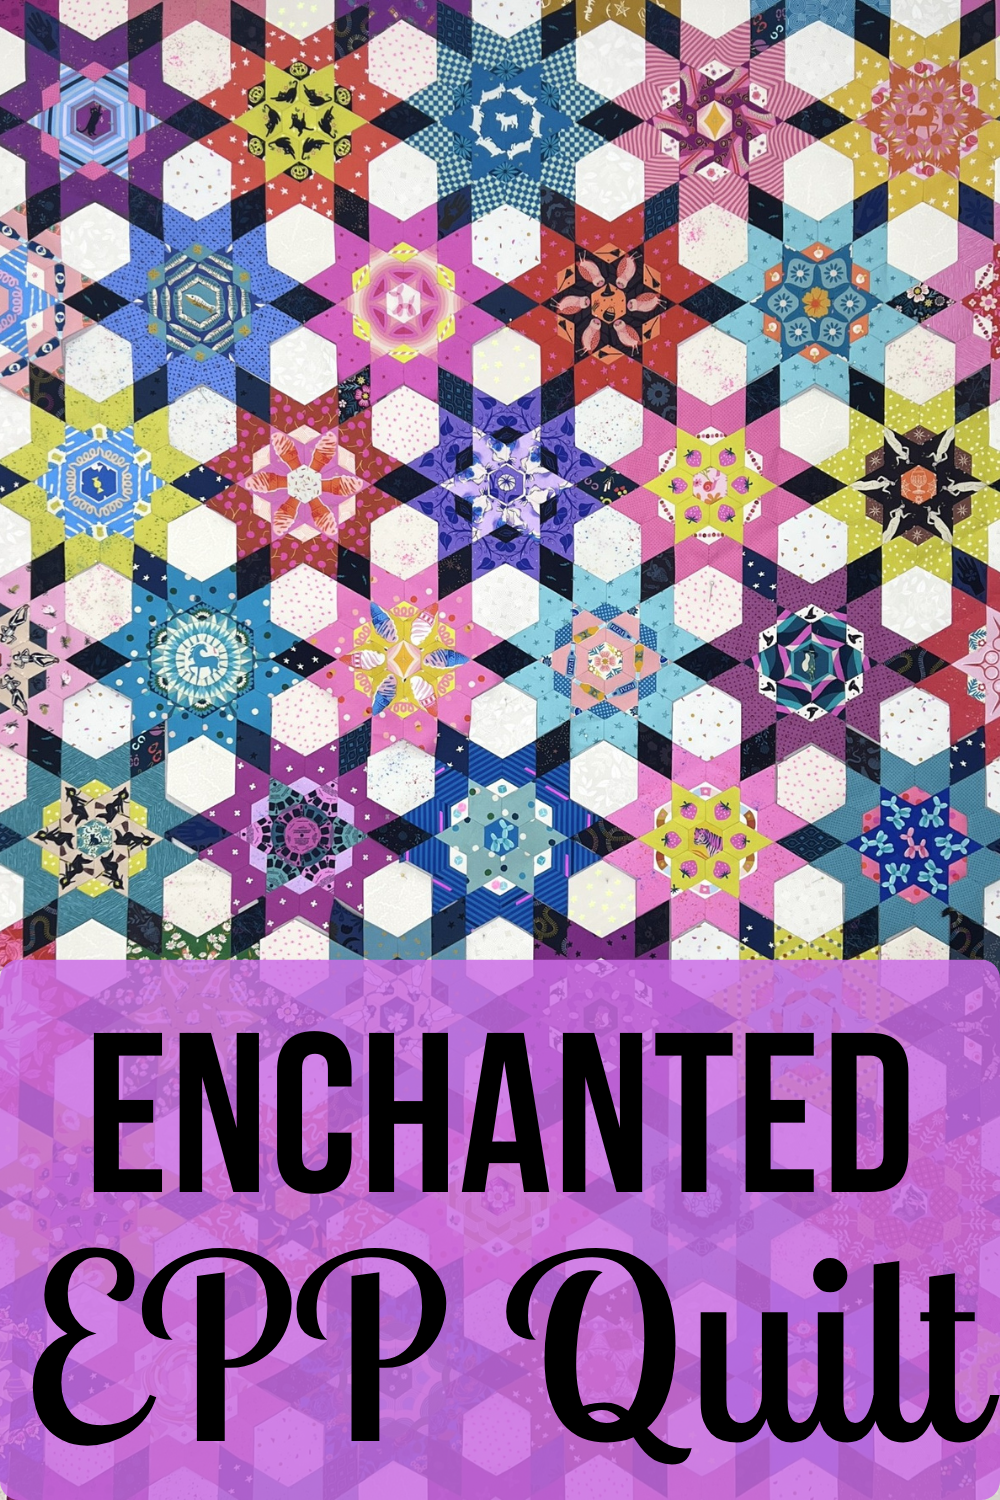
My labor of love (aside from longarming) this year has been the Spellbound EPP pattern! When Tula Pink released her black and white line called Linework, I knew I wanted to make something really special with it. I love black and white fabrics and adding a pop of color to them really sets them apart. I’ve had a blast on this journey picking the fabrics and fussy cutting different elements of each fabric to make it shine. The Spellbound quilt pattern will be available this Friday, October 29!
I am a little bit of a mover and a shaker. You know what I mean–I’m one of those people that can’t stand to just sit idle and not do anything. If you’re here, and reading this, you might have this problem too 😉 . If I have some free time and a free set of hands, you better believe I’ve got some EPP prepped and ready to go. Aside from longarm quilting (which I do almost all day), EPP is my favorite way to pass the time.
I always have a little EPP kit in my purse so that if I’m caught waiting at the doctor’s office, or getting my car inspected, or whatever, I always have a little something to keep me busy AND productive (I posted a list of my favorites at the end of this post). I hate wasting so much time on my phone when I could be sewing something, right!?
It’s such a convenient way to pack a little sewing kit and get things done when you otherwise couldn’t. I love the portability and convenience of EPP, and my daughter Gemma has even helped me finish a few stitches. You can see a ton of my Spellbound EPP shares by heading over to Instagram.
Today is the Hurricane quilt pattern Release Day! And I love to celebrate pattern releases with a sale, so you can get the Hurricane quilt pattern on sale through 8/10/2021 and use the code HURRICANE for 20% off everything else in my shop. You’ll want to keep reading until the end because there are kits, too! Also, there are some sweet free patterns in there too, if you haven’t checked them out!
Before we had kids, my husband and I started our work careers in Houston, TX. In the few years that we lived there, we had countless tropical storm warnings and a handful of pretty serious hurricanes. One particularly memorable storm was IKE. I had just started a new position at a brand new high school (really–it was the school’s first year to be open) and we didn’t know if we should stay and ride it out or evacuate. We ended up leaving after the storm hit and we lost power to stay with my parents a few hours away, since we didn’t know when the power would be restored (spoiler, it came back on within a day…womp, womp). My new high school sustained a lot of damage and, if I remember right, closed for two weeks for repairs.
I can’t stand bad weather…but love to make the best of it
If you’ve ever evacuated an area in hurricane/tropical storm territory, you’ve probably noticed the little graphic painted on the highway shoulder and marked on road signs to indicate a storm route evacuation. I really can’t stand storms and bad weather, and I remember thinking how much I liked the little symbol and the hundreds of painted ones we passed on our way out of town–in spite of what it stood for. The symbol for those storms has always stuck with me and I needed to create a scrapbook of sorts with the symbol. So the hurricane quilt pattern was born and it ALMOST makes me not hate those destructive storms and what they stand for. I like to think of it as a way to turn lemons into lemonade 🙂 .
The PDF and print copies are here for you to make your own stunning Hurricane quilt. I’ve made sure this pattern is jam packed full of all the resources you might need or want, including:
Hurricane Quilt Pattern Features
Easy to read cutting diagrams
FIVE sizes, including:
Baby
Throw
Twin
Queen
King
Easy to read color-coded charts and diagrams
Cutting chart/checklist
Clearly written instructions and colorful diagrams
Okay, so you just got an invite to a party–maybe it’s a housewarming/baby shower/wedding shower/etc. You fill in the blank. This person is super special to you and you just want to give a gift that is really cool and not a lame bottle of wine they probably won’t even like (I’m not a wine drinker ;). Aaaaaaand, you want to show off your fancy schmancy free motion quilting skills, amiright? Let’s learn how to quilt words with free motion to make your text POP.
I absolutely LOVE taking a baby name and using this technique to jazz it up a little and make a sweet wall hanging for when the parents bring their new babe home. I made a similar one for my daughter before she was born, but I incorporated a little embroidery into hers as well. The great thing about this gift is:
It’s quick and easy
Even solid fabric will look good (and fancy)
It’s PERSONAL. Capitalized.
You can use a name, phrase, initial, literally WHATEVER you want
You probably already have the things on hand you need for this and don’t have to run to the fabric store.
Materials-What do you need?
This is a super simple project. Unless you want to piece some fabric and get a little more intricate, all you need is some solid fabric. And, to be honest, this technique looks best with solids. Patterned fabrics will sometimes take away from the relief quilting, unless it’s a really subtle pattern. I have a lot of LOUD, busy prints. So solids for the win for me!
Solid fabric for the top or front of the wall hanging–I always make this piece a little bigger than I want my finished piece to end up so I can cut it down to size.
Solid fabric (or a print) for the back of the wall hanging. This piece needs to measure 12″ bigger on width and height. If your top fabric is 12″ x 24″, this piece needs to measure 24″ x 36″.
Quilting thread that is at least slightly contrasting to your top fabric.
Stencil made from your favorite font (you can also freehand whatever word you want)
Longarm or domestic sewing machine (whatever you have and are comfortable using for free motion quilting)
2 pieces of batting the same size as your backing fabric
Binding fabric for the finish.
Watch the tutorial on How to Quilt Words
Give it a go!
Now that you’re an expert, give it a try! When I was a beginner quilter, I would buy some really cheap flat twin sheets and practice this kind of stuff on that. I built up my confidence a little on the cheap sheets and then wasn’t so afraid to try it with good quality quilting cotton.
Think of what a hit your gift will be at the next wedding shower when you give the happy couple a wall hanging with their new last name (if they are using the same last name :), or for whatever occasion, this can be personalized in so many ways. Be creative and have fun! And don’t forget to spice up your free motion with themed shapes. For the “Summer” wall hanging, I threw in a few whimsical starfish here and there. Have fun and give it a shot!
Today is the Retro Groove Quilt pattern release day! And you know I love nothing more than to have a little sale when I drop a new pattern…You can get the Retro Groove quilt pattern on sale through 5/16/2021 aaaaaand use the code GROOVY for 20% off everything else in my shop. Don’t forget to check out the free patterns, too.
The Retro Groove quilt pattern features five different options, including baby, throw, twin, queen, and king sizes. The Retro Groove pattern is fantastic for showcasing big, bold prints or using up those solids and tone on tone prints. Retro Groove has some easy curves and I’ve made some supplemental videos that you’ll get access to when you purchase the pattern that walk you through each and every step. Here are some other fun things you get with the pattern:
Full size templates
An awesome coloring page and fabric amounts required for each size.
Backing assembly instructions for each size of Retro Groove are included. You don’t have to worry about doing any quilt math for your backings!
Colorful, easy to read diagrams and written instructions.
Detailed cutting diagrams AND a cutting checklist are included for ease of use.
Supplemental video to accompany the cutting chart.
Supplemental video that walks you through assembling a block & sewing curves, step-by-step.
The finished size options include the following:
Baby – 54″ x 54″
Throw – 63″ x 81″
Twin – 72″ x 90″
Queen – 90″ x 108″
King – 117″ x 117″
Skill level is confident beginner to intermediate. If you haven’t sewn curves before, I would recommend stitching up a practice block with some scrap fabric before cutting into your gooooood fabric. The video and pattern steps will walk you through the curves.
Tester Retro Groove pics
The Retro Groove pattern testers came up with some amazing versions of this quilt. I can’t wait for you to see how versatile and all around awesome they are!
Kelley’s Retro Groove
Angie M.
Haley M.
Sarah H.
Mahalia D.
Angela J.
Margo D.
Meredith E.
I’m so excited to see what you’ll come up with for your version of Retro Groove! I’ve been itching to make another version with some really big prints that are hard to use in other quilts with smaller blocks. You can see in Margo’s tester quilt that big prints look pretty awesome in those squiggly curves! Don’t forget to share your makes (I want to see those fabric pulls too!) on Instagram with #retrogroovequilt . Happy sewing!! -Joanna
Today is the Kapow! quilt pattern Release Day! And since we’re coming in hot to Labor Day Weekend, let’s celebrate with a sale! You can get the Kapow! quilt pattern on sale through 9/7/2020 aaaaaand use the code LABORDAY for 20% off everything else in my shop. Also, there are some sweet free patterns in there too, if you haven’t checked them out!
I always love star patterns so much and I wanted something that gave a feeling of an explosion from the center of the star, like fireworks. The PDF and print copies are here for you to make your own stunning Kapow! quilt. I’ve made sure this pattern is jam packed full of all the resources you might need or want, including:
I’m so thrilled to share my OLFA Creator project with you today! The Sunshine Tote PDF Pattern is here! I’m a sucker for oversized tote bags and I love creating details that will really make a tote POP. So I’ve gathered together some of my favorite OLFA tools to put together the Sunshine Tote. I used the OLFA Circle Rotary Cutter to cut out the circles on by tote. It makes for some really cool reverse applique. This was such a great project that lifted my spirits during sewcial distancing.
If you’re ready to add another tool to your quilting arsenal, graffiti quilting is an awesome one to have. A few years ago (when I was prego with Gemma), Karlee Porter visited our guild to teach her Graffiti Quilting workshop. Also, I love Guns N Roses. I just saw them in concert a few days before this, so the shirt I bought there was getting some heavy use! Ever since I found Karlee, I’ve been a serious fan girl–so I jumped at the chance to take the class. I learned so much from that workshop and the techniques Karlee taught stuck with me and influence my personal quilting style.
Today is Cabin Fever Release Day! I’m so excited to share this modern log cabin quilt with you today, as it’s a design I planned out about two years ago. It’s always difficult to be patient waiting for this day! The PDF and print versions are now available :)–and a limited amount of kits.
The inspiration for this quilt came from a few things…even though the name conjures images of being stuck inside. (Which, admittedly, we can all probably relate to currently.) First, I wanted to make a quilt that came together fast and looked great with solids or prints. I like to try out new quilting motifs, and this quilt is so much fun to practice on. Secondly, our daughter was one at the time. A lot of times, I felt the repetition of house chores and potty training (who was I kidding? She still wears a pull up to bed sometimes–and I’m fine with that 😉 made me a little cagey. So I jokingly named it Cabin Fever. The geese represent breaking free from routine and they’re ridiculously fun to quilt.
Funny enough, I didn’t realize how appropriate the name would be at the time, but here we are!
The Cabin Fever quilt instructions come in two sizes, baby and throw. These quilts go together really quickly, and they’re a nice break from traditional block-based quilts. The pattern comes with some fun and easy tips for making flying geese quickly.
Tula Pink Solids / Kona Cotton Equivalents
This colorful version is one of my favorites. I’ve been using all Tula Pink solids and stripes to work on another quilt, and I stumbled across a perfect stack of colors just as I was about to make an all blue version. Sadly, after I made it, I realized the Tula Pink solids can be a bit hard to find, so I matched them closely to Robert Kaufman Kona Cotton Solids. Thank goodness for color cards! I quilted the outer border with some ghost geese to make it appear the entire border had flying geese. Then I did some fun ruler work in each strip of color. I love how the straight lines pop so much on solids! This is the baby version, which measures 52″ x 52″. It’s a really nice size, and I use this one to cover up on the couch while I english paper piece.
Blue & Grey Cabin Fever
This colorway is the very first one I had planned out but didn’t end up making until just recently. I love how the brightness of the blues contrast with the darkness of the grey. I haven’t decided just how to quilt this one yet. Some nice ruler work and custom quilting would really pop against those solids, but I have a new edge to edge design I’m itching to try out. This is the throw size, which measures 81″ x 81″.
Peaches and Pinks Cabin Fever
This was the very first Cabin Fever Quilt I made. I mixed in prints with Kona cotton solids, but I’ve added a color chart in just solids. The great thing about Robert Kaufman fabrics is they generally use the names of the coordinating solids in a lot of their prints. It’s easy to mix and match prints from different collections to what the coordinating solid would be. This is another throw size.
Ruby Star Society – Clementine
Have you seen Miss Melody Miller’s new collection for Ruby Star Society called “Clementine”? I love it so much!! She’s a wizard when it comes to color, and these ethereal pinks and blues are insanely good together. I used Rashida Coleman Hale’s Speckled as the sashing/background fabrics. My daughter Gemma saw me putting this one together and claimed it before I could say no. I let her pick out a color of Shannon Cuddle. Her favorite color is pink, so it was a no brainer. And then she got to pick the edge to edge design that I quilted. They’re subtle, but they’re little heart rainbows. This is the softest quilt, so cozy and squishy.
I can’t wait to see what fabric collections or solids you guys pick for your Cabin Fever quilts! I love seeing the amazing different quilts that y’all make and the incredible fabric selections you make. Have fun with this one–I know I do 🙂 If you want to see more of the photos I’ve been posting of Cabin Fever, you can head over to Instagram and check them out!
I’m stoked to finally introduce to you the Trippy Triangles Quilt pattern! This quilt has been a pet project of mine for the last year (and then some). From picking just the right fabrics–I changed my fabrics several times before I finally got with it stitching–to fussy cutting, etc. and I’ve loved every minute of it. I’m currently working on another version and planning yet another with some fun fussy cutting 🙂
The thing with EPP
Here’s the thing with English Paper Piecing: It’s an obsession of mine. Aside from longarm quilting (which I do almost all day), EPP is my favorite way to pass the time. I always have a little EPP kit in my purse so that if I’m caught waiting at the doctor’s office, or getting my car inspected, or whatever, I always have a little something to keep me busy AND productive. I hate wasting so much time on my phone when I could be sewing something, right!? It’s such a convenient way to pack a little sewing kit and get things done when you otherwise couldn’t.
Last week was QuiltCon 2020 in Austin, TX. I had the best time one could have–and got the full experience of teaching a handful of classes too. I dropped my kiddo off at daycare on Wednesday and headed to Austin (only about a 2 hour drive for me), checked in, and had lunch at Moonshine across from the convention center. Me and the hubs had a meal there a few QuiltCons ago the last time it was in Austin and the food is SO good. Then I got settled into my AirBNB–check out the gorgeous couches in this place…I pretty much picked this airbnb for those couches…and the reviews on the super comfy bed–it did not disappoint.