Today is the Kapow! quilt pattern Release Day! And since we’re coming in hot to Labor Day Weekend, let’s celebrate with a sale! You can get the Kapow! quilt pattern on sale through 9/7/2020 aaaaaand use the code LABORDAY for 20% off everything else in my shop. Also, there are some sweet free patterns in there too, if you haven’t checked them out!
Continue reading Kapow! Quilt PatternSunshine Tote PDF Pattern – download now!
I’m so thrilled to share my OLFA Creator project with you today! The Sunshine Tote PDF Pattern is here! I’m a sucker for oversized tote bags and I love creating details that will really make a tote POP. So I’ve gathered together some of my favorite OLFA tools to put together the Sunshine Tote. I used the OLFA Circle Rotary Cutter to cut out the circles on by tote. It makes for some really cool reverse applique. This was such a great project that lifted my spirits during sewcial distancing.
Continue reading Sunshine Tote PDF Pattern – download now!Get your Graffiti Quilting on!
Cabin Fever Quilt Pattern
Today is Cabin Fever Release Day! I’m so excited to share this modern log cabin quilt with you today, as it’s a design I planned out about two years ago. It’s always difficult to be patient waiting for this day! The PDF and print versions are now available :)–and a limited amount of kits.
Continue reading Cabin Fever Quilt PatternTrippy Triangles Quilt pattern release
I’m stoked to finally introduce to you the Trippy Triangles Quilt pattern! This quilt has been a pet project of mine for the last year (and then some). From picking just the right fabrics–I changed my fabrics several times before I finally got with it stitching–to fussy cutting, etc. and I’ve loved every minute of it. I’m currently working on another version and planning yet another with some fun fussy cutting 🙂
The thing with EPP
Here’s the thing with English Paper Piecing: It’s an obsession of mine. Aside from longarm quilting (which I do almost all day), EPP is my favorite way to pass the time. I always have a little EPP kit in my purse so that if I’m caught waiting at the doctor’s office, or getting my car inspected, or whatever, I always have a little something to keep me busy AND productive. I hate wasting so much time on my phone when I could be sewing something, right!? It’s such a convenient way to pack a little sewing kit and get things done when you otherwise couldn’t.
Continue reading Trippy Triangles Quilt pattern releaseQuiltCon 2020 recap
QuiltCon Austin
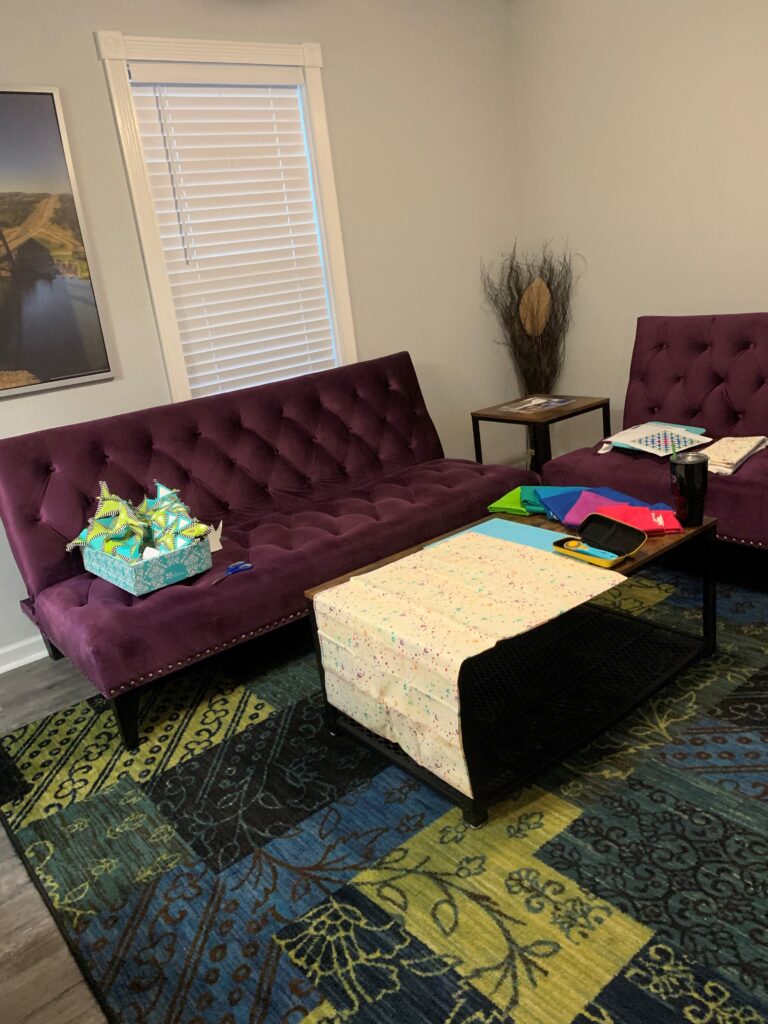
Last week was QuiltCon 2020 in Austin, TX. I had the best time one could have–and got the full experience of teaching a handful of classes too. I dropped my kiddo off at daycare on Wednesday and headed to Austin (only about a 2 hour drive for me), checked in, and had lunch at Moonshine across from the convention center. Me and the hubs had a meal there a few QuiltCons ago the last time it was in Austin and the food is SO good. Then I got settled into my AirBNB–check out the gorgeous couches in this place…I pretty much picked this airbnb for those couches…and the reviews on the super comfy bed–it did not disappoint.
How to English Paper Piece – sewing pieces together
How to English paper piece
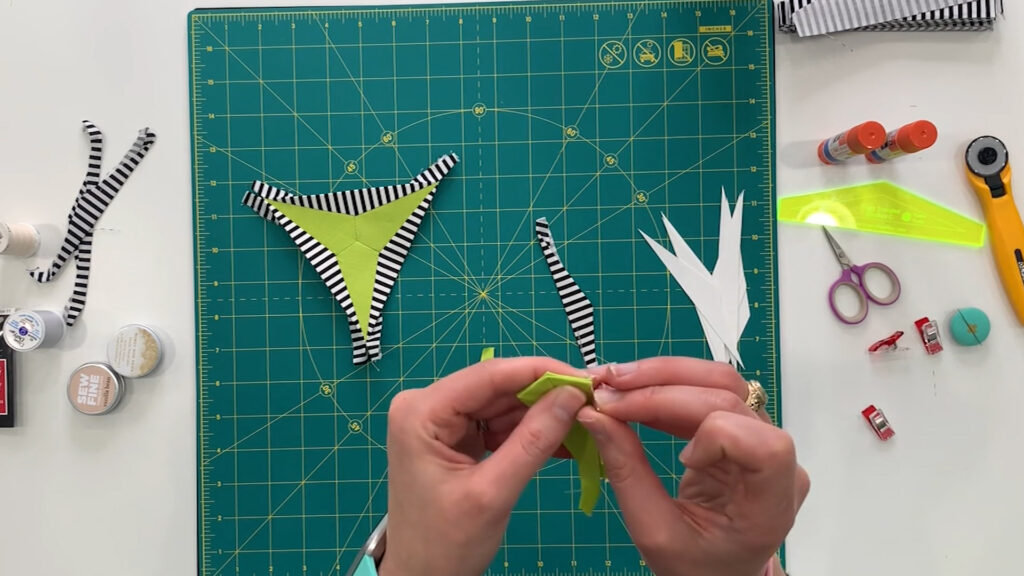
In this series of blog posts, I’ve talked about start up supplies (what my favorites are) and discussed glue basting (also my favorite). Now that you know how to prepare for sewing, lets get going! In this video, I’ll show you how I sew my paper pieces together once they’re basted. There are many, many ways to accomplish this. I’m showing my favorite methods, in case you haven’t seen them before, in the hopes of inspiring you to try new things!
There are different kinds of stitches you can use to sew the pieces together. My go to is a simple whip stitch, but I’ve heard people rave about the flat back stitch. I tried the flat back stitch, and it wasn’t for me–but you might love it (so def. check it out!).
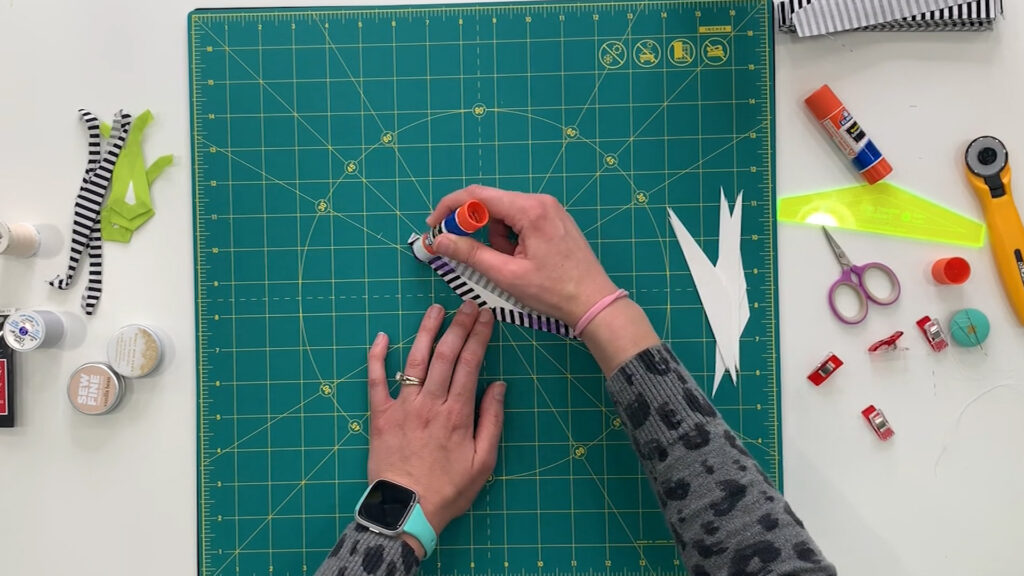
How to glue baste – English paper piecing
How to glue baste…
I know, I know. I know what you’re thinking. Why do I need to know how to glue baste?? So before we get into it…let me just say that I am not the authority on english paper piecing. There are so many ways to get a finished project, and I certainly don’t claim to be the one holding all the answers. But I want to let you in on what has worked so well for me after lots of trial and error. And before I go on, I just want to say: ALWAYS TEST NEW PRODUCTS LIKE GLUE STICKS ON YOUR FABRIC PRIOR TO USING THEM IN AN ENTIRE PROJECT. The glue I use has never done me wrong, but that’s not to say you might not have a different experience.
English Paper Piecing – Getting started and basic supplies
If you’ve spent any amount of time on my blog or Instagram, you know by now that I LOVE sewing and quilting. SO much so that I like to have a travel-friendly project I can take with me, whether it’s in the car, waiting at the doctor’s office, taking my daughter to the dentist, etc., to help pass the time. While English paper piecing is fun, it is much slower than powering up your sewing machine and zipping through a few seams. There’s something meditative about it that helps the craziness of the world to fade away for just a moment and let you appreciate the thoughtfulness of a stitch. English paper piecing appealed to me first when I was still an ag teacher. A lot of times, I’d be on a school bus with kids and nothing to do for hours while we traveled to judging contest OR I’d be stuck in a hotel room at night, not able to go to sleep and wishing for something productive to do. So I started dabbling in EPP. My husband bought me the La Passacaglia kit (Pattern by Willyne Hammerstein) for my birthday and I was totally hooked. I want to take the time to share my favorite English Paper Piecing supplies and tips in the video below.
Continue reading English Paper Piecing – Getting started and basic suppliesDivination EPP – Pattern Correction
If you purchased a PDF or print pattern prior to 2/2/2026 the following correction should be noted:
The Divination Supplemental Bundle (a separate PDF download from the pattern) has the following corrections on page 10:
The basting diagram should show that on “Piece A”, the numbers 2 and 3 should be swapped for the order in which the seam allowances are basted. The same goes for “Piece F”–the numbers 2 and 3 should be swapped for the order in which the seam allowances are basted. The images are showing the correct way to baste, but the numbers were incorrect.
If you purchased the pattern or downloaded the supplemental bundle AFTER 2/2/2026, this has already been corrected.