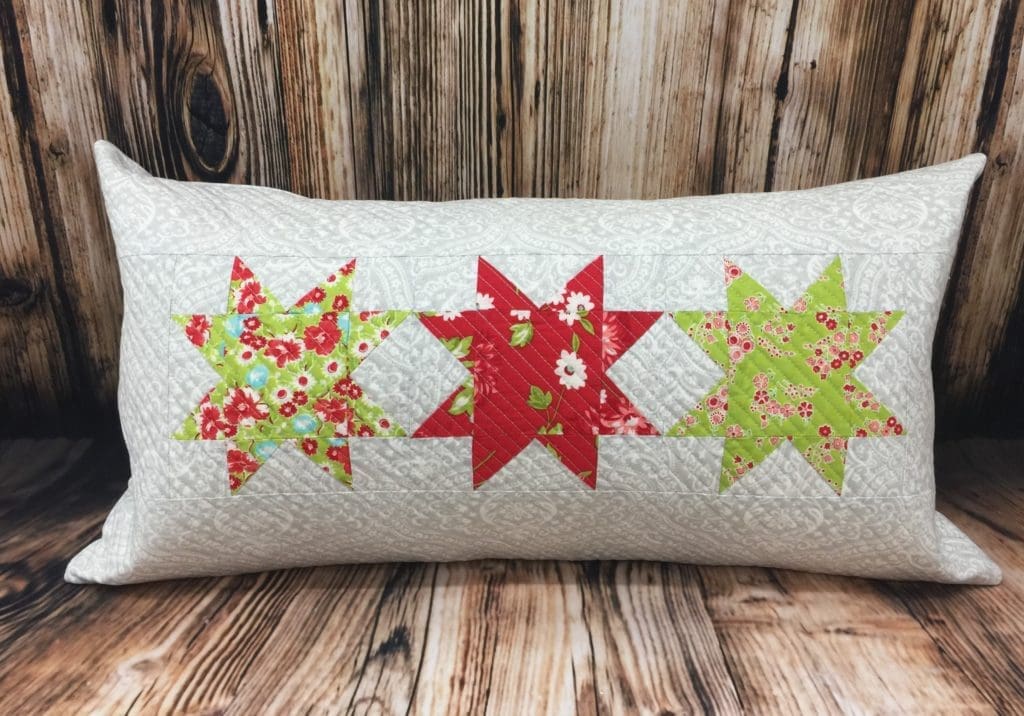
Are you tired of your throw pillows and need a quick way to freshen up your home dec? Grab a few sewing supplies, a pillow form, and some fabric and you’ll be on your way to piecing and quilting up this simple pillow cover in no time at all! I made my pillow on the Janome MC9400, but it can easily be adapted to work with any sewing machine and it’s helpful if you’ve got a walking foot (or some sort of dual feed device), but not a deal breaker! This tutorial consists of piecing some flying geese units and doing a little straight line quilting to add a modern punch to your home dec. Check out the supply list below, then click on the PDF instructions “All is Bright” below for the complete project.
Supplies
Janome HMC9400QCP (or other sewing machine)
Janome supplies (or other sewing machine supplies): Dual feed foot holder, Dual Feed Foot AD, 1/4″ Foot, Standard Foot A, Purple Tip Needle, Empty Bobbin, Pre-wound Bobbin
1 FQ bright green floral fabric (fabric A) sub cut into:
(4) 2-3/8″ square
(1) 3-1/2″ square
1 FQ true red floral fabric (fabric B) sub cut into:
(4) 2-3/8″ square
(1) 3-1/2″ square
1 FQ bright green and true red mix fabric (fabric C) sub cut into:
Are you looking for a way to brighten up your patio with some fun home dec pillows? Make your own DIY outdoor pillow with this quick and easy tutorial to create a super cute oilcloth pillow with pom pom trim, and give your deck a cheery look! I used my Janome Horizon Memory Craft 9400QCP and the Janome Ultra Glide Needle Plate and Ultra Glide Foot to stitch up this oilcloth pillow. Start sewing with some new fabrics and try out a new foot attachment that will take your sewing projects to the next level. The Ultra Glide Needle Plate and Ultra Glide Foot set is perfect for working with fabrics that might not smoothly feed under the standard foot A, such as oilcloth and laminated cotton. Also, check out my previous post on TOP TIPS FOR SEWING WITH OILCLOTH. This is a great tutorial for beginners, and will take approximately 4 hours from start to finish. The finished pillow size is 12″ x 18″.
Supplies: Sewing machine, Janome Ultra-Glide foot and Ultra Glide Needle Plate (Teflon foot for all other sewing machine brands), Zipper foot (Foot E for Janome), Needle, Pre-wound bobbin.
1 yard Aqua Rose gall oilcloth (Fabric A) sub cut into:
(2) 6-3/4″ x 19″ (zippered back of pillow)
(1) 13″ x 19″ (front of pillow)
3 yds. Jumbo Pom Pom Trim/ball fringe
40 wt. Black sewing thread (or white for less contrast)
20″ zipper
12″ x 18″ Weather proof pillow form/Outdoor pillow form
Marking pen
Rotary cutter/ruler/mat
Binding clips
Scissors
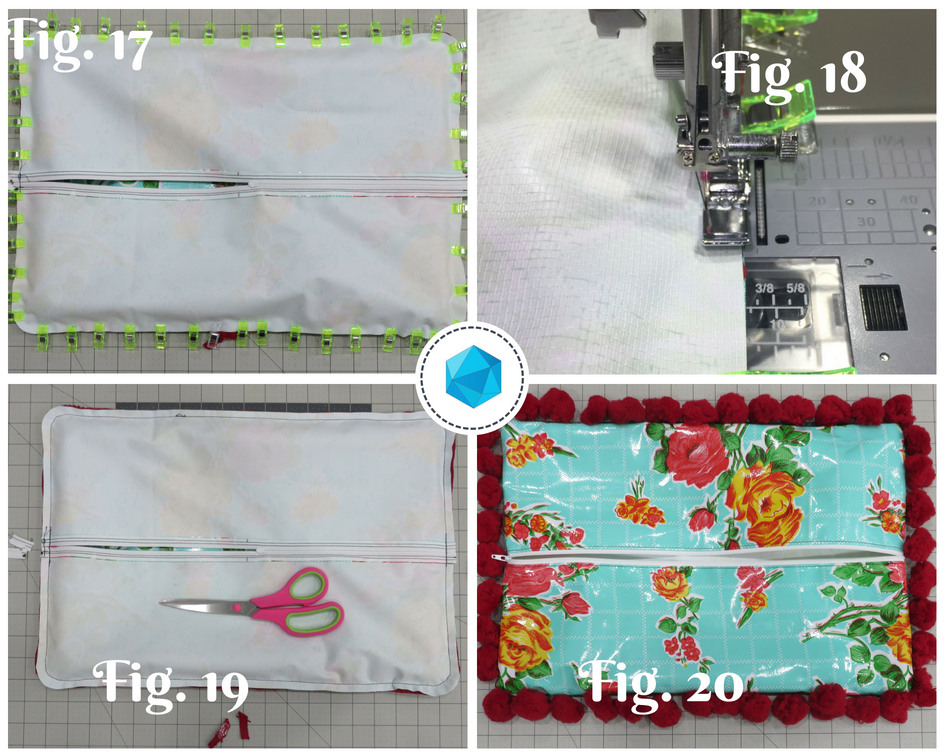
Figures 1-4
Prepare the back of the pillow and install the zipper
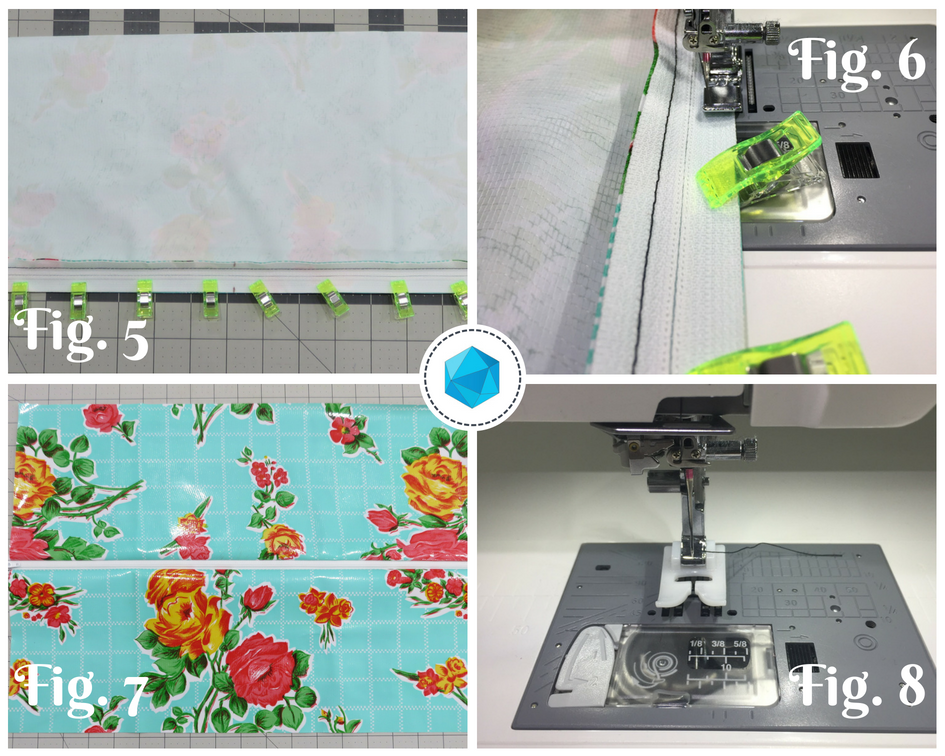
Take the two 6-3/4″ x 19″ pieces of Fabric A and measure and mark the center of one 19″ edge. Take the 20″ zipper and measure and mark the center on both edges of the zipper tape (see figure 1).
Tip: Use binding clips instead of pins when working with oilcloth. The fabric does not heal when holes are made in the oilcloth. Any holes made in the oilcloth will be permanent. Also, use a slightly longer stitch length to minimize the amount of puncture holes made in the fabric when sewing. Typically, adjusting the stitch length from the standard 2.4 to 3.0 is a good adjustment. The raw edges of oilcloth don’t fray, so there isn’t a need to finish raw edges as there would be with a regular woven fabric.
Place one of the 6-3/4″ x 19″ pieces of fabric A RSU and align the zipper tape with the 19″ raw edge, matching the marked centers of the zipper and the pillow back. The zipper and the fabric should be RST (see figure 2). Use binding clips to secure the zipper in place.
Remove the standard needle plate from the MC9400 and install the Ultra Glide Needle Plate. Using this needle plate with the Ultra Glide Foot will keep the oilcloth gliding smoothly under the presser foot. Select a zipper sewing stitch to move the needle position to the left. Lengthen the stitch length to 3.0. Attach zipper foot E to the presser foot and sew the zipper to the fabric A with a 1/4″ seam allowance (see figure 3). Finger press the seam allowance of the zipper away from the zipper teeth, under the oilcloth. Fold the remaining edge of the zipper over (see figure 4).
Place the remaining 6-3/4″ x 19″ piece of fabric A RSU. Take the remaining side of the zipper tape and match the marks on the zipper tape edge and the pillow back edge, with the zipper right side down. Line up the raw edges and clip in place with binding clips (see figure 5). Sew the zipper in place with a 1/4″ seam allowance (see figure 6).
Once again, finger press the zipper tape seam allowance away from the zipper teeth so it is under the oilcloth pieces (see figure 7).
Remove the zipper foot E from the presser foot and attach the Janome Ultra Glide Foot to the presser foot (see figure 8).
Figures 5-8
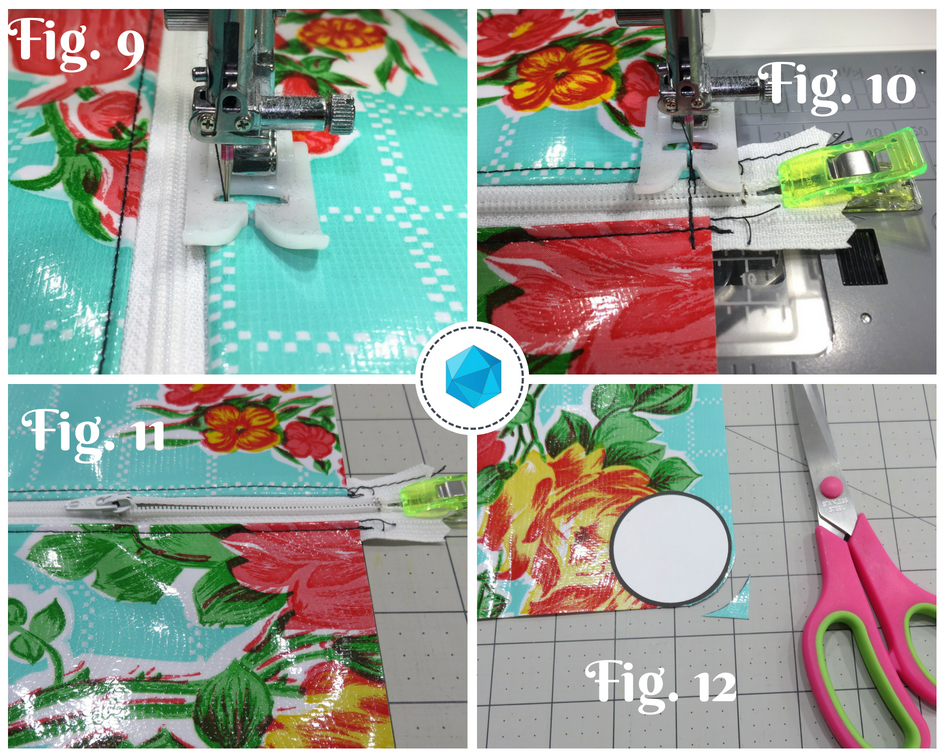
Topstitch 1/8″ away from the folded edge of the oilcloth (see figure 9).
Select stitch #1 from the utility menu. Move the zipper head towards the middle of the zipper tape (see figure 11). Use a binding clip to keep the ends of the zipper together. Sew a few stitches and then backstitch to connect the zipper ends, about 1/8″ away from the edge of the oilcloth fabric (see figure 10). This will act as a zipper stop until the front and back of the pillow are sewn together. Keep the zipper unzipped at least half way.
Round the corners and baste the pom pom trim
Take the circle template that you printed and cut out, and place it with the edges touching the corner edges of the pillow. Trace around the curved edge of the circle with a marking pen.
Cut the edge to round the corner (see figure 12).
Figures 9-12
Repeat steps 8 and 9 with the remaining corners of the back of the pillow and the four corners of the front of the pillow.
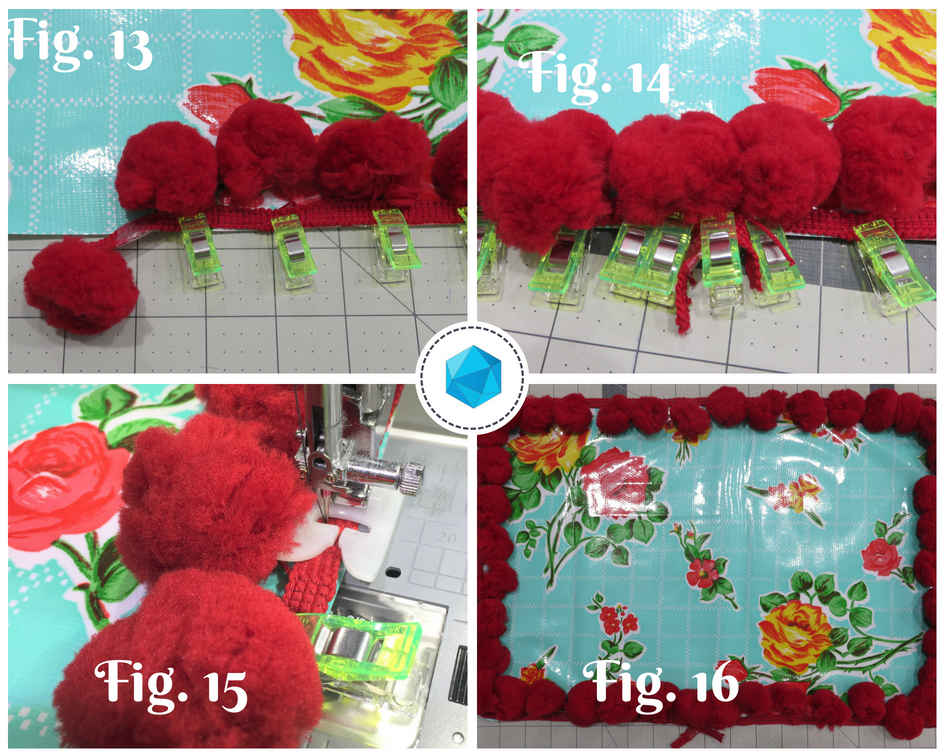
Set aside the zippered back of the pillow. Take the 13″ x 19″ piece for the pillow front and the jumbo pom pom trim. Place the pillow front RSU. Starting in the middle of one of the 19″ edges of the pillow front, align the edge of the trim with the edge of the oilcloth. Trail the end of the trim off the edge of the pillow by 2-3 inches figure (see figure 13). The pom poms should be pointing inward towards the center of the pillow front.
Align the edge of the trim and the edge of the pillow front all the way around the perimeter of the pillow. When you reach the point you started the trim at, overlap the trim and trail the end off by 2-3 inches, as you did to start (see figure 14). If the jumbo poms overlap, carefully trim one or two away to decrease the bulk. Use binding clips to clip the trim in place.
Move the needle position to the left. Lengthen the stitch length to 5.0 for a basting stitch. Baste the trim in place with a 1/8″-1/4″ seam allowance (see figure 15).
Sew the pillow together and finish
Place the basted pillow front RSU (see figure 16).
Figures 13-16
Place the zippered back of the pillow right side down on top of the pillow front (see figure 17). Line up all the edges and make sure the pom poms are all facing in towards the center of the pillow. Double check to be sure the zipper is unzipped at least half way. Use binding clips to secure all the edges together.
Remove the Ultra Glide Foot and attach the zipper foot E to the presser foot. Keep the needle position moved to the left, as if you were sewing a zipper. Sew around the perimeter of the pillow using a 1/4″ seam allowance (see figure 18). Double check that none of the pom poms are getting caught in the seam allowance while you are sewing.
Use a pair of scissors to trim away the excess ends of the zipper so the ends are flush with the pillow edges (see figure 19).
Turn the pillow right side out and carefully push out all the curved edges (see figure 20).
Figures 17-20
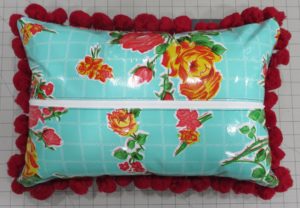
Tip: Oilcloth has little to no stretch, unlike cotton fabrics you might be used to working with. A zipper closure helps to keep seams sewn together versus using an envelope closure. Be careful to not stretch the fabric when inserting the pillow form. For a fully weather-resistant pillow, you can opt to sew this pillow without the ball fringe trim.
Insert the 12″ x 18″ pillow form and use to liven up your patio!
Finished Pillow!
Now get out there and party with your new DIY outdoor pillow 😉
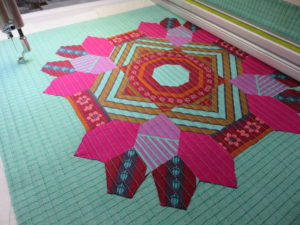
After a long day at work, picking the kiddo up from daycare, fixing dinner and doing the dishes…I like to relax by doing English Paper Piecing. I started my EPP journey before Gemma was born by sewing up La Passacaglia (pattern by Willyne Hammerstein). I’d pick my fabrics in the morning before I went to work (this was when I was still teaching high school), then when I got home, I’d cut the fabrics out as quickly as I could, make dinner, etc., then start glue stick basting all the papers on the couch. I’d organize all my rosettes into little zip lock baggies so I could just grab and go. I also had color coded templates I made so I wouldn’t get my little papers confused. I’d throw a prepped ziplock into my purse when I knew I’d be travelling with students and had some time alone at the hotel at night and sew when I had a chance. That project really hooked me into EPP.
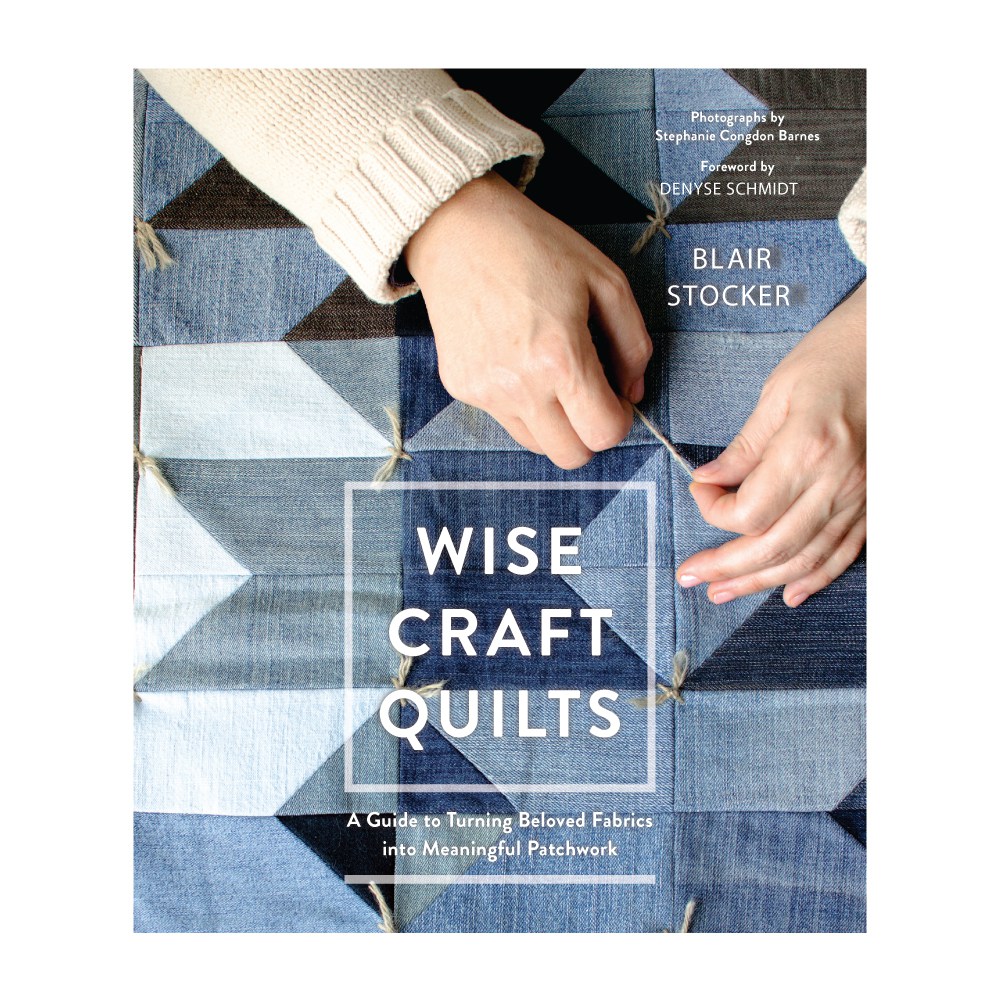
Fast forward to now…I sew full time and any extra time in the morning is spent prepping for the day’s work ahead. Now I have a sweet & sour toddler who demands most of my extra time in the evenings, and I’m so wiped after she goes to bed that the last thing I want to do is think about anything. That is…until I got Blair Stocker’s Wisecraft Quilts book. It’s such an organically creative book about repurposing and it really pulls at my creative heartstrings.
Wise Craft Quilts
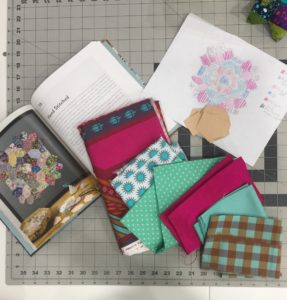
There’s an EPP project in Blair’s book called “Handstitched” that made me fall in love with English Paper Piecing all over again. It’s a project I was confident I could complete, even with my never ending checklist and a needy toddler. If you’re so inclined, you can pick up a paper template kit from Blair’s website HERE. (Full disclosure-none of these are affiliate links. I don’t get anything out of you making a purchase other than the satisfaction of knowing you’ll love this project as much as I do!) Below is a picture from Blair’s book of the project and my beginning planning phase of the EPP. Anytime I do EPP, I always sketch out a “map” of the project with a key for what fabric goes where. I can’t ever remember what my original plan is without writing it down!
Handstitched EPP planning
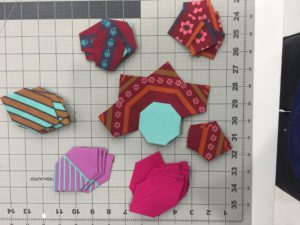
You can see in the finished/progress pictures that I didn’t end up using some of my fabric selections. I’m a die hard Anna Maria Horner lover, and I ended up mainly using one print of hers that I’m a sucker for fussy cutting. There’s so much going on in the pattern of that one fabric that you can basically fussy cut it all over and get dozens of different looks.
Handstitched step 1
I started by assembling the center with my fussy cut pieces.
Handstitched step 2
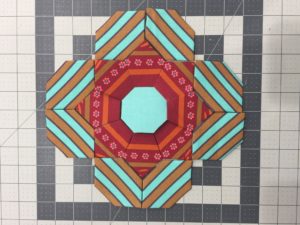
I absolutely LOVE incorporating stripes and straight lines into EPP. I’m always surprised by the outcome. See above.
Handstitched step 3
There’s just something about those dull gold and maroons working with that magenta and mint that make them almost glow.
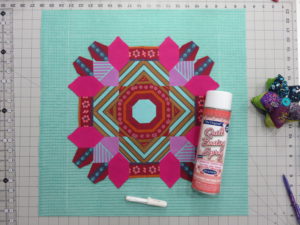
Spray basting onto my pillow front
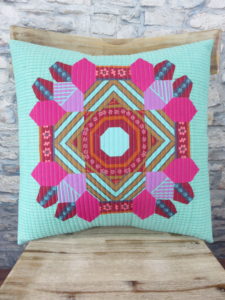
So I decided this project would be a perfect throw pillow. Once I started it, I knew I needed to see this EPP on a daily basis and not just hanging out in my sewing studio. I grabbed my favorite spray baste and cut a pillow front a little larger than it needed to be finished so I could quilt it as well. I used Chaco liner to mark the pillow front into quarters to easily find the center and centered the English Paper Piecing piece on the pillow front. After I used just a smidge of spray baste, I hand appliqued it to the fabric (also AMH fabric-loominous). All while sitting on my cozy couch with the husband 🙂
Appliqueing the EPP to the pillow front
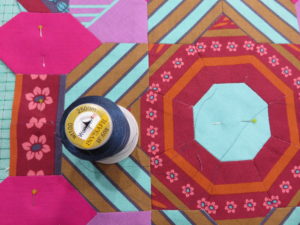
I used Wonderfil 100 wt. thread to hand stitch.I quilted some simple straight lines on the pillow front to add a little texture. The Loominous fabric already has a grid motif on it, so I only did straight lines one way to save me some time.
Quilting
My finished EPP pillow
I could have just stitched up the project and made a mini out of it, but we’re a pillow household. I love how you have to really look at the center to see the English Paper Piecing template shapes. The stripes really break it up and make you have to search for it. I’m really hoping to start another of these soon once I get some other projects off my plate because it is so enjoyable to sew. I put a lot of thought and even auditioned some of the fabrics before I started sewing, but you could just as easily make a scrappy version that would look outstanding as well. I believe Blair’s version in the book is all Liberty (insert all the heart-eyed emojis here!!!).
Basically, I love this project. I can sit my fanny on the couch and relax while my fingers do all the work. And it makes me still feel like I’m being productive (while not actually having to do anything strenuous). Win-win, right!?
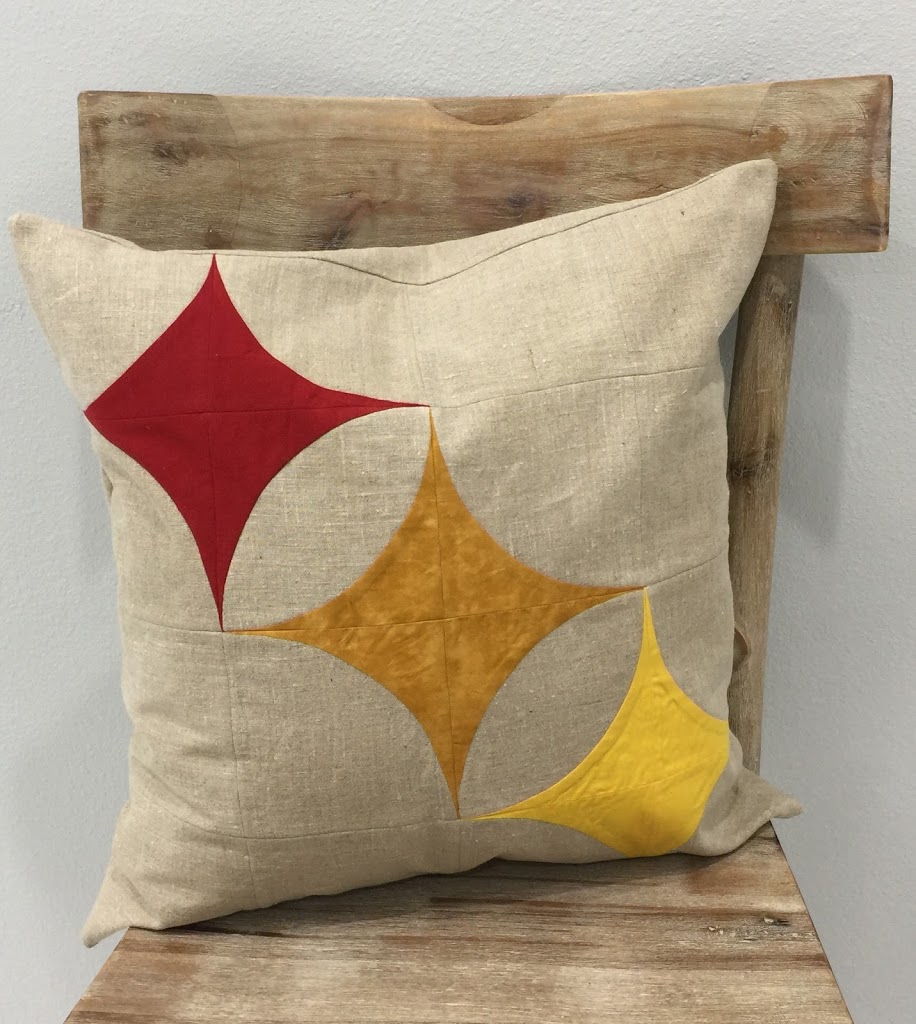
A few weeks ago around Mother’s Day, I was contemplating what handmade gifts would be truly appreciated by mom. As a new mom, I was excited to celebrate my first mother’s day, but didn’t really care about getting any gift (I honestly wanted some house chores done as a gift, and maybe some honey-do’s!), so I was thinking about gifts with meaning. I was seeing lots of advertisements on social media for jewelry and diamonds and just lots of STUFF. I’m not much of a jewelry person, but the diamonds got me thinking about birthstones and some of the jewelry I had seen a few years ago. I remembered one of my friends receiving a ring that had her kids’ birthstones set in it, and how much she loved it. How could you translate that representation into a quilt? And how many people have time to whip up a “quick” quilt, by the time they are pondering mother’s day gifts?
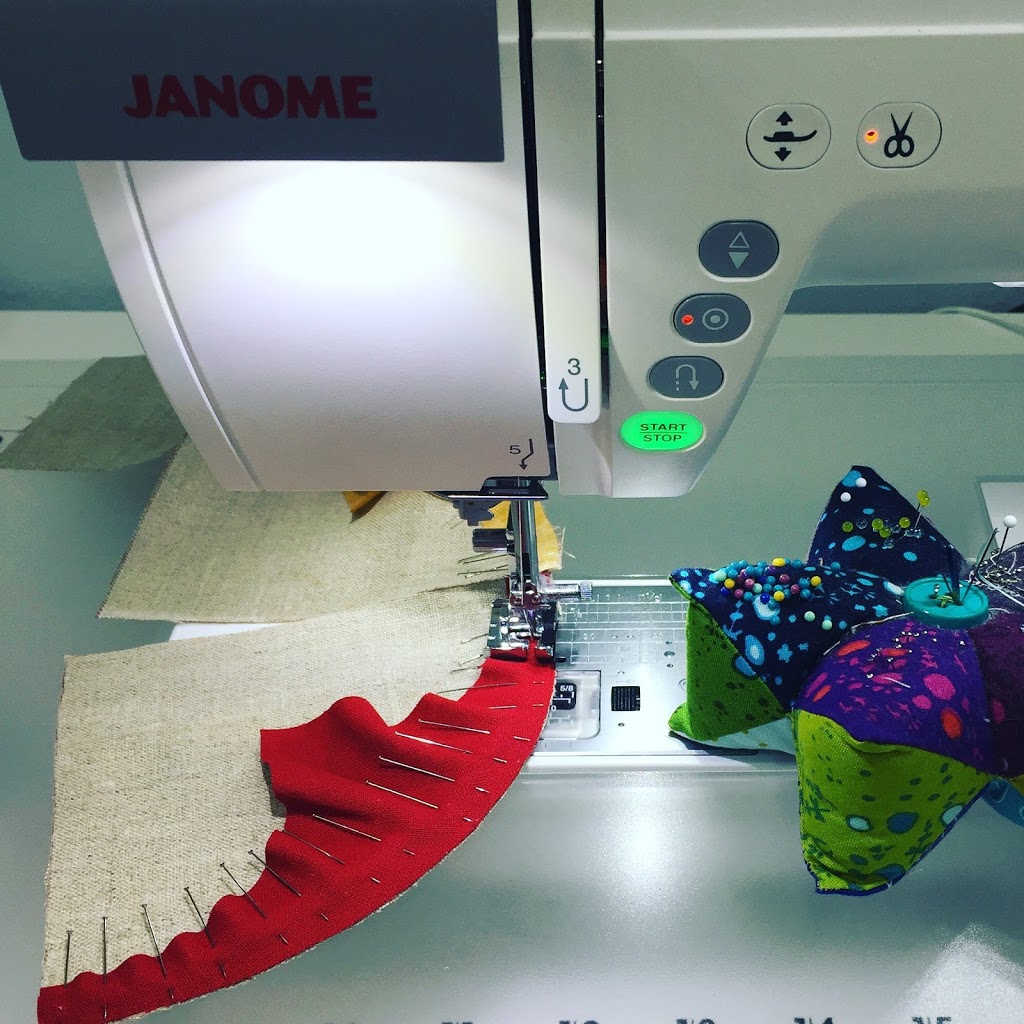
I thought a decorative pillow for the couch or bed might be more practical and manageable on a short time frame. So I teamed up with Janome to create a generational pillow that would be a great design for using the birthstone jewelry idea and making something for the home. You can view the free tutorial on the Janome Projects Website
I used the Janome Horizon Memory Craft 9400QCP to sew this project, and sewing the curves was a breeze. I’m completely spoiled by this machine and will be hard pressed to sew on anything else ever again. It even has an additional light that you can pull out for a better lit area when sewing. It’s extremely helpful, especially if you are sewing dark fabrics and using dark thread. Another favorite perk from this machine is that when you stop sewing, the needle remains in the down position. Which is absolute heaven when you are sewing anything tricky that you don’t want to shift too much when the presser foot is lifted.
In the free tutorial, there are three options for the pattern–you can select birthstone colors for 3, 4, or 5 people (or even more-but you’ll have to do the math for that on you own 😉
If you have a couple of people with the same birthstone, you can use different tones of that stone for a little variety. Some months even have multiple birthstones (or so I was told in my reading up on different months…), so you could go that route as well. Happy sewing, and see you next time!
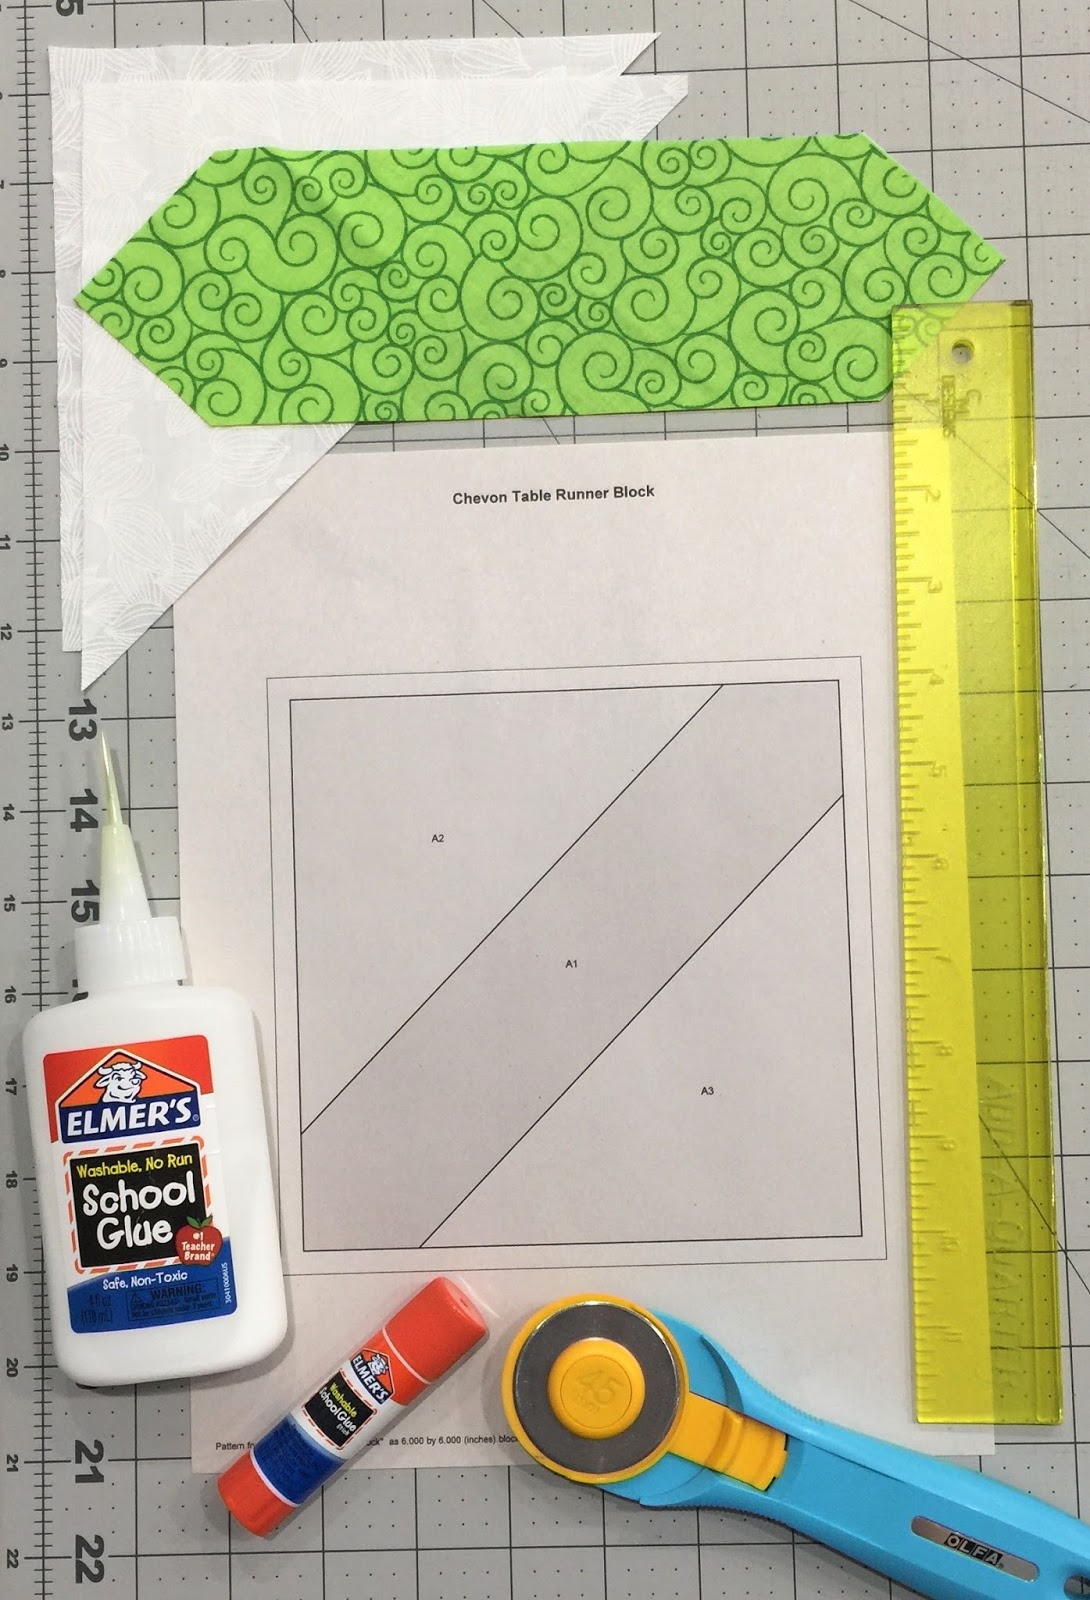
So St. Patrick’s Day is right around the corner–let’s face it–everything is right around the corner! I feel like I blink and the week is over ;)–anyway, you probably need some greenery in the kitchen to avoid getting pinched, right? Well, you’re in luck (like what I did there??), because I’ve teamed up with Janome to bring you a super simple tutorial for a table runner. If St. Patty’s Day isn’t your thing, you can easily swap out the colors for something more suiting and make it your own. So pictured below are a few great supplies to have on hand for foundation paper piecing. I absolutely love my add-a-quarter ruler. It has a little lip that you butt up against the edge of your fabric for easy trimming. I’m also a big fan of Cristy Fincher’s glue basting tips that you can get HERE. They screw onto the top of a regular bottle of Elmer’s school glue and are fantastic for distributing just the right amount of glue to the fabric. And some 8.5″ x 11″ newsprint paper–you can use standard printing paper if you don’t have this on hand and don’t want to make a special trip for it. The newsprint tears away a little easier than the heavier weight printer paper, so that’s why I prefer it. And a glue stick! The rest of the supplies are pretty standard sewing supplies.
Foundation Paper Piecing Supplies
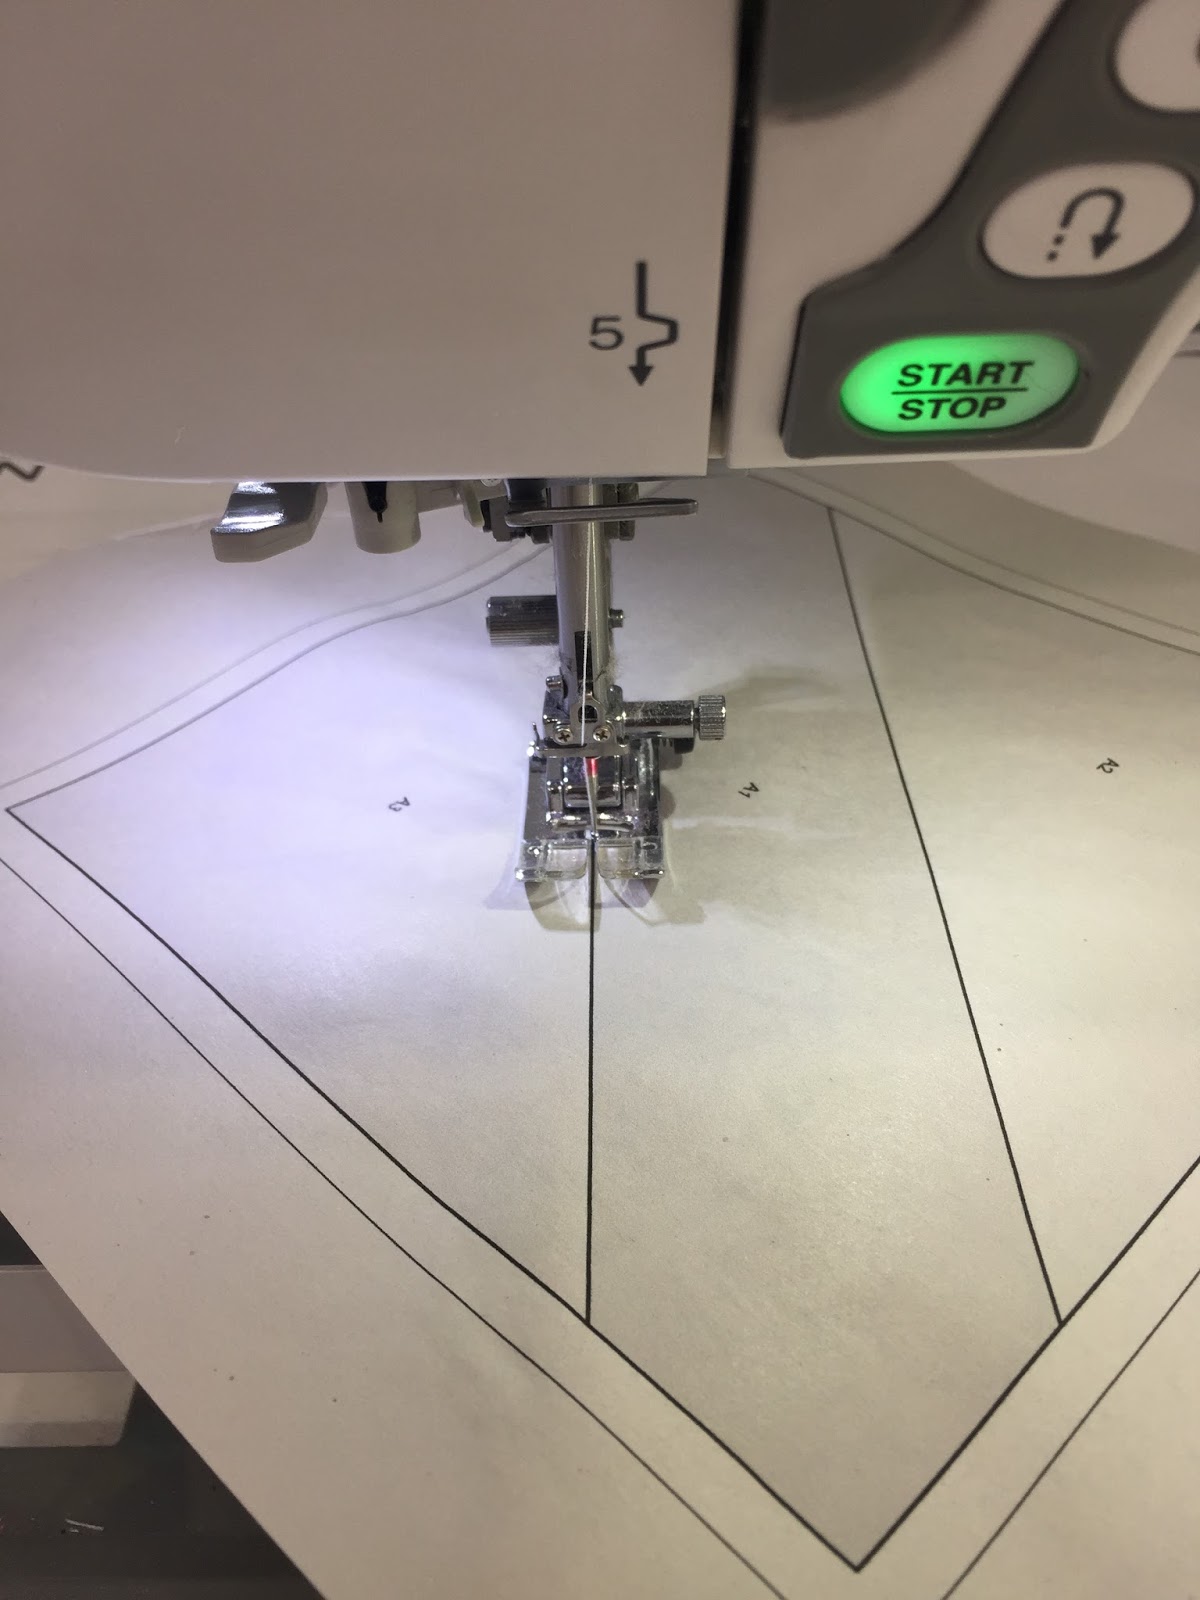
When you foundation paper piece, you sew on the printed side of the paper. The fabric is secured by using a little glue from the glue stick to adhere it to the opposite side, and the elmer’s glue to add another piece of fabric. Be sure you shorten your stitch length–a good rule of thumb is to shorten your stitch length to 1.5 or smaller. This perforates the paper enough to easily tear away later. If you don’t shorten the stitch length, you could play tug of war trying to tear the paper away once your blocks are complete!
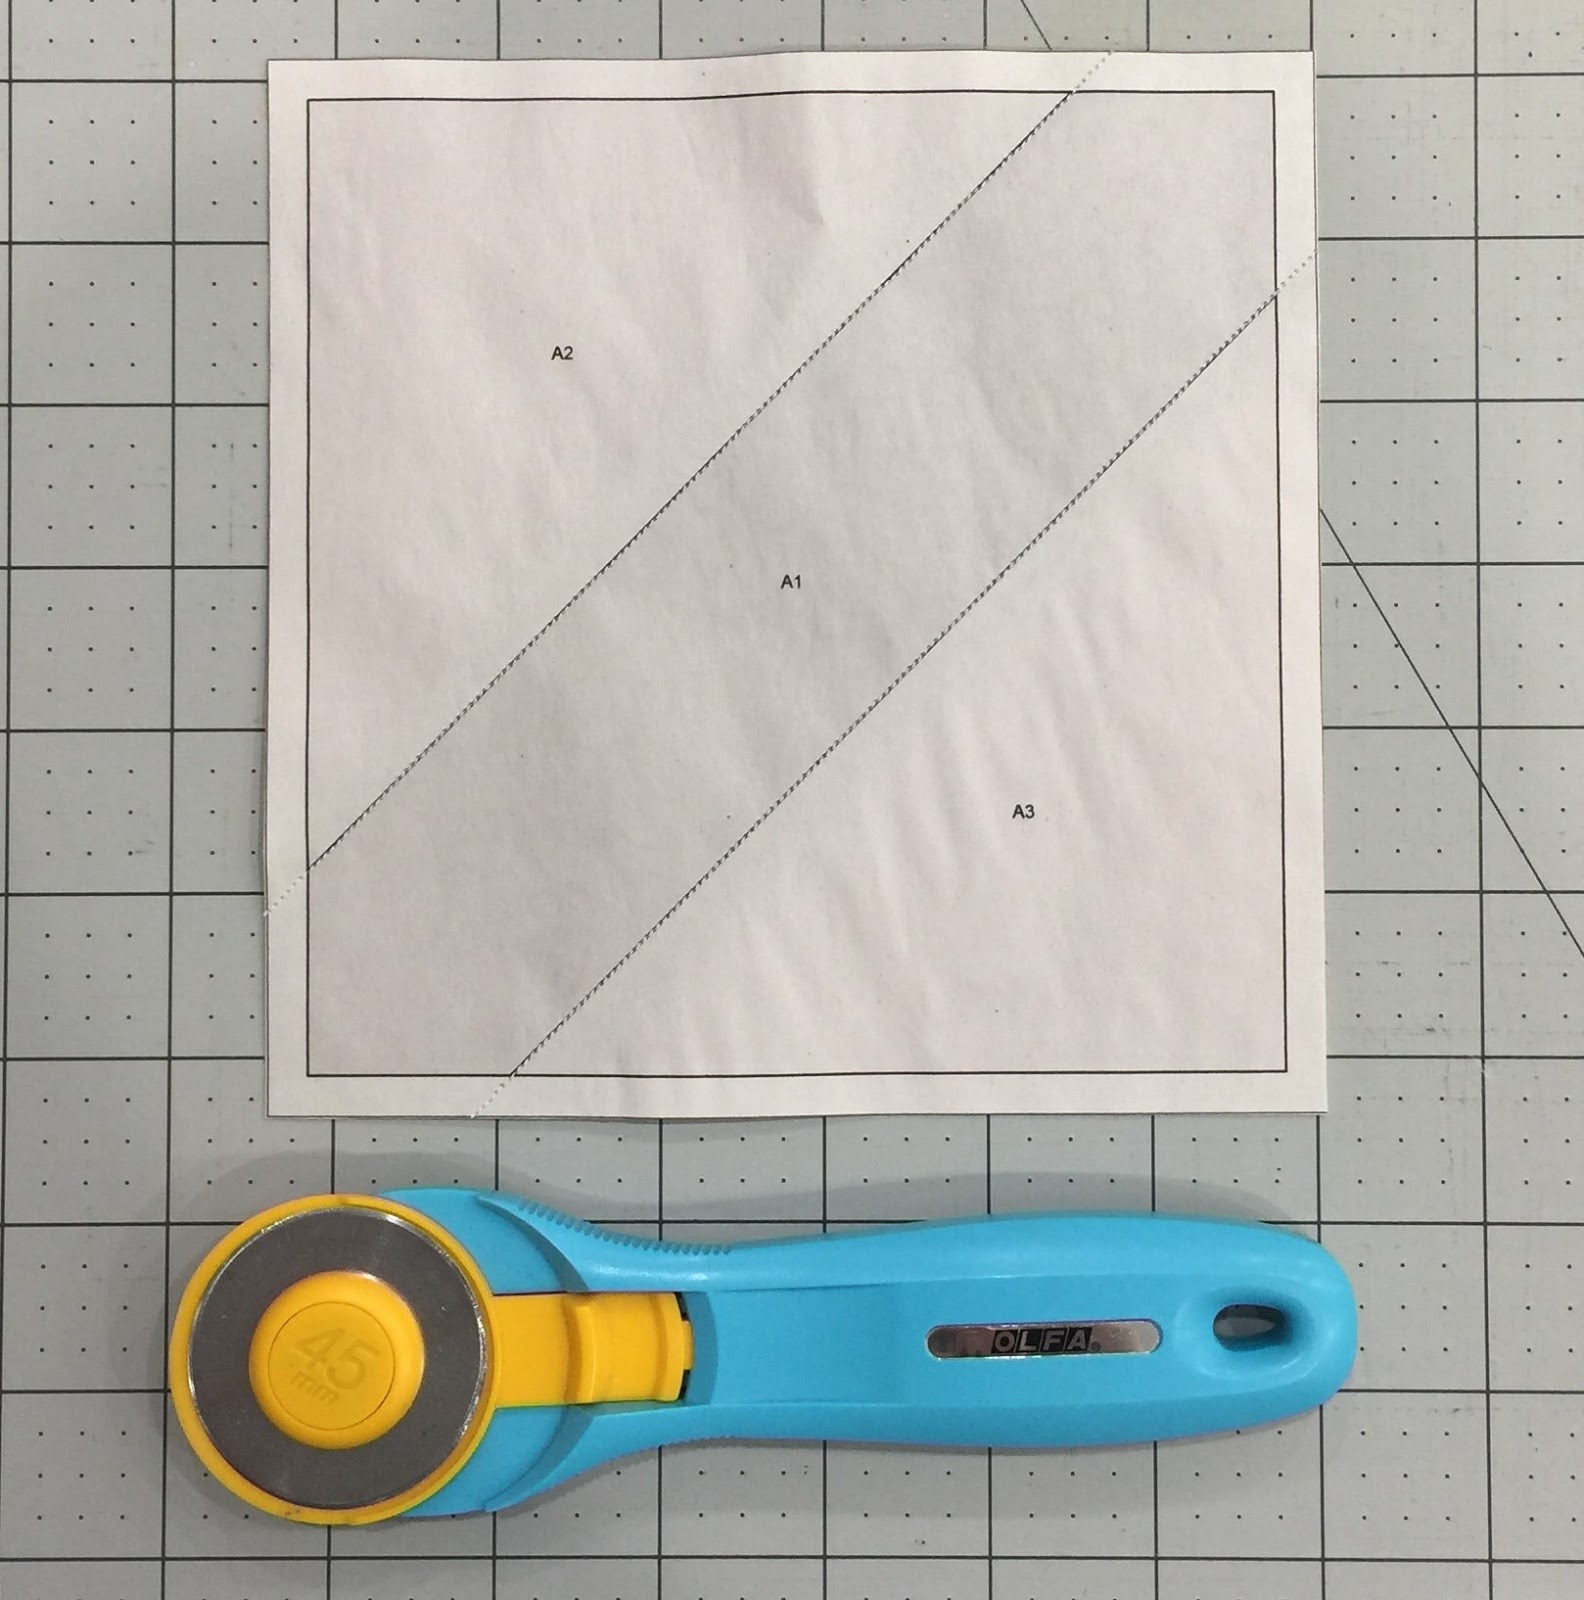
Use a ruler to trim away the excess fabric and paper (you may want to use a rotary cutter that you designate for paper use for this), making sure you leave the 1/4″ seam allowance in tact!
Visit the Janome Website for the full instructions on how to finish this sweet project!
Enjoy the rest of your week! I know I will–as I type this, my husband has taken our 3 month old for a walk so I can have a little break 🙂 I love her to pieces, but my lanta–sometimes it’s nice to have a minute for yourself! Happy sewing!
Yikes!! So I’m a little late on sharing this, but it will be here for future reference 😉
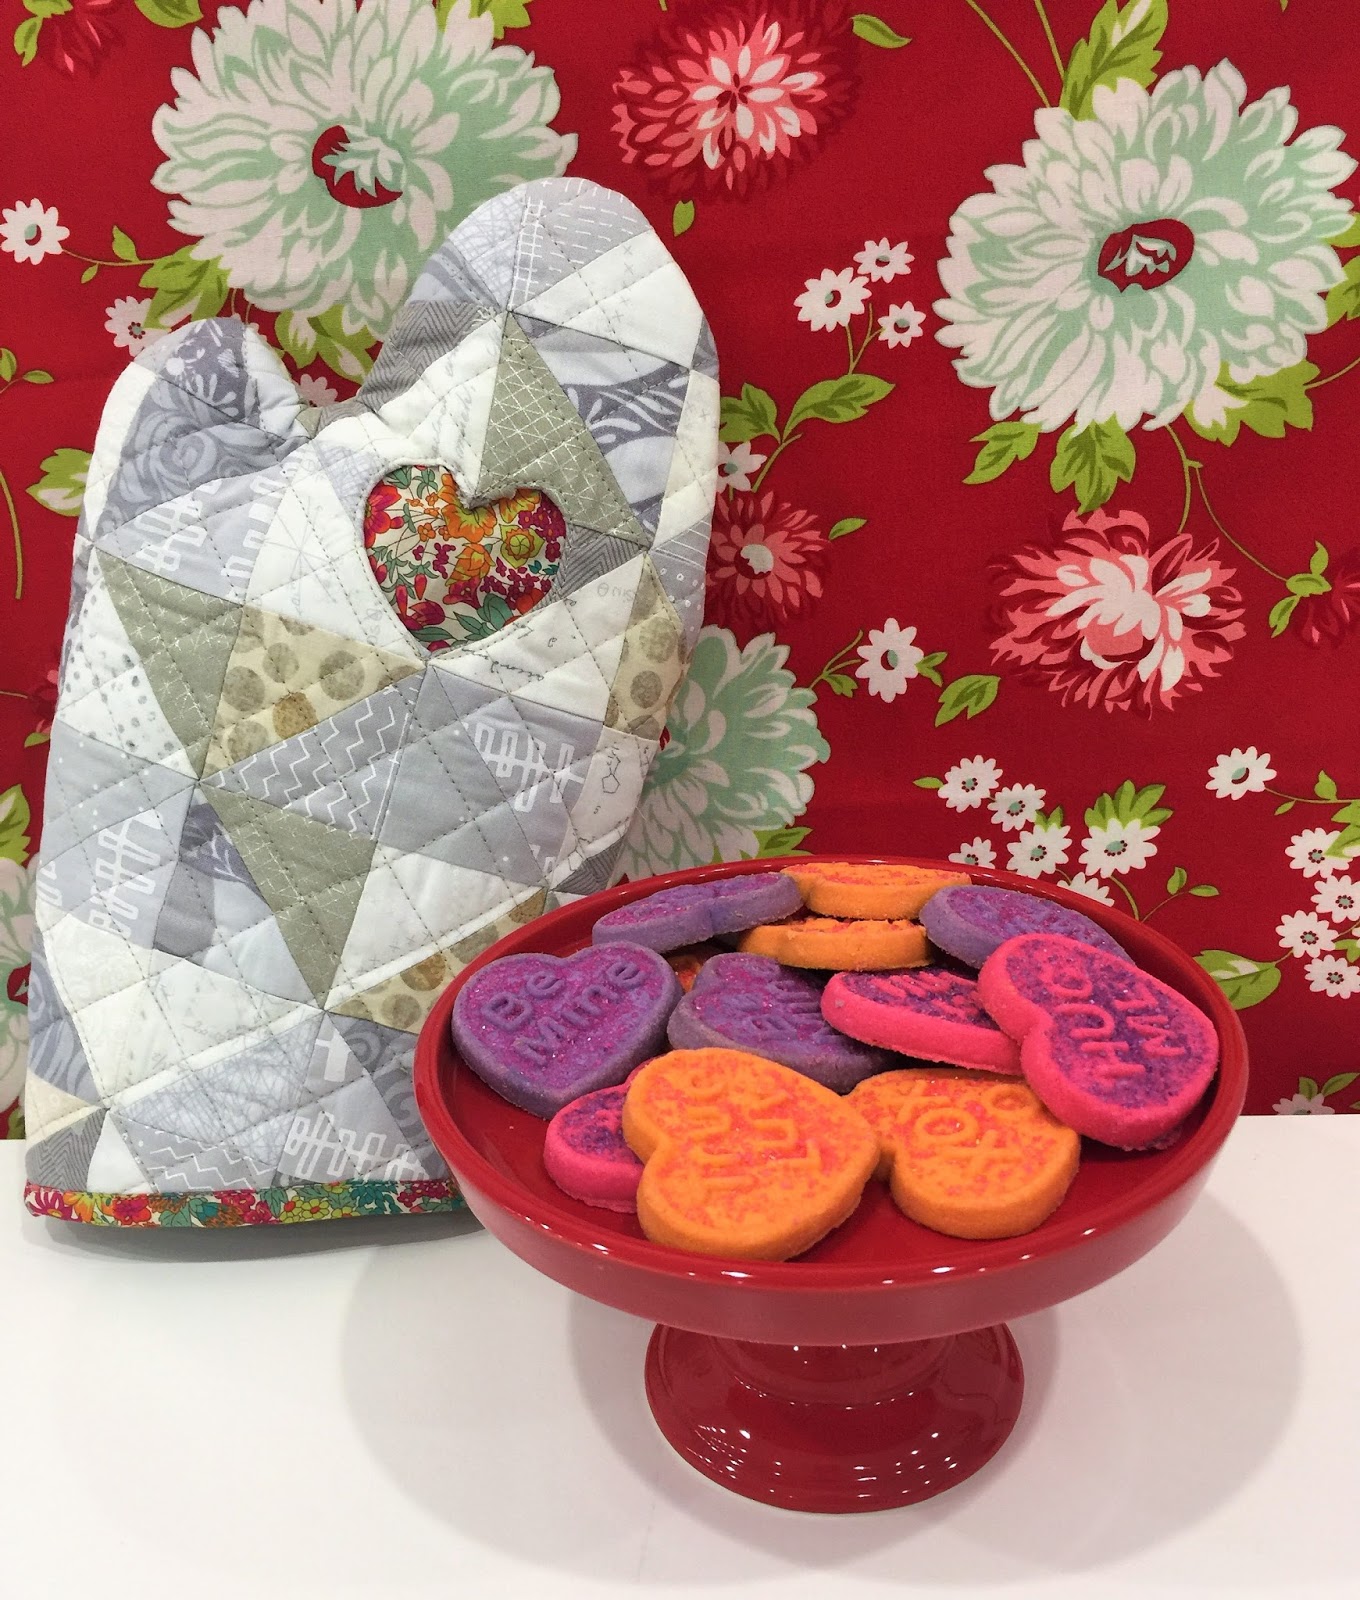
Do you love a fun (and quick) project for Valentine’s sewing? Check out this sweet tutorial I teamed up with Janome to create HERE . This is a great project to incorporate some low volumes with a great print that you’ve been saving (I used Liberty of London), but you might now have a lot of!
The oven mitt tutorial can also be customized–you can leave out the reverse applique option for a simpler finish and enjoy your new oven mitt quicker.
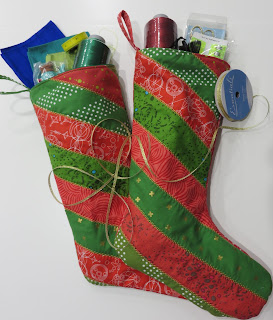
It’s time for another free tutorial! I got to team up with Janome again to bring you an awesome Christmas stocking tutorial 🙂 Be sure to check it out on the Janome website !
These stockings are super easy to whip up! All you have to do is sew some strips of fabric together (jelly roll strips would be perfect!), then use the template to cut the stockings out. You can add some decorative stitching to the seams where the fabric is joined for a little extra oompf! Start and finish in an afternoon and make some awesome new stockings for the family 🙂 Merry Christmas!
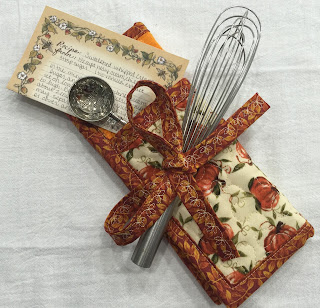
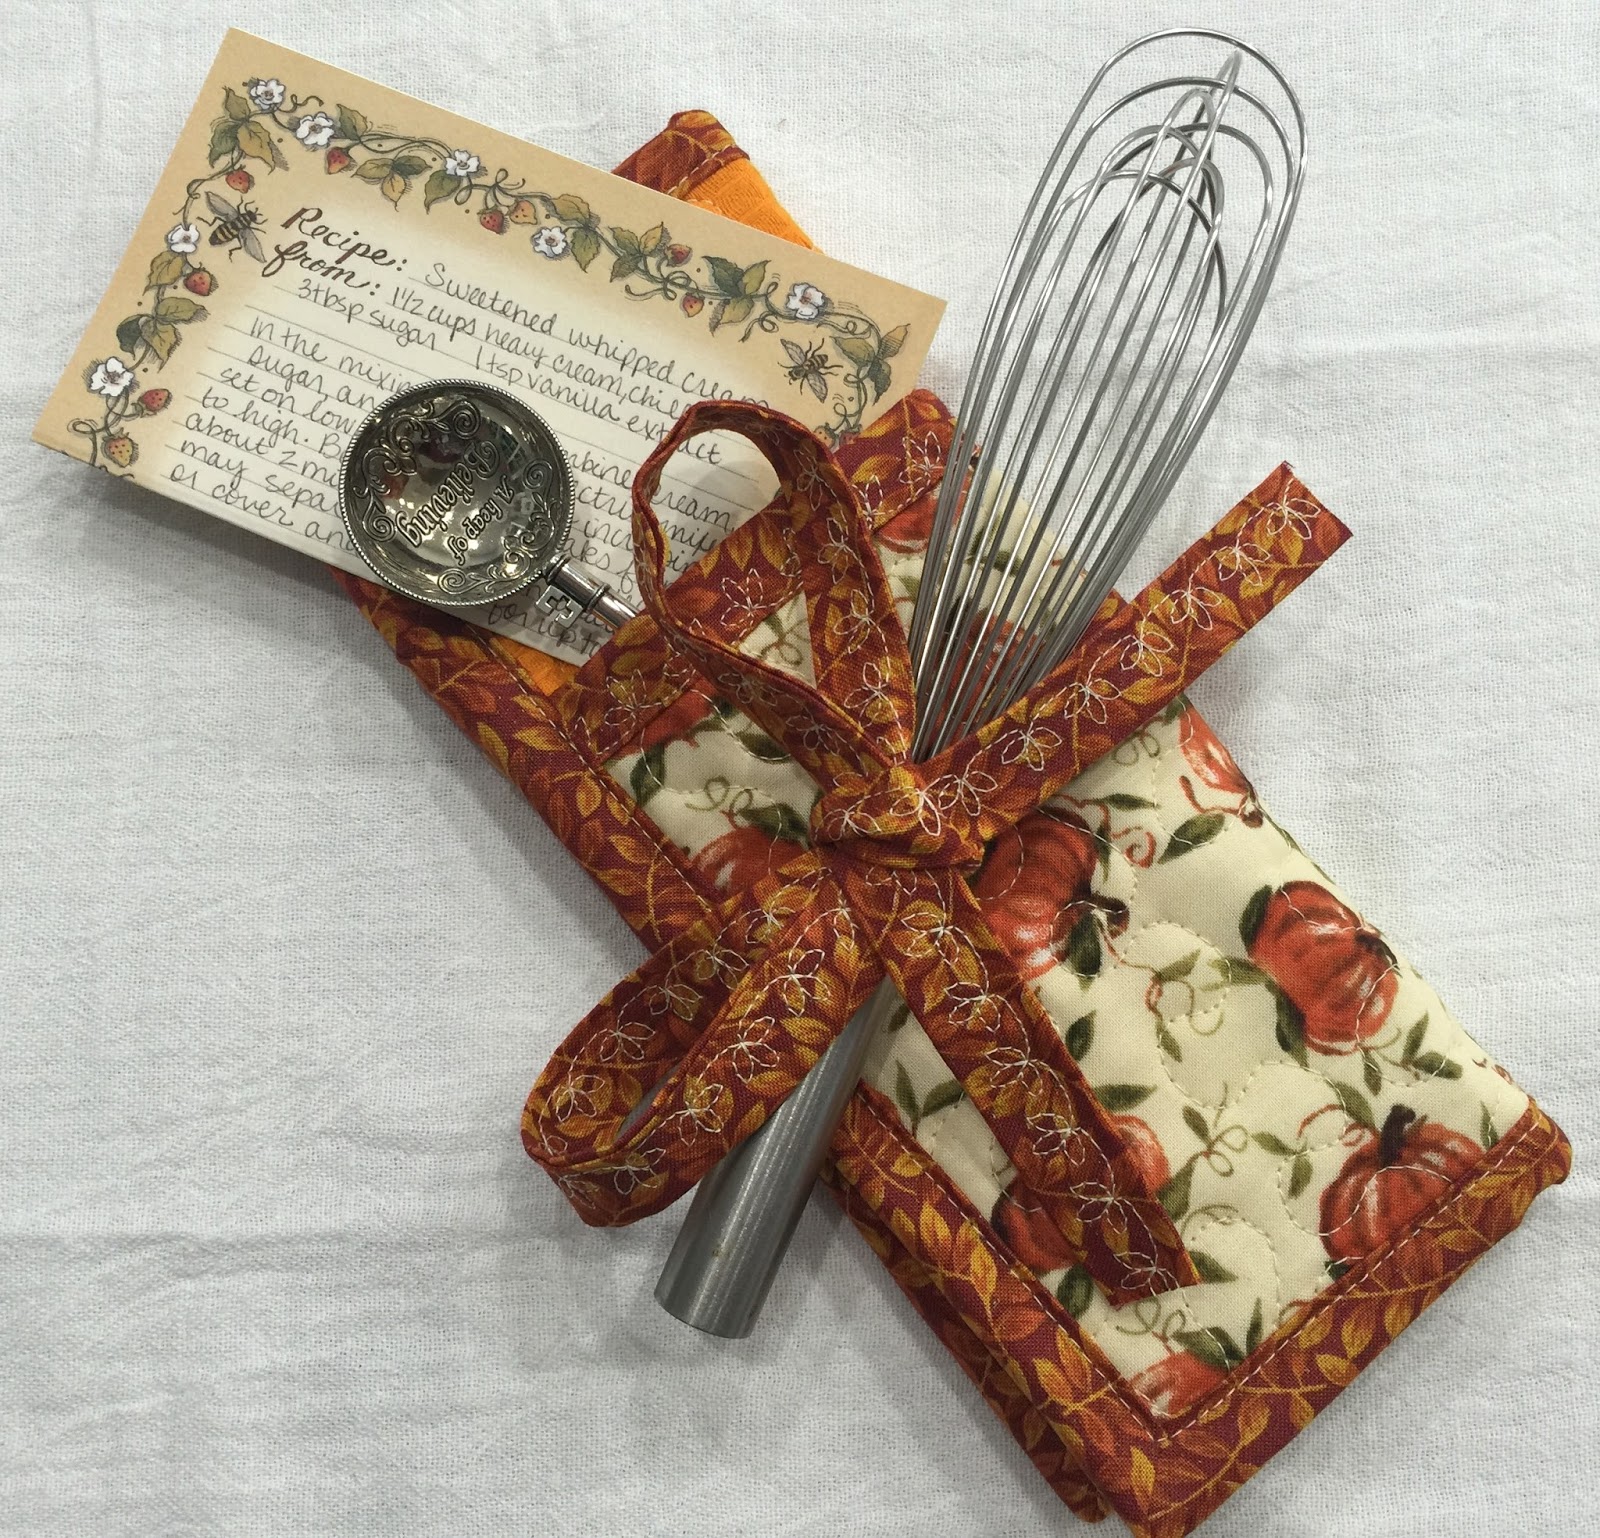
So I got to team up with Janome to offer a free tutorial for a quick and cute hostess gift! If you aren’t the main cook in charge of Thanksgiving, but a guest at someone else’s table–you don’t want to show up empty handed! Whip up one of these cute hot pads with a little recipe card and a cooking utensil and you’ll be sure to be invited back! Get the free pattern at the AQS Blog ! And also–Happy Thanksgiving!!!
Welcome to the next stop on the SewHome blog hop! I am super excited to be included in this blog hop and can’t wait to share one of my favorite projects from this awesome book with you. There’s also a giveaway (open internationally) hosted by each blog hop participant!!! Instructions on how to enter are at the end of the post 🙂
SewHome by Erin Schlosser (photo by C&T Publishing)
Be sure to follow the other participants as they showcase some seriously amazing projects from Erin’s new book!
Let me start by saying I had the awesome opportunity to quilt another project for SewHome, and so found out about this amazing book a few months before its release. Erin is so talented and has thought of literally every project you could ever want to sew up to make a house your home. I am not as blessed as others when it comes to the interior decorating gene, so this book is a God send. Erin even thought to include some design basics and clearly explains everything that needs to be considered prior to starting any project. She has tons of suggestions on how to keep your projects cohesive, even discussing color and fabric selection. I had the opportunity to preview this awesome book before it was printed, and had to purchase it myself to keep a hard copy on hand.
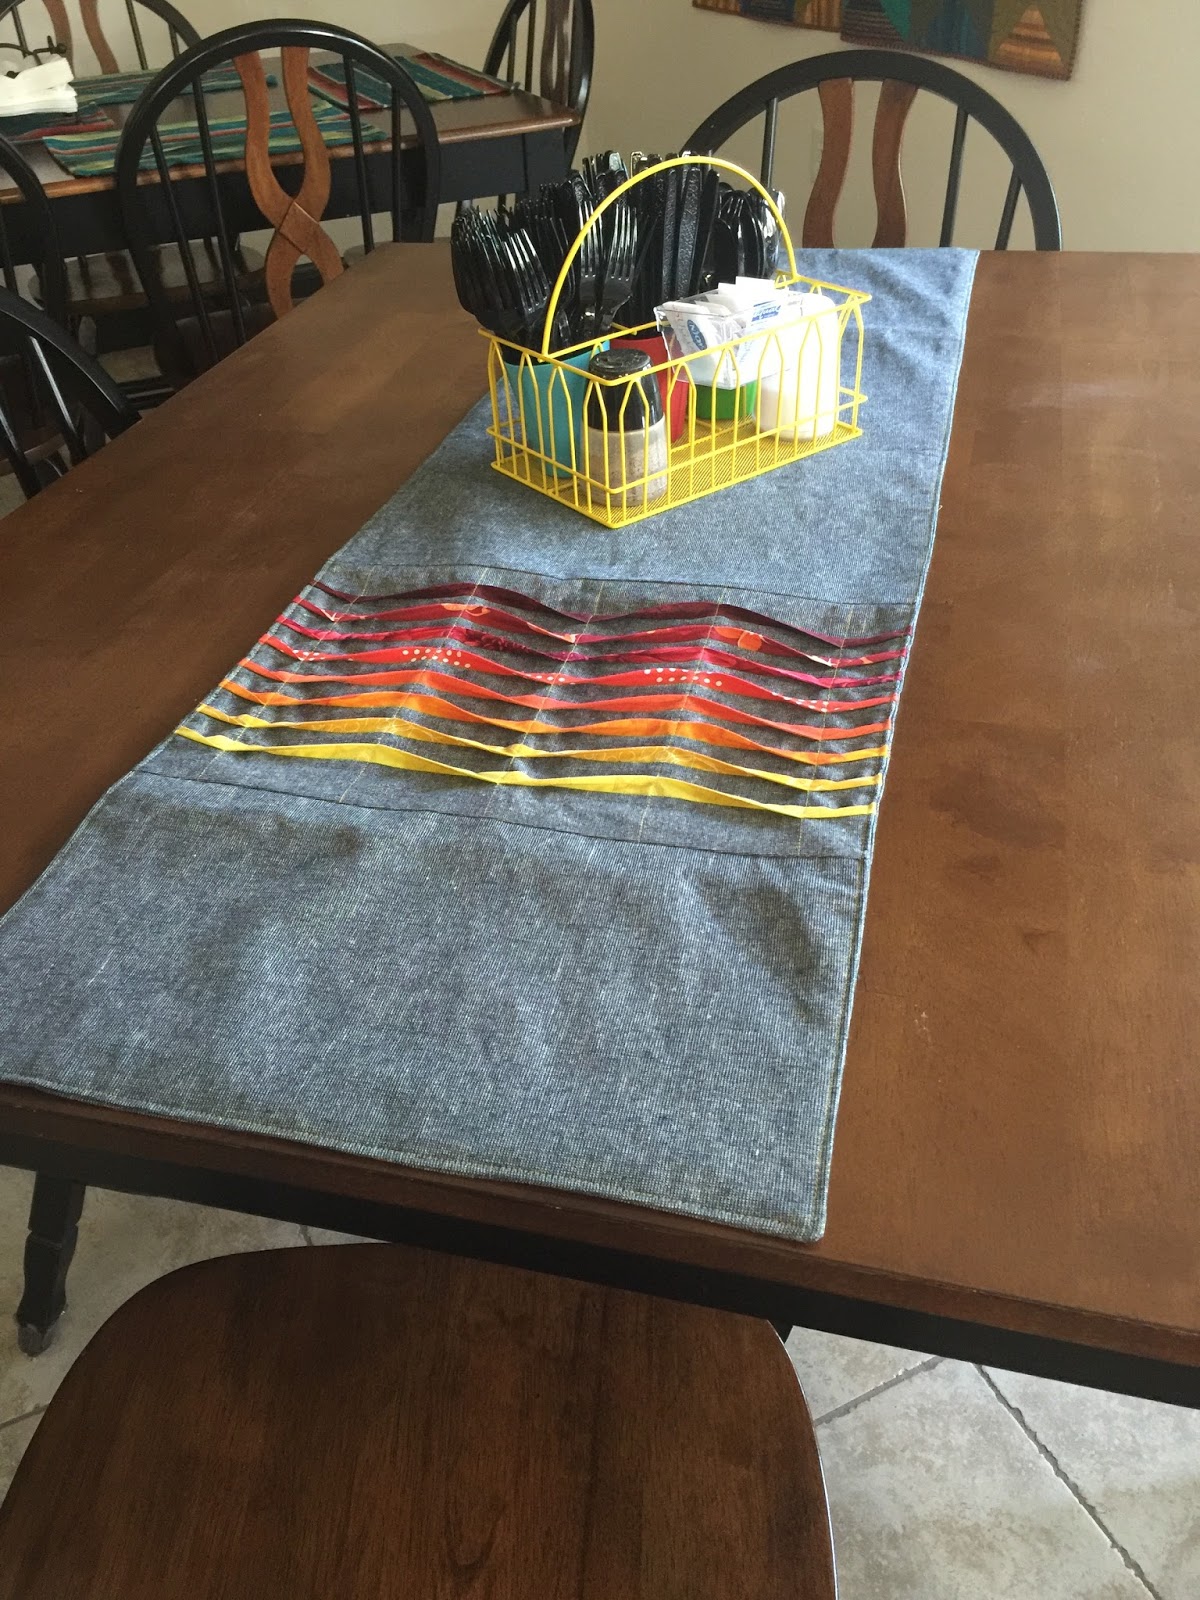
It’s a Twist Table Runner (photo by C&T Publishing)
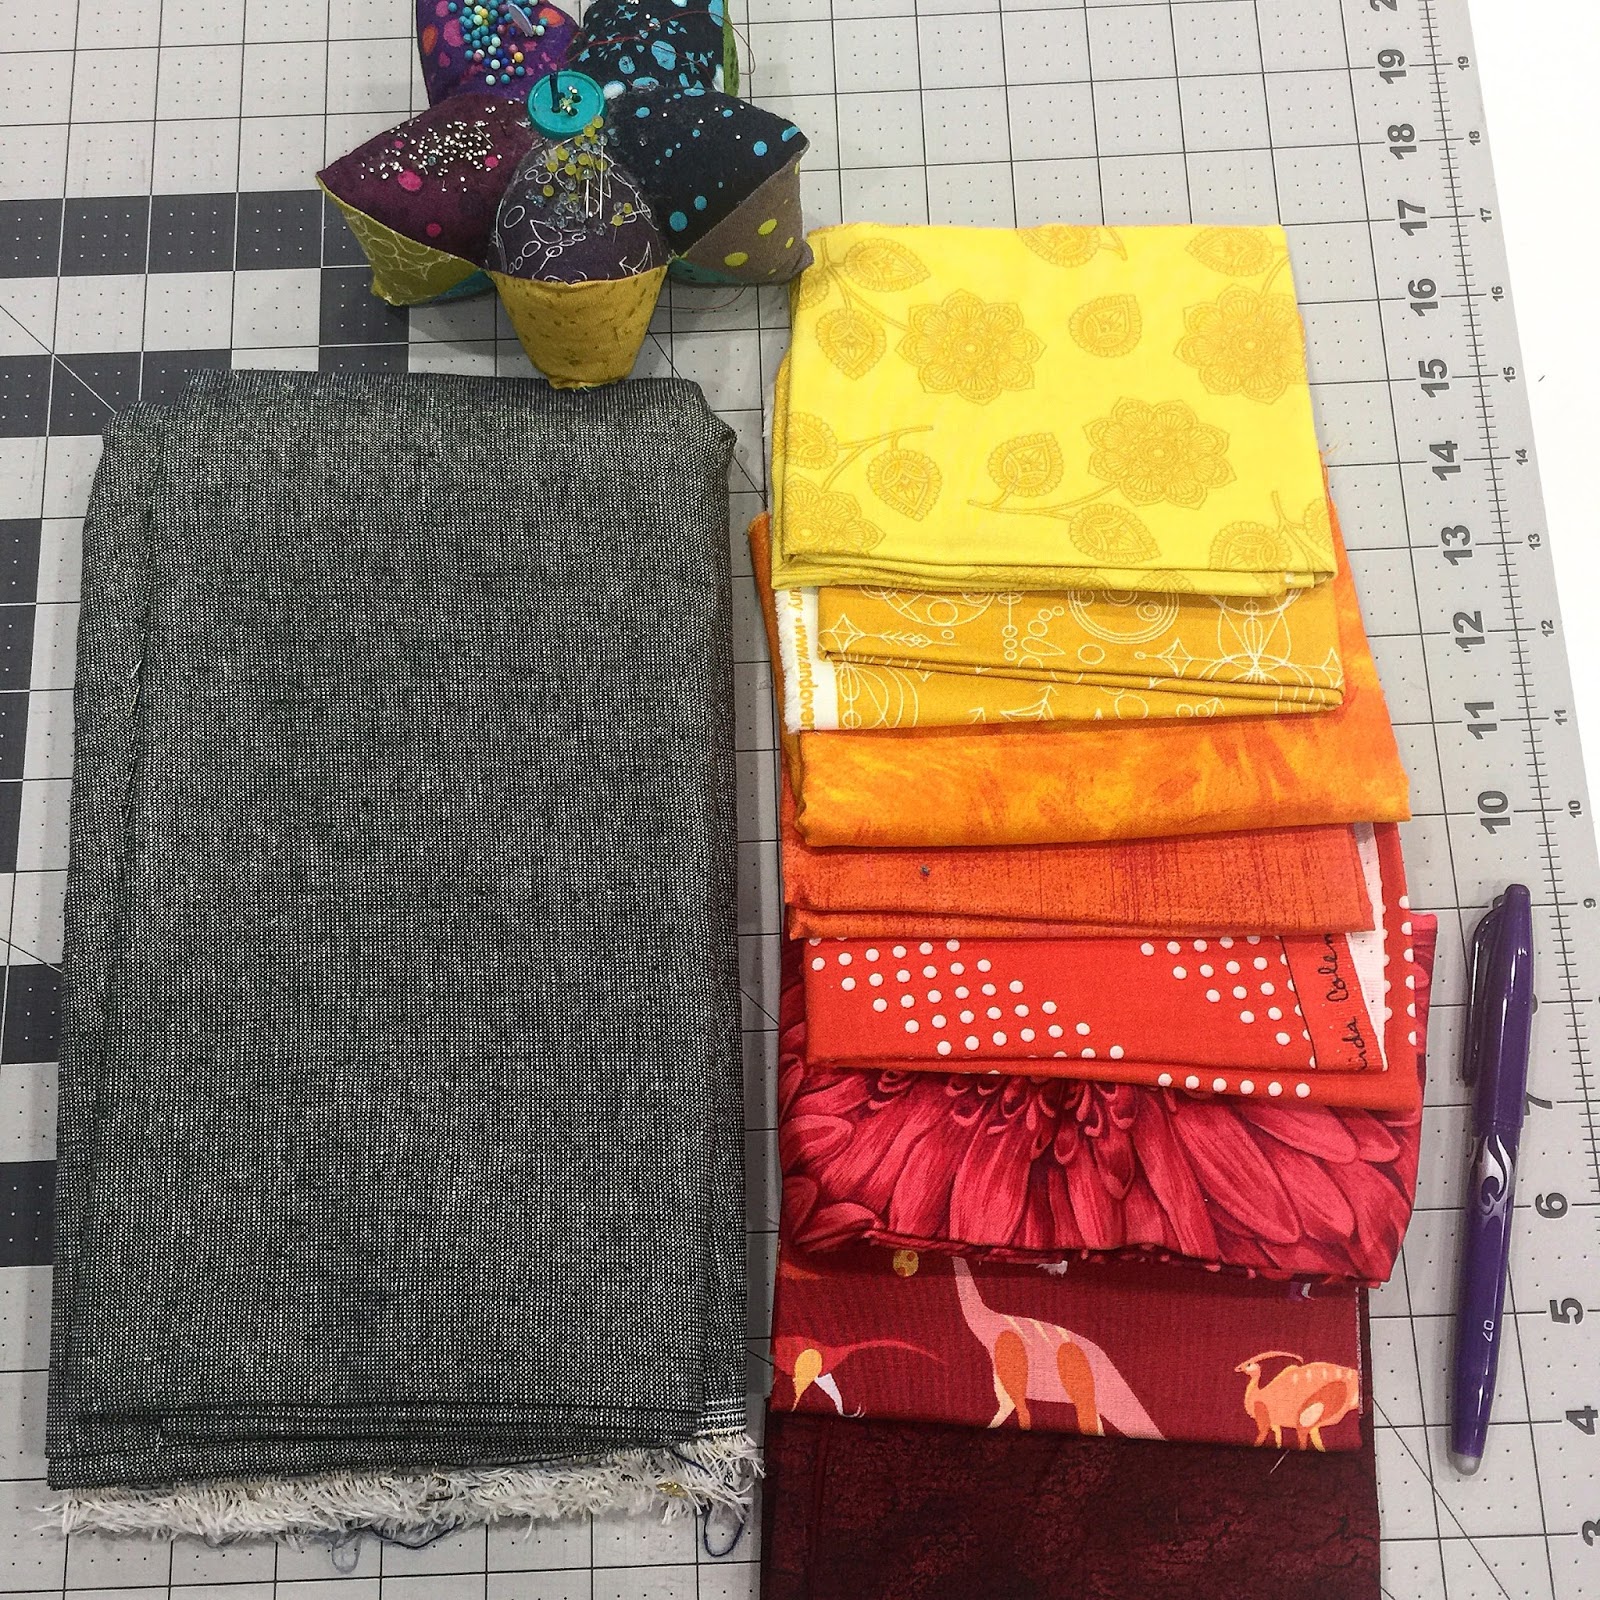
I chose to make the “It’s a Twist Table Runner” since my kitchen decor is a little blah…and I had never seen a design this unique before. With summer fading and fall quickly approaching, I opted for a warm ombre color scheme to do my “twists” in, and chose the new Essex linen in yarn dyed metallic by Robert Kaufman so I could keep this beauty on the table from September through December.
Warm ombre color scheme with Essex metallic linen
I had so much fun picking out my fabrics, and couldn’t wait to try the new Essex yard dyed metallic to keep the design warm and fall-feeling. This project is so fun, and great for adapting to use up your scrap pile!
You can see the tiny metallic detail in this close up of the sewn together table runner
Erin’s instructions are clear and concise, and I was able to finish this adorable project in under 3 hours. The twisting technique is really simple to follow and gives such a great look when finished. I’m excited to try this technique in other sewing projects, too!
My finished table runner
I also loved that the table runner didn’t have batting in it and wasn’t quilted. It seems like most table runner projects these days are of the quilted variety, and the “It’s a Twist Table Runner” has ample interfacing to give it a luxurious feel and weight. It also made it a quick and fun sew. I was thrilled to participate in this, and can’t wait to make more projects from SewHome. Thanks Erin for a delightful read!!! To enter the giveaway for your free copy of Erin’s book SewHome, answer the following question by September 30, 2016 either in a comment here (on my blog), or a comment on my instagram post about this project: What home decor item have you been dying to sew for your home? Giveaway entries will close at midnight, central standard time 9/30/2016 and winner will be selected randomly. If winner is domestic (US), they will receive a hard copy of SewHome, if international, the winner will receive the e-book version. Winner will be contacted by me for shipping information.
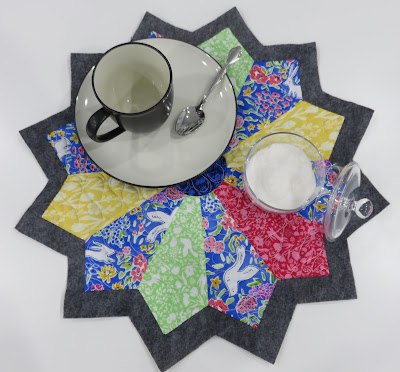
Do you need a little something special to liven up your table top decor? How about whipping up some fabulous new place mats that easily reflect your awesome style? I recently created a cute little tutorial with a free dresden template that can be downloaded HERE !
There’s also a really cool-no bind technique that is explained in the tutorial that you’ll just have to try out! I love this fabric by Sarah Jane Studios for Michael Miller fabrics, and think it’s perfect for spring and most of summer! I hope you’ll find some time to sew this week and play around with some cute dresdens!