Posted on

Kapow! Quilt Pattern

colorful quilt

Today is the Kapow! quilt pattern Release Day! And since we’re coming in hot to Labor Day Weekend, let’s celebrate with a sale! You can get the Kapow! quilt pattern on sale through 9/7/2020 aaaaaand use the code LABORDAY for 20% off everything else in my shop. Also, there are some sweet free patterns in there too, if you haven’t checked them out!

I always love star patterns so much and I wanted something that gave a feeling of an explosion from the center of the star, like fireworks. The PDF and print copies are here for you to make your own stunning Kapow! quilt. I’ve made sure this pattern is jam packed full of all the resources you might need or want, including:

Kapow! Quilt Pattern Features

  • Fat Quarter Friendly – includes cutting diagrams
  • SIX sizes, including:
    • Baby
    • Throw
    • Full
    • Twin
    • Queen
    • King
  • Easy to read color-coded charts and diagrams
  • Cutting checklist (cheat sheet)
  • Clearly written instructions
  • Backing prep diagrams for each size
  • Coloring/planning sheet
six sizes of kapow quilt
fabric requirements chart
Continue reading Kapow! Quilt Pattern
Posted on

How to English Paper Piece – sewing pieces together

How to English paper piece

In this series of blog posts, I’ve talked about start up supplies (what my favorites are) and discussed glue basting (also my favorite). Now that you know how to prepare for sewing, lets get going! In this video, I’ll show you how I sew my paper pieces together once they’re basted. There are many, many ways to accomplish this. I’m showing my favorite methods, in case you haven’t seen them before, in the hopes of inspiring you to try new things!

There are different kinds of stitches you can use to sew the pieces together. My go to is a simple whip stitch, but I’ve heard people rave about the flat back stitch. I tried the flat back stitch, and it wasn’t for me–but you might love it (so def. check it out!).

how to english paper piece
Sewing the pieces together
Continue reading How to English Paper Piece – sewing pieces together
Posted on

Edge to Edge Pantograph options

See below for the E2E pantographs I currently carry. Other options can be viewed here for an additional purchase fee. I also have more traditional patterns not shown here. Email me for pricing and shipping instructions. Most Edge to edge designs are 2.5 cents/sq. in. The designs I have are categorized below with headings. The “DENSE” category shows designs that start at 3.5 cents/square inch either because they are dense or take special care to line up correctly after each advance. Some of these designs are also cross categorized and have “Dense” in the caption after the design name. Please feel free to reach out if you have any questions!

Newest and Most Popular

Animal Themed Designs

Christmas, Winter

Circles

Dense designs – start at 3 cents/sq. in.

Generic, Geometric

Halloween, Fall

Hearts, Valentines

Leaves, Flowers, Feathers

Modern, Geometric

Nature, Water

Novelty, Themed

Patriotic

Stars

Swirls

Traditional

Posted on 6 Comments

Cheeky Churn Dash Quilt Along – Official Post

Cheeky Churn Dash Quilt Along

I’m so excited to announce the Cheeky Churn Dash Quilt Along!

I’ve been wanting to host a quilt along for a long time now, and I thought the Cheeky Churn Dash would be the perfect pattern to make!  You can RSVP for the quilt along to sign up for weekly updates and get insider tips and tricks with bonus material.  I love quilting, but it’s so much more fun to make a quilt with a fun group, right?

DATES

September 15, 2018 – November 16, 2018

Why join a quilt along?

I don’t know about you, but sometimes when I start a project, I need a little more motivation to finish.  Sewing with a group of quilters and sharing our progress together will give you inspiration and answer any questions you might have while making your quilt.  I like to know when I make a pattern that I’m going to have some help, and quilt alongs are a great way to get that support!  This quilt along will take place on Instagram using the hashtag #cheekychurndashquiltalong.  Use this hashtag when you post your weekly progress so others can see your awesome progress (and you’ll be able to see what everyone else is doing)!

Also, you might be thinking…good grief.  This is right at the beginning of the school year?  Why???  I know.  I was a high school teacher in my past life.  I get it.  I planned this quilt along with that in mind–I know everyone has busy schedules.  There’s a catch up week included in the quilt along, and I’ve divided the steps up into very doable tasks, even if you have a very limited schedule.

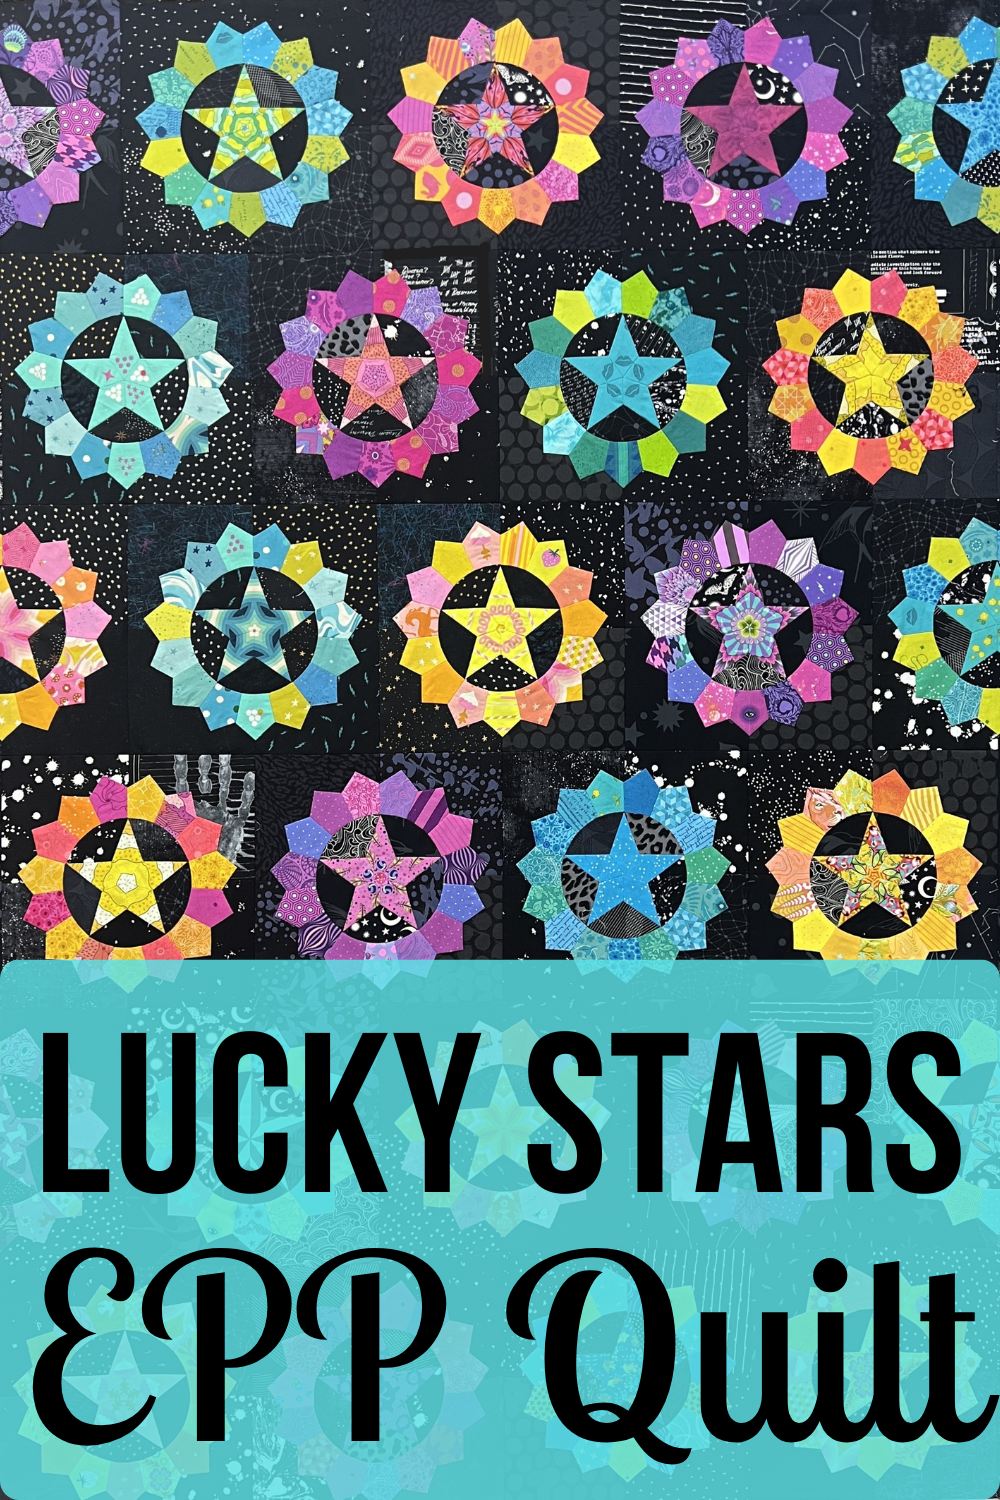
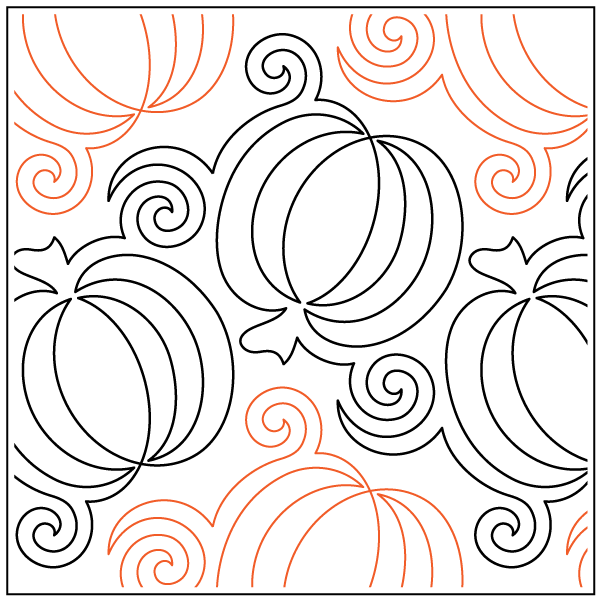
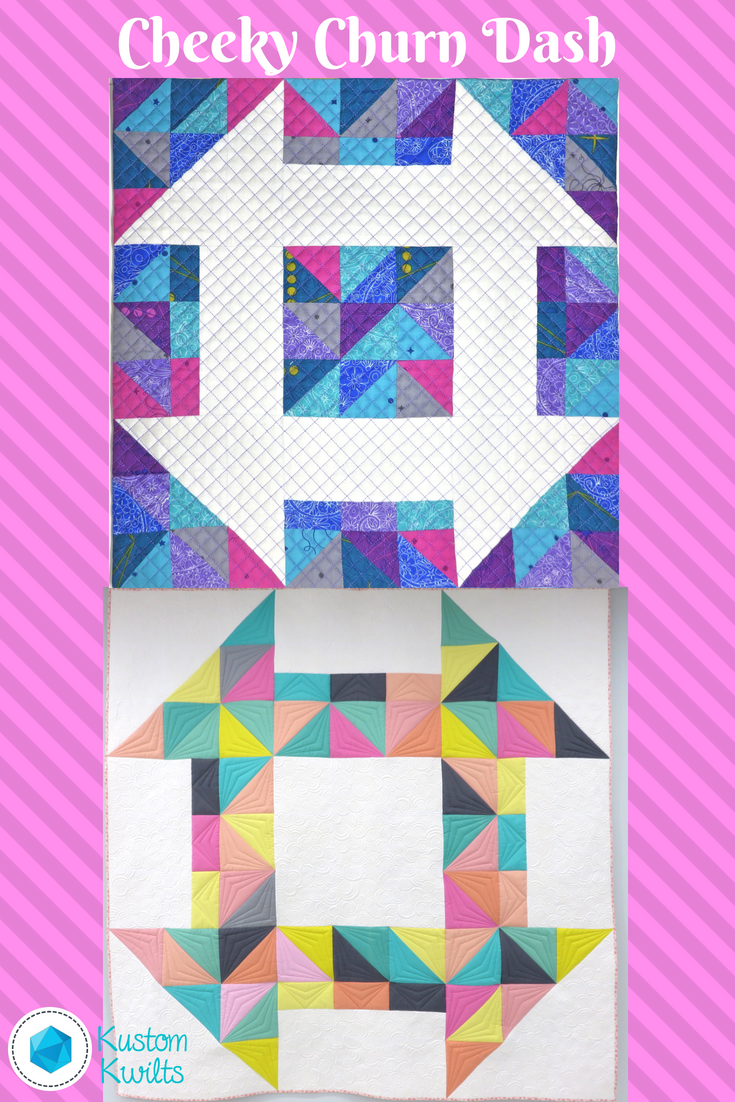
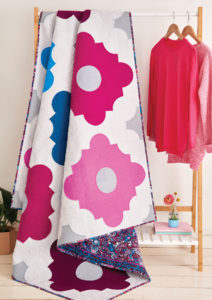
The Cheeky Churn Dash Quilt

You can click over to the original Cheeky Churn Dash Post to read more about it and my inspiration for making this quilt.  I just finished making another Cheeky Churn Dash with Alison Glass Sun Print 2018, and I’m loving the gem tone colors in that one!  This pattern is great for showing off your favorite fabric collections or going purely scrappy.

color options

Not sure you have the skills to make this quilt?

That’s a question I used to ask myself all the time when I started quilting.  If you are able to sew a consistent 1/4″ seam allowance and cut your fabrics fairly accurately, you’ll be fine!  And if you aren’t comfortable with those things, you’ll never learn if you don’t try.  6 years ago, I didn’t even know how to thread a needle, much less use a rotary cutter!  Quilt alongs provide great community for asking questions and discovering new tips and tricks you might not have known before.

What will you learn?

You’ll get to practice your 1/4″ seam allowance AND I’m going to show you Beth Helfter’s Accordian Sewn HST™ method for sewing half-square triangles.  It is an absolutely BRILLIANT technique that you’ll find yourself wondering how you ever did without.  You can always use your preferred method of piecing HSTs, as well.  You’ll also get tons of inspiration from other participants in the quilt along.
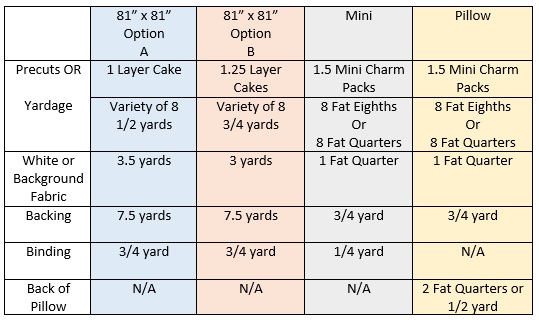
What will you need?

Fabric Discount!

Jennifer at Knotted Threads on Etsy has joined in the Quilt Along fun to bring all Cheeky Churn Dash QAL participants a 10% discount on fabrics purchased from her shop!  She has a great selection of current and modern fabrics, so you’ll want to take advantage of this 🙂  Use the coupon code: CHEEKYCHURNDASH at checkout.

Schedule September 15-November 16, 2018

September 15-21 Week One:

RSVP for the quilt along, gather your pattern, fabrics, and materials and introduce yourself using the hashtag #cheekychurndashquiltalong.  I’ll be randomly picking one winner from week one (you have to post on instagram with the hashtag) to win an awesome prize!

September 22-28 Week Two:

Starch fabrics if needed (you won’t need to do this if you plan on using Beth Helfter’s Accordian Sewn HST™ Method.  Cut all fabric according to the option you are making.

September 29-October 5 Week Three:  

Draw one diagonal line on the backs of the squares we’ll be using to make half-square triangles if using the Accordian Sewn HST™ Method.  Assemble the half-square triangles and press.

October 6-12 Week Four:  

Square up the half-square triangles to 9.5″ square for the quilt size and 2.5″ square for the mini and pillow sizes.

October 13-19 Week Five:

Assemble sections 1, 3, 7, and 9.

October 20-26 Week Six:

Catch up week if you’re behind!

October 27-November 2 Week Seven: 

Assemble sections 2, 4, 6, and 8

November 3-9 Week Eight:

Assemble section 5

November 10-16 Week Nine:

Sew the quilt top together!

Location

This Quilt Along will take place primarily on Instagram, so be sure to follow along on Instagram and use

#cheekychurndashquiltalong

to participate!  Instagram now lets you follow hashtags, so you can get inspiration and encouragement from everyone participating.  Don’t worry if you don’t have Instagram.  There will also be weekly blog posts with photos and tips, and be sure to sign up for the quilt along e-mail updates! (Just a note–there’s a double opt in for the updates, so be sure to check your spam folder, and add me to your address book to make sure you get the updates)

JOIN THE QUILT ALONG UPDATES!

Rules

There aren’t many rules for this quilt along, unless you want to be considered for giveaway prizes.

There will also be some awesome giveaways sprinkled throughout the quilt along, so be sure you post one picture to your Instagram account of that week’s progress before the next week’s starting date in order to qualify for prizes (see the schedule above for specific dates).

There will be one grand prize winner at the end of the quilt along for one lucky person who completed and posted their quilt top (must be the 81″ x 81″ version) by November 16, 2018.  You’re still in the running for the grand prize, even if you missed posting throughout the quilt along, so long as you post your finished quilt top to your Instagram account by November 16.

The giveaway prizes are only for US participants and cannot be shipped outside the US.  Sorry!

Thank you for joining in the fun, and I can’t wait to start sewing with you!  I’ll see you in the quilt along!

-Joanna

Posted on 2 Comments

Moroccan Tiles Quilt – Love Patchwork & Quilting Issue 63

LPQ Issue 63 Moroccan Tiles Quilt

Do you have a favorite crafting or quilting magazine?  There are so many great magazines filled with exciting new patterns, and I have quite a few favorites of my own!  I’m so excited to finally be able to share with you the Moroccan Tiles Quilt in Love Patchwork and Quilting Issue 63.

LPQ Issue 63 Cover
LPQ Issue 63 Cover Photo Provided by LP&Q

Issue 63 isn’t yet available in the US, but it is on shelves in the UK now.  I’m anxiously awaiting my copy in the mail any day now!

I designed the Moroccan Tiles quilt because I have a secret love of traditional quilt blocks–specifically the different variations that can be made from drunkard’s path blocks.

Sewing curves
Sewing curves

I used to be scared stiff of sewing curves, but there really is nothing to it once you practice a little bit.  The shapes I created by rotating and flipping the drunkard’s path blocks reminded me of gorgeous tile work and design shapes.

I chose a gem toned palette from some of my favorite Robert Kaufman Kona Cotton Solids and rather than using the standard go-to white background fabric, I love to use Kona Silver!  I like to think it makes the background such a shocking contrast, and gives it a softer glow so the other colors can shine on their own.

LPQ Issue 63 Moroccan Tiles Quilt
LPQ Issue 63 Moroccan Tiles Quilt Photo provided by LP&Q

For the backing, I was dying to use Robert Kaufman’s Effervescent fabric.  It is a beautiful fabric that looks like it has little champagne bubbles overflowing on the entire surface.  The color way I chose coordinated exactly with the colors of Kona Cotton I had selected, so it was definitely a match made in heaven!

I hope you’ll grab your very own issue of the magazine and check out all of the awesome projects and all of the great contributors, and maybe try something a little new this week that involves sewing some curves?  You might fall head over heels for them, just like I did–so you won’t know if you don’t try!  Happy sewing!


Posted on 1 Comment

Top Tips for Sewing with Oilcoth

Top Tips for Sewing with Oilcloth

So I know what you’re thinking…this blog is called “Kustom Kwilts”…what gives with the oilcloth?

There are so many skills in sewing and quilting that can be transferred to other things-garments, bags, household and decor items.  If you can sew a straight line, there are so many other amazing things you could be creating if you’re willing to do a little exploring.  I just released my new Mamacita Tote pattern, which is a perfect fit for using quilting cotton AND alternative fabrics!  The pattern suggests using oilcloth for the lining, and I don’t want to leave you hanging on how to do that (you can also use quilting cotton).  I love to quilt, but I also adore sewing clothing and bags.  I hope I can share some of that love with you!

Mamacita Tote in Quilting Cotton

What do I mean by alternative fabrics??  I’m talking about vinyl, leather, faux leather, and one of my personal favorites, OILCLOTH.  I’d love it if you were willing to read on and open yourself up to some great new possibilities for yourself!

Some of my favorite oilcloth prints
Some of my favorite oilcloth prints 🙂

Let me break it down for you:  A lot of the things you need to know about oilcloth also goes for other vinyl fabrics and faux leathers.  Here are some things you need to know before buying your first yard of oilcloth–

  • It’s water resistant/doesn’t absorb water.
  • It’s relatively inexpensive.
  •  It is super-duper easy to clean.  All you need is a wet paper towel and you can wipe off pretty much anything.
  •  It doesn’t fray.
  •  It’s more stable than quilting cotton, so most of the time it doesn’t need extra interfacing when used in bags.
  • When you use it as a purse lining, it wipes clean and is SO easy to maintain!

    Mamacita Tote with an Oilcloth lining
    Mamacita Tote with an Oilcloth lining

I’m sure I’m leaving a few important things out, but these things alone are pretty fantastic.  There are some things you’ll want to know about sewing with oilcloth and what you want to do a little differently than if you were sewing with regular quilting cotton.

Here are my Top Tips for sewing with OILCLOTH~

  • Don’t ever use an iron to get the wrinkles out!  You will melt the fabric, and more than likely ruin your iron.  I like to either use a blow dryer on low heat to relax wrinkles , or lay the fabric out in the sun on a flat surface for a few hours (I live in Texas, so sometimes it doesn’t take long!)
  • The holes your needle makes in the fabric are permanent.  That means you want to use a longer stitch length (somewhere around 3.5) so you have less perforations in the fabric.  If you’re using a teeny tiny stitch length, your needle is making a ton of holes that’s making your fabric weaker.
  • Don’t use sewing pins!  The holes they make will be permanent.  When securing oilcloth, use clips instead of pins.

    Pins and oilcloth are a big No-No!
    Pins and oilcloth are a big No-No!  Don’t do it!
  • Use a Teflon or non-stick sewing foot to help the oilcloth slide under your foot with ease.  If you don’t have a Teflon foot, you can also stick a piece of satin scotch tape under your sewing foot, and that will help ease the fabric instead of sticking to it.  You can also use tissue paper between the presser foot and the oilcloth, then tear it away when you’re done.
  • Since oilcloth is a little thicker than cotton, try using a slightly larger needle, like one suited for leather or denim.  If you try a smaller needle and it works okay for you, stick with it–because that means the holes the needle makes will be smaller :).

I buy all of my oilcloth at Jack’s Country Store (not an affiliate link).  It seems like an unlikely place to get it, but it’s a pretty fun site, and they have tons of options and cheap shipping.  Are you ready to try it?  Go ahead, be brave!  I have a total oilcloth addiction now, and it’s so easy to work with.  I’d love it if you gave it a go and shared with me how you used oilcloth in your next sewing project!  Happy sewing 🙂

Posted on

It’s finally here! The Mamacita Tote Pattern Release!!!

Mamacita Tote

Today is the official release day for the Mamacita Tote Pattern!  Hip hip hooray!!!  I’d love to tell you the story behind this pattern and why it’s so dear to me.

Mamacita Tote with Serape

When I first started sewing, I loved to make things that were useful (that still applies today).  I love the feeling I get when I plan a project and sewing that last stitch, and the overwhelming feeling of pride I get when I know I made something that I love (or someone else will love).  I loved quilting, but I loved making bags even more.  I used to be an agriculture science teacher, so my purses were always getting filthy from being at stock shows and around livestock all the time.  I did some research on fabrics that were easy to clean, and I came across oilcloth.  Long story short, oilcloth is a wonderful fabric that doesn’t fray, wipes clean, and, in my experience, has a ridiculously long life.  So I’m going to show you my very first go at what evolved into today’s Mamacita Tote:

My very first oilcloth bag

It isn’t exactly swoon worthy, but I loved it.  I used this bag for about a week before I realized the importance of interfacing and stabilizer in a bag this size, and made from all oilcloth.  It didn’t stand up on its own and was pretty floppy.  Also, when you sew with oilcloth, the holes made by the needle are permanent.  That means if you don’t lengthen your stitches, you’ll get lots of perforations that will weaken the fabric.  Hence, sewing the straps directly to the oilcloth where all the weight will be stressing the fabric = terrible idea.  I still have this bag in my sewing room and love to bring it out and see how far my design has come since January 2013.  That’s right.  This pattern has been FIVE YEARS in the making.

I needed a better way to attach the straps and I wanted a more stable, sturdy bag.  So another year of trying out different things and I came up with using large drapery grommets as the strap attachments.  I really loved this, but after I got a package of grommets from the manufacturer and they were all cracked from shipping, it was time to rethink using them.  I couldn’t risk having one break and then go through the hassle of replacing them all the time.  Quality supplies are my top priority.

The second generation Mamacita Loca bag

I really like embroidering the vinyl or quilting it (or both!) and adding unique embellishments to make each bag unique.  Late in 2017, I have the absolute best version of this bag that I could dream of.  I’ve made over 200 of these bags, and even sell custom Mamacitas on Etsy.  They have an updated strap attachment that is stylish and functional, and I love the look of them.  I recently made my favorite Mamacita Tote EVER from Tula Pink’s latest line- De La Luna in quilting cotton.  Although I really like using oilcloth for the lining since it’s so easy to clean, I love the bright and vibrant colors in Tula’s line, so I’ll sacrifice the wipability for that, and just try really hard to keep my 1.5 year old from spilling her milk in it 😉

Mamacita Tote in De La Luna

The Mamacita Tote has been my ultimate labor of love, and I know this pattern by heart.  I love that the lining keeps me organized with all the pockets, and that I can still be stylish or trendy with my fabrics.  Every time I make one, I remember how much I’ve grown as a sewist and how much I’ve learned from all my trial and error and fearlessness as a novel sewer.  I’d love to see your take on the Mamacita Tote and I hope you’ll share your creations with me (use the hashtag #mamacitatote or tag me @kustomkwilts) so I can see the amazing work you’ve done!

Embroidered Mamacita Totes

Posted on

Churn Dash Quilt – Love Patchwork and Quilting Issue 54

Love Patchwork and Quilting Issue 54

Who doesn’t love a little churn dash quilt?  I know I can’t seem to get enough of the traditional block that basically represents butter being churned!  Have you peeked in issue 54 to check it out?  I’ll tell you a little bit about the design…

Love Patchwork and Quilting Issue 54
Photo provided by Love Patchwork and Quilting

I’m so excited to share my most recent quilt with you from the Love Patchwork and Quilting Issue 54.  I’m inspired by bright, saturated colors–and that’s typically the palette I use.  But for this quilt, I opt for a more subtle palette. The cheery sherbet colors and hints of greys that are sure to make you swoon!  This quilt- “Sorbet Shades” in the mag, is inspired by one of my favorite traditional quilt blocks–the churn dash.  This block is so rich in history and I love that it can be interpreted in a modern way.  I have a great appreciation for the traditional quilt blocks and the colors they typically have.  I also love seeing them updated in a more modern way.

One of the first quilts I made when I was learning to sew was a traditional churn dash quilt.  My mother and I gave this special quilt to my grandmother prior to her passing.  The churn dash block represents so much more to me than just a traditional quilting block.  The simplicity of the block lends itself to being altered in construction in so many ways.  The possibilities for this block are limitless!  I quilted this quilt with swirls on the white background and simple straight lines on the colored blocks.

Sorbet Shades Quilt as pictured in Love Patchwork and Quilting, Issue 54
Photo provided by Love Patchwork and Quilting

For this project, I use some delightful Kona Cotton Solids and create a coordinating pillow to go with the quilt.  The colors in these projects really make me want some ice cream and macaroons–or really any other cute little pastel dessert!  I hope you’ll checkout the issue (digital issues are available here).  Don’t be afraid to try your hand at breaking out of the traditional box to create a modern spin on traditional.  (photos above provided by Love Patchwork and Quilting).