Tag: Janome
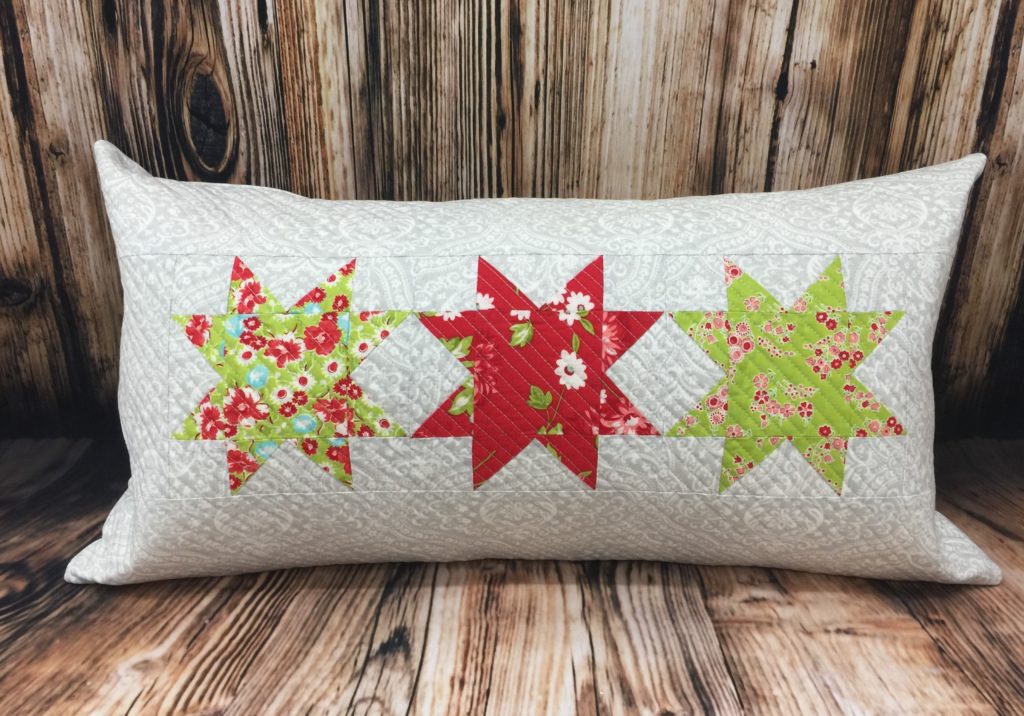
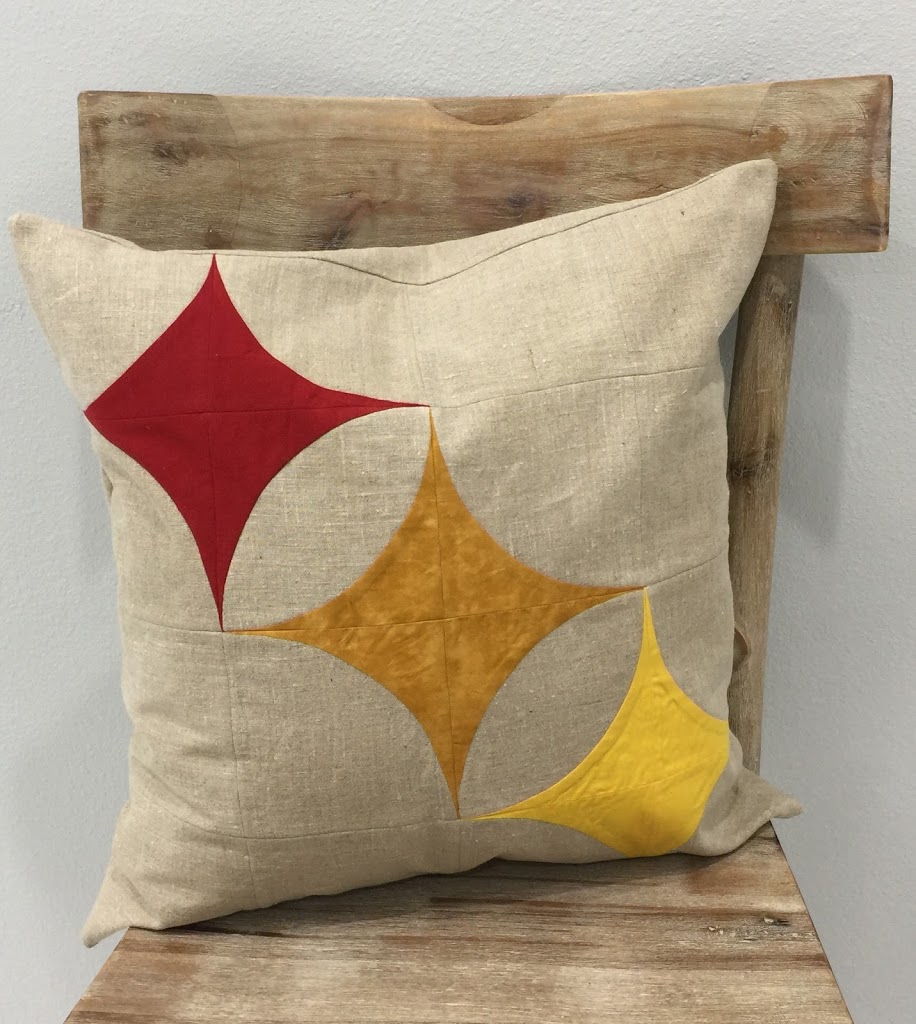
All is Bright Pillow tutorial
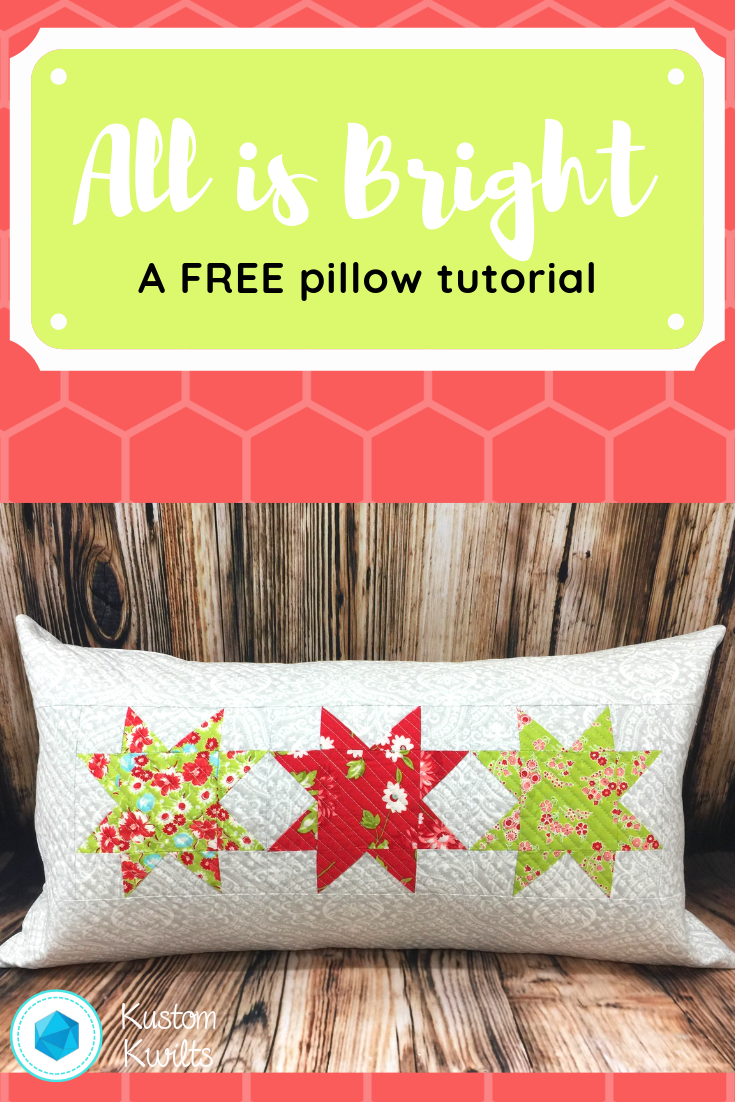
Are you tired of your throw pillows and need a quick way to freshen up your home dec? Grab a few sewing supplies, a pillow form, and some fabric and you’ll be on your way to piecing and quilting up this simple pillow cover in no time at all! I made my pillow on the Janome MC9400, but it can easily be adapted to work with any sewing machine and it’s helpful if you’ve got a walking foot (or some sort of dual feed device), but not a deal breaker! This tutorial consists of piecing some flying geese units and doing a little straight line quilting to add a modern punch to your home dec. Check out the supply list below, then click on the PDF instructions “All is Bright” below for the complete project.
Supplies
- Janome HMC9400QCP (or other sewing machine)
- Janome supplies (or other sewing machine supplies): Dual feed foot holder, Dual Feed Foot AD, 1/4″ Foot, Standard Foot A, Purple Tip Needle, Empty Bobbin, Pre-wound Bobbin
- 1 FQ bright green floral fabric (fabric A) sub cut into:
- (4) 2-3/8″ square
- (1) 3-1/2″ square
- 1 FQ true red floral fabric (fabric B) sub cut into:
- (4) 2-3/8″ square
- (1) 3-1/2″ square
- 1 FQ bright green and true red mix fabric (fabric C) sub cut into:
- (4) 2-3/8″ square
- (1) 3-1/2″ square
- 1-3/4 yds. light grey patterned fabric (fabric D) sub cut into:
- (12) 2″ squares
- (3) 3-1/2″ square
- (1) 18″ x 30″ (back of the quilted pillow top)
- (2) 4-1/2″ x 6-1/2″ (borders)
- (2) 4-1/2″ x 26-1/2″ (borders)
- (2) 13-1/2″ x 15″ (pillow back)
- 1 yd. SF101 woven fusible interfacing sub cut into:
- (2) 13-1/2″ x 15″
- 16″ x 28″ piece of batting
- Coordinating all-purpose sewing thread for piecing and quilting
- 12″ x 24″ pillow form
- Other miscellaneous supplies: Spray baste/basting pins, Spray starch, sewing pins, thread snips, marking pen/tailor’s chalk, rotary cutter/ruler/mat, iron and pressing board
Piece the Flying geese units and assemble the pillow (PDF instructions)
I can’t wait to see how your pillow turns out! I hope you’ll tag me on Instagram @kustomkwilts when you finish your awesome project 🙂
DIY Outdoor Pillow free tutorial
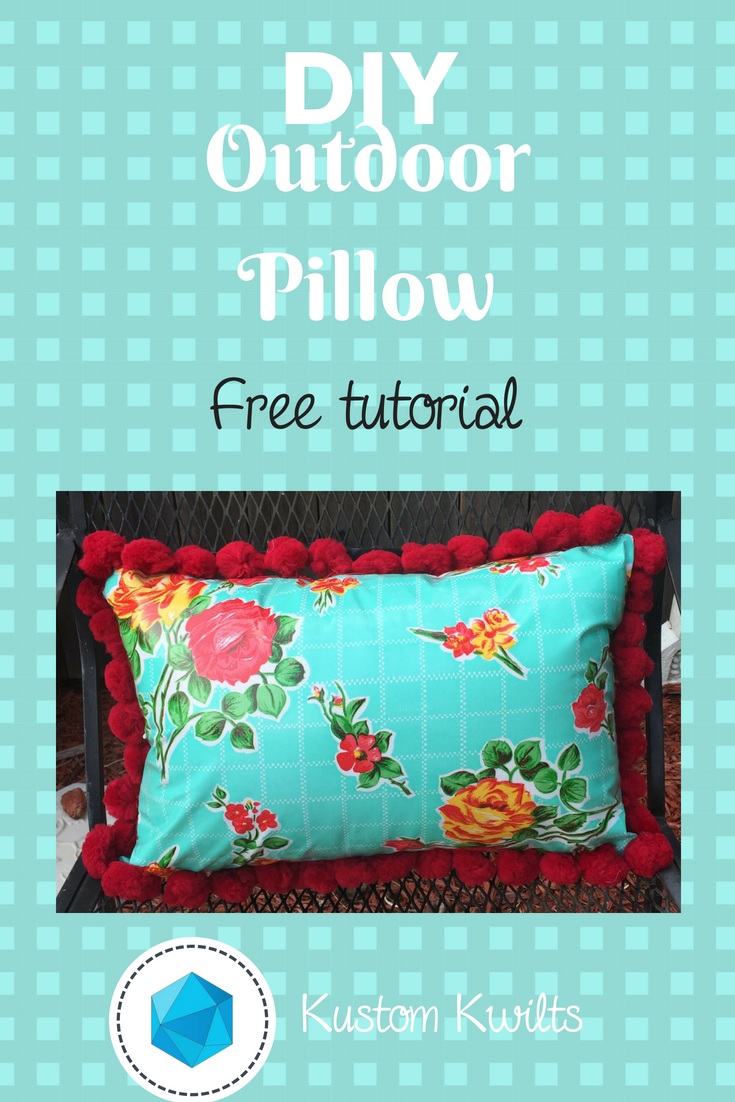
DIY Outdoor Pillow tutorial
Are you looking for a way to brighten up your patio with some fun home dec pillows? Make your own DIY outdoor pillow with this quick and easy tutorial to create a super cute oilcloth pillow with pom pom trim, and give your deck a cheery look! I used my Janome Horizon Memory Craft 9400QCP and the Janome Ultra Glide Needle Plate and Ultra Glide Foot to stitch up this oilcloth pillow. Start sewing with some new fabrics and try out a new foot attachment that will take your sewing projects to the next level. The Ultra Glide Needle Plate and Ultra Glide Foot set is perfect for working with fabrics that might not smoothly feed under the standard foot A, such as oilcloth and laminated cotton. Also, check out my previous post on TOP TIPS FOR SEWING WITH OILCLOTH. This is a great tutorial for beginners, and will take approximately 4 hours from start to finish. The finished pillow size is 12″ x 18″.
Supplies: Sewing machine, Janome Ultra-Glide foot and Ultra Glide Needle Plate (Teflon foot for all other sewing machine brands), Zipper foot (Foot E for Janome), Needle, Pre-wound bobbin.
Fabric/notions required:
- Circle Templateprinted at 100% and cut out
- 1 yard Aqua Rose gall oilcloth (Fabric A) sub cut into:
- (2) 6-3/4″ x 19″ (zippered back of pillow)
- (1) 13″ x 19″ (front of pillow)
- 3 yds. Jumbo Pom Pom Trim/ball fringe
- 40 wt. Black sewing thread (or white for less contrast)
- 20″ zipper
- 12″ x 18″ Weather proof pillow form/Outdoor pillow form
- Marking pen
- Rotary cutter/ruler/mat
- Binding clips
- Scissors

Prepare the back of the pillow and install the zipper
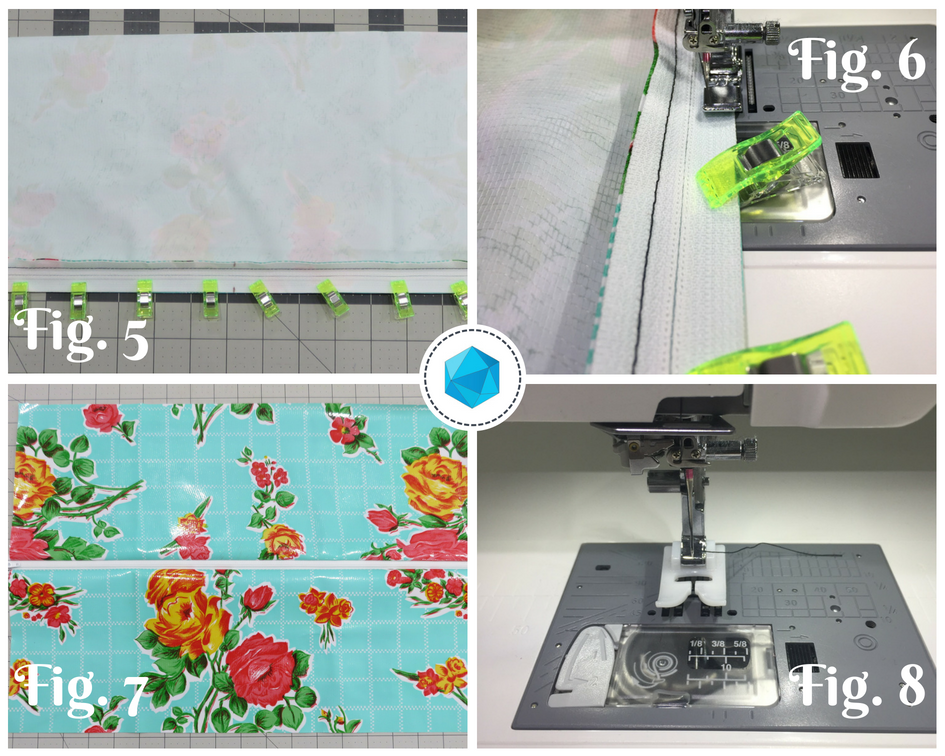
- Take the two 6-3/4″ x 19″ pieces of Fabric A and measure and mark the center of one 19″ edge. Take the 20″ zipper and measure and mark the center on both edges of the zipper tape (see figure 1).
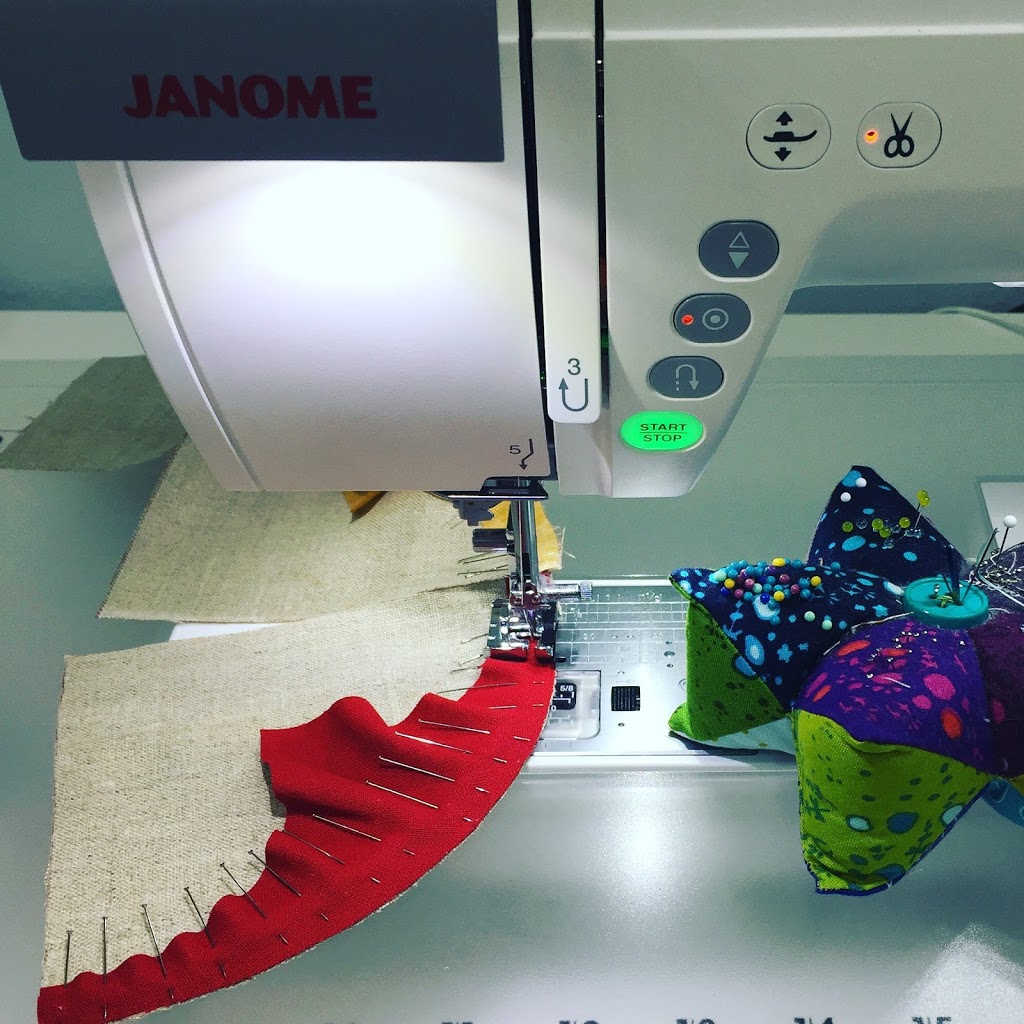
Tip: Use binding clips instead of pins when working with oilcloth. The fabric does not heal when holes are made in the oilcloth. Any holes made in the oilcloth will be permanent. Also, use a slightly longer stitch length to minimize the amount of puncture holes made in the fabric when sewing. Typically, adjusting the stitch length from the standard 2.4 to 3.0 is a good adjustment. The raw edges of oilcloth don’t fray, so there isn’t a need to finish raw edges as there would be with a regular woven fabric.
- Place one of the 6-3/4″ x 19″ pieces of fabric A RSU and align the zipper tape with the 19″ raw edge, matching the marked centers of the zipper and the pillow back. The zipper and the fabric should be RST (see figure 2). Use binding clips to secure the zipper in place.
- Remove the standard needle plate from the MC9400 and install the Ultra Glide Needle Plate. Using this needle plate with the Ultra Glide Foot will keep the oilcloth gliding smoothly under the presser foot. Select a zipper sewing stitch to move the needle position to the left. Lengthen the stitch length to 3.0. Attach zipper foot E to the presser foot and sew the zipper to the fabric A with a 1/4″ seam allowance (see figure 3). Finger press the seam allowance of the zipper away from the zipper teeth, under the oilcloth. Fold the remaining edge of the zipper over (see figure 4).
- Place the remaining 6-3/4″ x 19″ piece of fabric A RSU. Take the remaining side of the zipper tape and match the marks on the zipper tape edge and the pillow back edge, with the zipper right side down. Line up the raw edges and clip in place with binding clips (see figure 5). Sew the zipper in place with a 1/4″ seam allowance (see figure 6).
- Once again, finger press the zipper tape seam allowance away from the zipper teeth so it is under the oilcloth pieces (see figure 7).
- Remove the zipper foot E from the presser foot and attach the Janome Ultra Glide Foot to the presser foot (see figure 8).

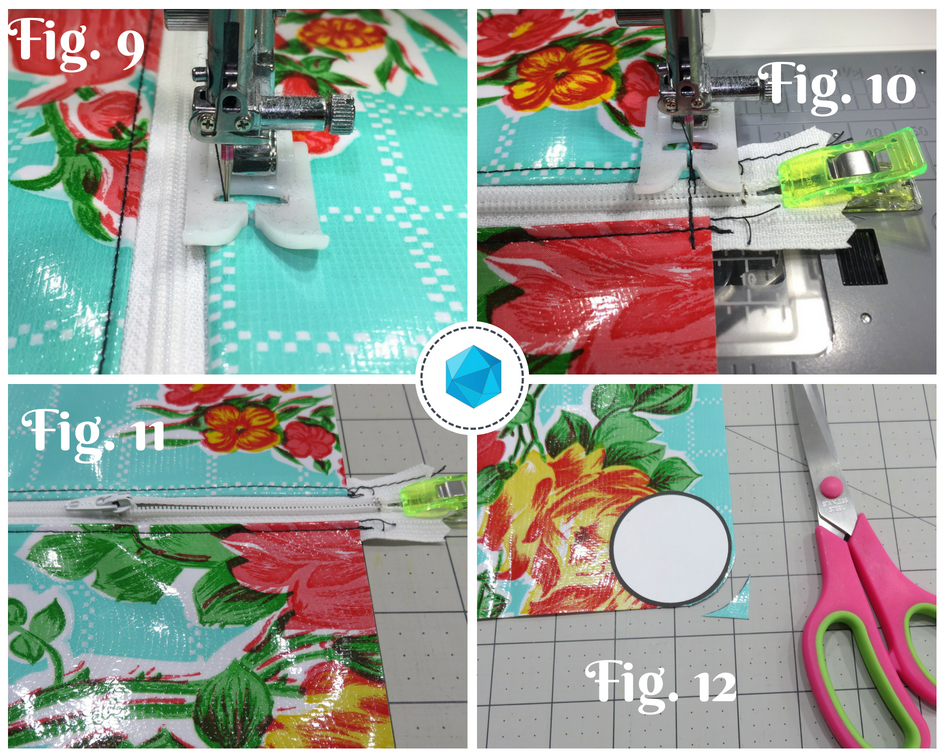
Figures 5-8 Topstitch 1/8″ away from the folded edge of the oilcloth (see figure 9).
- Select stitch #1 from the utility menu. Move the zipper head towards the middle of the zipper tape (see figure 11). Use a binding clip to keep the ends of the zipper together. Sew a few stitches and then backstitch to connect the zipper ends, about 1/8″ away from the edge of the oilcloth fabric (see figure 10). This will act as a zipper stop until the front and back of the pillow are sewn together. Keep the zipper unzipped at least half way.
Round the corners and baste the pom pom trim
- Take the circle template that you printed and cut out, and place it with the edges touching the corner edges of the pillow. Trace around the curved edge of the circle with a marking pen.
- Cut the edge to round the corner (see figure 12).
Figures 9-12 - Repeat steps 8 and 9 with the remaining corners of the back of the pillow and the four corners of the front of the pillow.
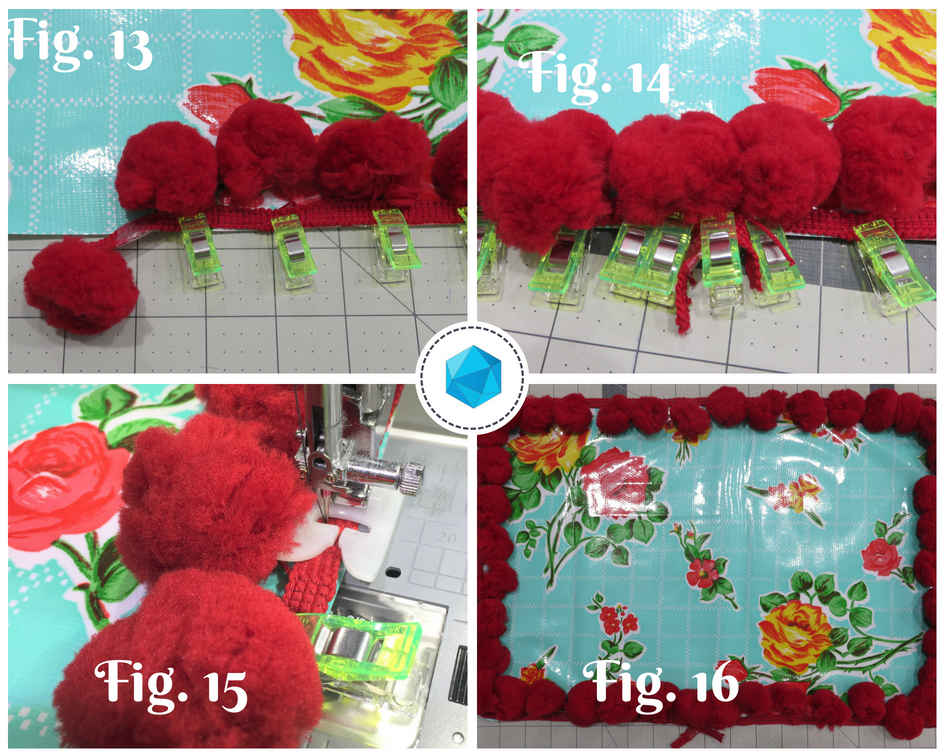
- Set aside the zippered back of the pillow. Take the 13″ x 19″ piece for the pillow front and the jumbo pom pom trim. Place the pillow front RSU. Starting in the middle of one of the 19″ edges of the pillow front, align the edge of the trim with the edge of the oilcloth. Trail the end of the trim off the edge of the pillow by 2-3 inches figure (see figure 13). The pom poms should be pointing inward towards the center of the pillow front.
- Align the edge of the trim and the edge of the pillow front all the way around the perimeter of the pillow. When you reach the point you started the trim at, overlap the trim and trail the end off by 2-3 inches, as you did to start (see figure 14). If the jumbo poms overlap, carefully trim one or two away to decrease the bulk. Use binding clips to clip the trim in place.
- Move the needle position to the left. Lengthen the stitch length to 5.0 for a basting stitch. Baste the trim in place with a 1/8″-1/4″ seam allowance (see figure 15).
Sew the pillow together and finish
- Place the basted pillow front RSU (see figure 16).
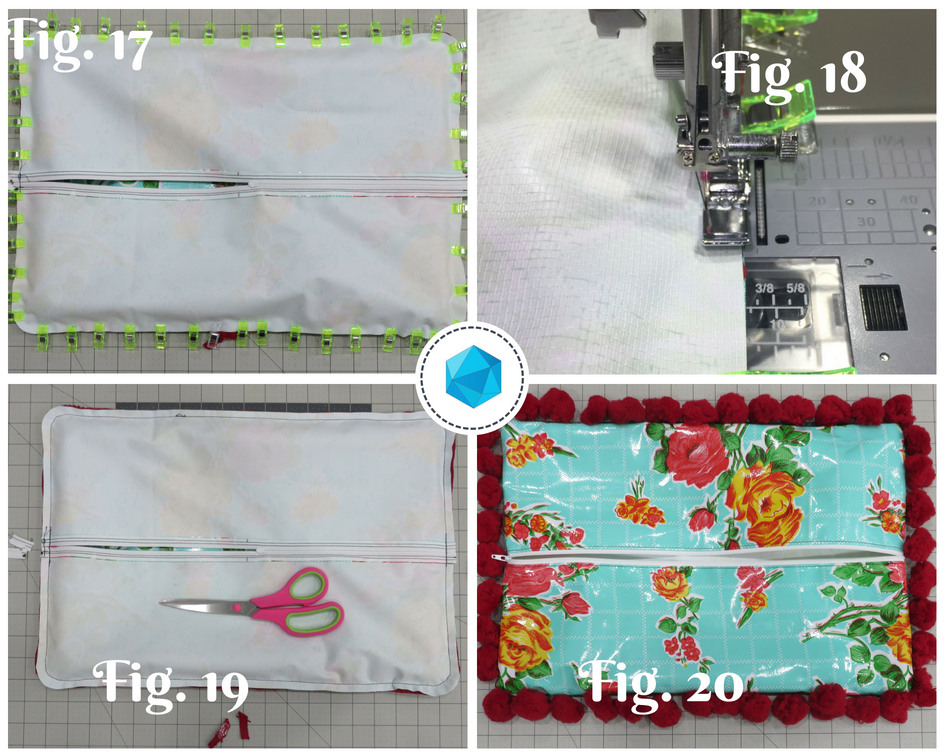
Figures 13-16 - Place the zippered back of the pillow right side down on top of the pillow front (see figure 17). Line up all the edges and make sure the pom poms are all facing in towards the center of the pillow. Double check to be sure the zipper is unzipped at least half way. Use binding clips to secure all the edges together.
- Remove the Ultra Glide Foot and attach the zipper foot E to the presser foot. Keep the needle position moved to the left, as if you were sewing a zipper. Sew around the perimeter of the pillow using a 1/4″ seam allowance (see figure 18). Double check that none of the pom poms are getting caught in the seam allowance while you are sewing.
- Use a pair of scissors to trim away the excess ends of the zipper so the ends are flush with the pillow edges (see figure 19).
- Turn the pillow right side out and carefully push out all the curved edges (see figure 20).
Figures 17-20
Tip: Oilcloth has little to no stretch, unlike cotton fabrics you might be used to working with. A zipper closure helps to keep seams sewn together versus using an envelope closure. Be careful to not stretch the fabric when inserting the pillow form. For a fully weather-resistant pillow, you can opt to sew this pillow without the ball fringe trim.
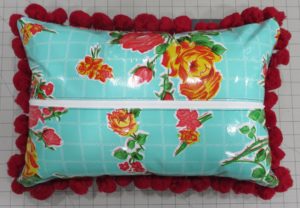
- Insert the 12″ x 18″ pillow form and use to liven up your patio!
Finished Pillow! Now get out there and party with your new DIY outdoor pillow 😉
DIY Starfish Tote – Sewing Camp with Janome
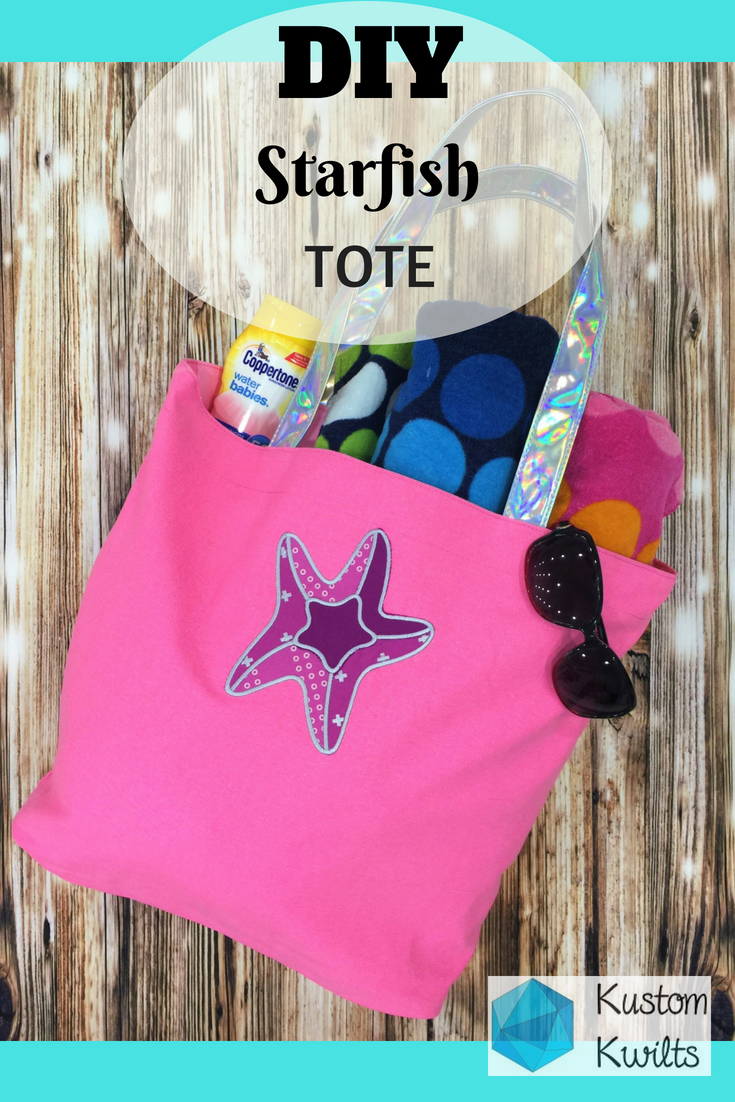
Are you looking for some cute and quick Summer sewing projects? Then you’ve got to hop over to the 2018 Summer Sewing Camp with Janome! The first three weeks of projects are already available, and there’s even a cut file for a camp t-shirt. It’s all the fun and creativity of summer camp without the hefty price tag, so you really can’t go wrong :). Every Monday, through July 30, a new sewing project will be released that can be finished in a couple of hours with minimal supplies. You have to check out the DIY Starfish Tote tutorial!
My contribution was Week 3– A DIY starfish tote bag with the option to use an embroidery design (if you have an embroidery machine) and an option to applique the star with a regular sewing machine. If you want a really quick finish, you can purchase a ready-made tote bag or follow my simple instructions to make your own!
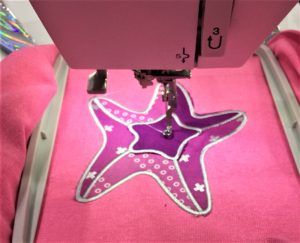
I used an embroidery/applique design from the Janome Embroidery website and it was so quick and easy to do, I was literally done in 30 minutes with the applique! I hope you enjoy this quick and easy FREE tutorial–you can download it from the Janome site linked above, or you can download the DIY Starfish Totehere as well 🙂
This is a great project to do with your kids to combat boredom and then load the bag up with some beach towels, sunscreen, and snacks and head over to your local watering hole. Or if you really want to score some points, gather up some of your kids’ friends and really create the camp feeling! If you participate in any of the projects, be sure to share what you make with the #janomecamp18 to be entered in the giveaway drawing that will end on August 13, 2018. They’re giving away a sewing machine AND some other awesome sewing related items, so you’ll definitely want to get in on this!
Happy sewing friends!
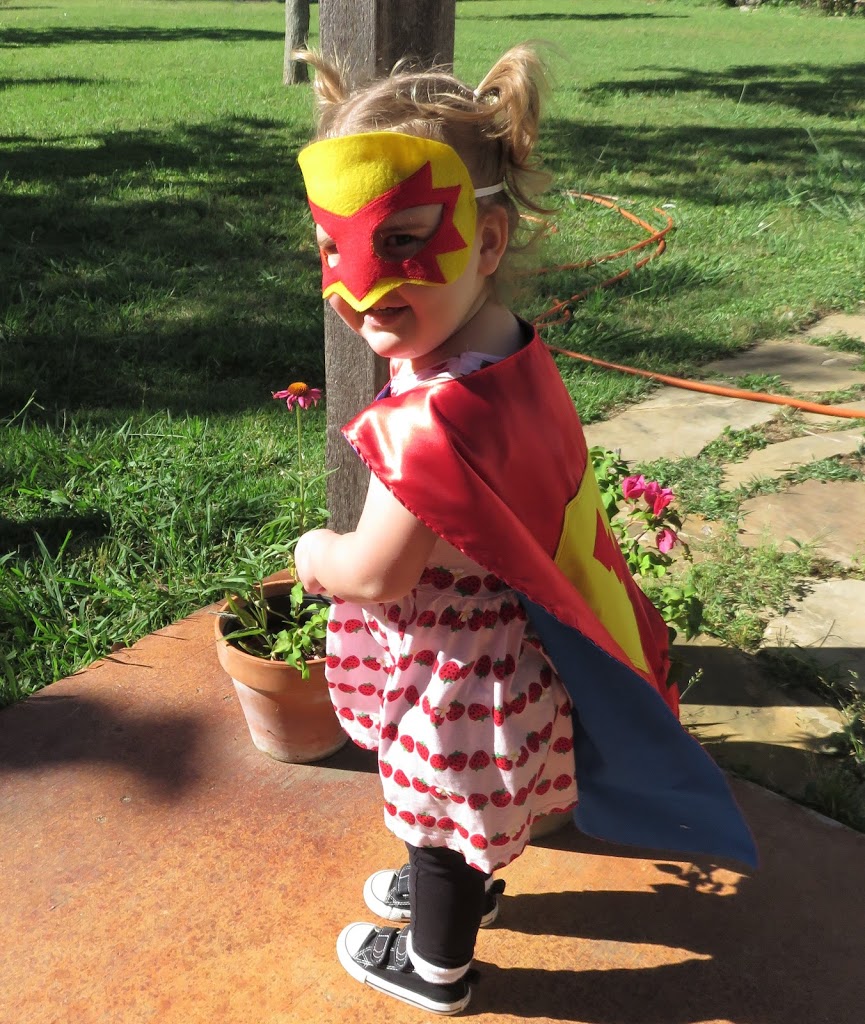
Sewing for littles – Superhero cape and mask tutorial
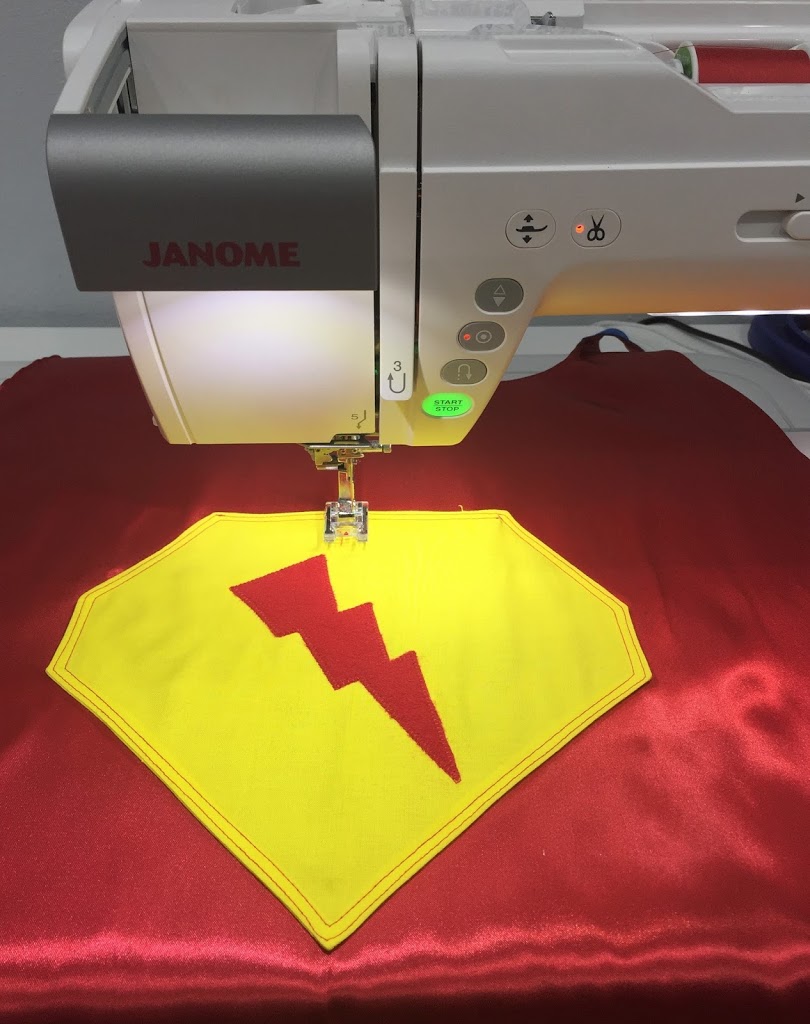
If you’re on the hunt for a sweet project to keep your little super hero busy this summer, pick up some satin and felt and sew up this easy superhero cape and mask. I used the Janome MC9400 to put this project together, and you can find the full tutorial HERE.
This isn’t a difficult project, and you can practice some basic applique skills to put a great finishing touch on it. Personalize this project with your kiddo’s favorite colors to really make this project pop!

This tutorial was made for approximately 3T-5T. The mask will fit larger children as well.
My best friend allowed me to have her precious little girl model this for me, and you can tell she’s ready to take on the world 🙂 Happy sewing!
Summer Picnic Quilt
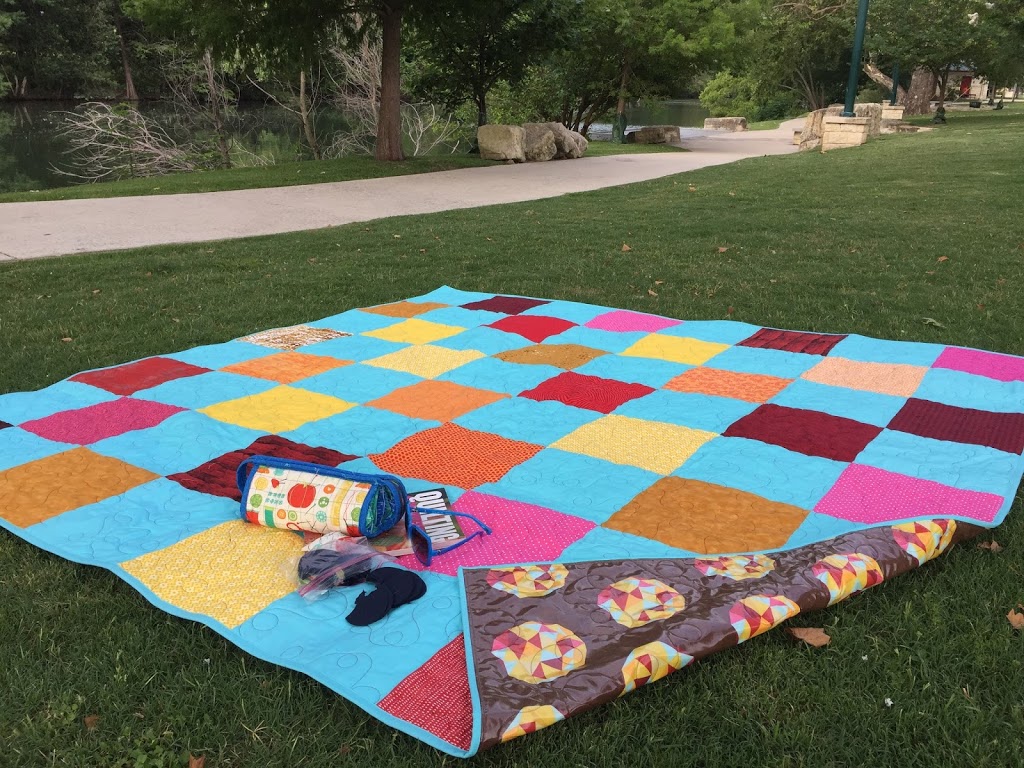
Summer Picnic Quilt tutorial

When summer arrives, I always get the itch to make a quilt. Nevermind the fact that I live in Texas and it is sweltering, to say the least. Also, disregard the fact that I have quilts coming out of my ears…what is that saying…you can’t swing a cat without hitting a quilt? (Surely that isn’t the saying, but I think you catch my drift!) So when I am thinking about making a new quilt…I need to have a reason for it, aside from just being functional to keep you warm. I also love to sew with materials that are a little unexpected. So I teamed up with Janome and American Quilter’s Society to bring you a free tutorial for a great summer picnic quilt.
This pattern is great for many reasons. It’s layer cake friendly, which makes it a super quick sew. The blocks are large enough to feature those great prints you’ve been holding on to for a special quilt. The quilt is large enough to accommodate a family picnic at the park. The backing can be made from laminated cotton (or regular quilting cotton, if you choose), so it won’t pick up dirt as easily as standard quilting cotton. You can just as easily throw it in the wash as you can a regular quilt (line dry to be on the safe side). So grab two layer cake packs and your favorite sewing and quilting notions and get ready to sew your socks off! Follow the link to the American Quilter’s Society blog to get started on your picnic quilt.
This is a great quilt to fold up and keep in the back of the car for unexpected outings (and if you have a little one in diapers, you can always use the laminated cotton side as a quick changing station on the go!).
I quilted this with some large meandering loops on my Janome MC9400, and was done with the quilting in under two hours.

Since the back of my quilt uses laminated cotton, I slipped a Supreme Slider onto the bed of the sewing machine and it really helped glide the fabric easily under the needle. This isn’t something you have to do, but it certainly makes the task a little easier. I tend to use one anytime I’m quilting something larger than a mini quilt. Put on your favorite podcast/Netflix and get ready to sew up a storm! Happy sewing 🙂
Summer fun and a DIY first aid kit
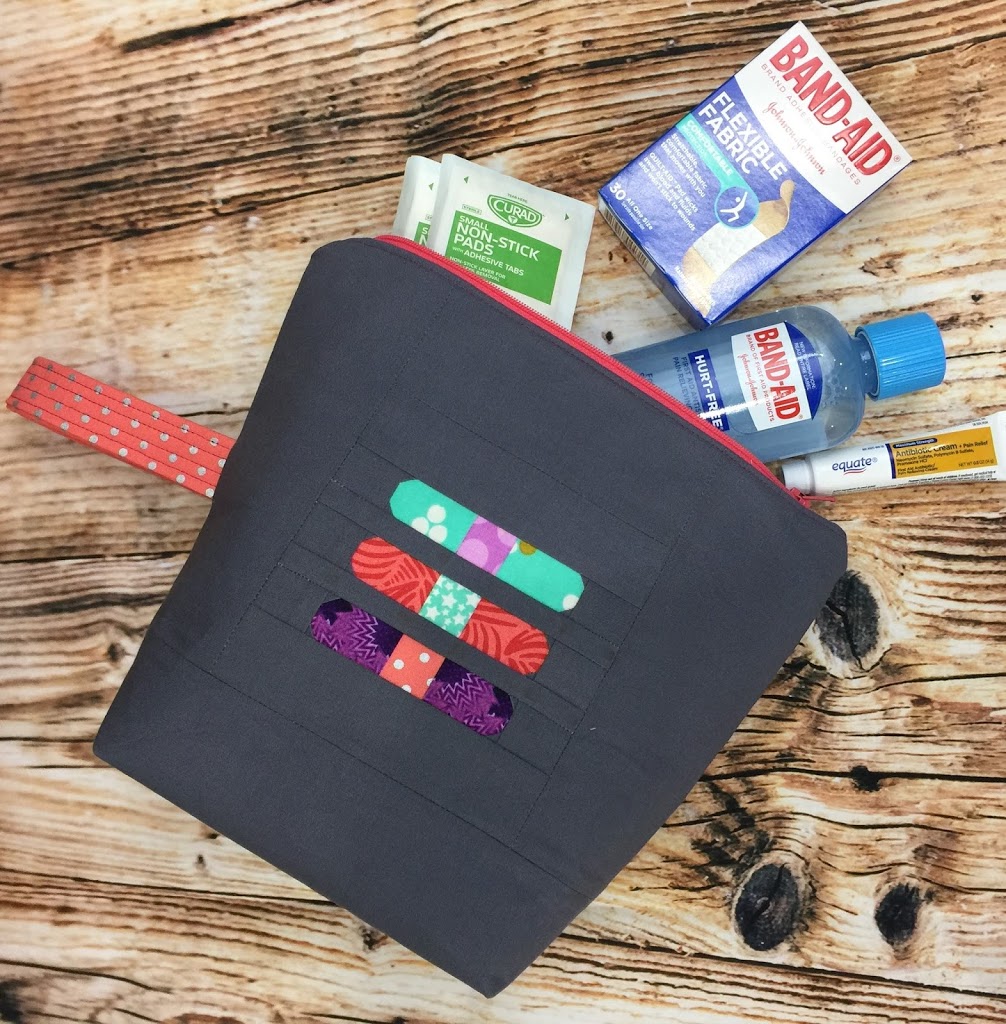
|
| DIY first aid kit |
Now that summer is here, many people are planning day outings or vacations with the kiddos. It’s a good idea to have a first aid kit with you in case something happens, and I know I haven’t even kept one in my car (I’m learning, though!). So this pattern has a free zipper pouch tutorial and a free foundation paper piecing tutorial in it. Two for the price of one! But not really, because they’re both free 😉 Head over to the AQS Blog and get your free tutorial HERE!
 |
| finished foundation block |
If you don’t feel like messing around with the band aid block and the paper piecing, you can totally skip that part and just cut two slid pieces of fabric for the front and back. But those little band aids are so cute!
I filled my little kit up with band aids, some antiseptic spray and wipes, bandage tape, gauze, and antibiotic ointment. You can personalize yours however you’d like and maybe sew up an extra one for a friend (or for dad’s car). The little band aids are a great way to use up small scraps of fabric. I know I have a hard time throwing any fabric away, so I’ll keep this block pattern close at hand for teacher gifts or whatever! Happy sewing until next time!
Quilting on unconventional fabrics – Quilted Notebook bag tutorial
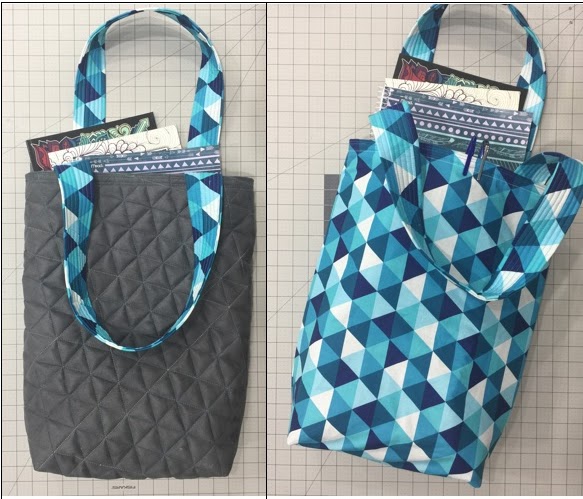
Today, I’m excited to share a free tutorial that I created with the Janome Horizon Memory Craft 9400 for an awesome project bag. I’m always scouring the house for bags to load up with notebooks, sketch pads, folders, or whatever I’m currently working on to squeeze in a few extra minutes of work on the go, and this bag has a little extra depth to really protect all those items. It’s also reversible, so you can make one side to go with the fall season and the other a little brighter to work with spring and summer!
|
| Reversible Notebook Bag |
Plus…we’ll take a look at quilting on a thicker fabric than your usual quilting cotton. I do a lot of quilting and embroidery on leather and faux leather fabrics, and there is a lot of hesitation when it comes to that from some. When I started sewing, I didn’t take a bunch of classes…rather, I just dove in and experimented to find what worked for me. I didn’t have anyone there to tell me I shouldn’t try something, or that it wouldn’t work, so I think that was a huge benefit. For this tutorial, break out that walking foot (or your free motion foot) and try your hand at some geometric quilting.
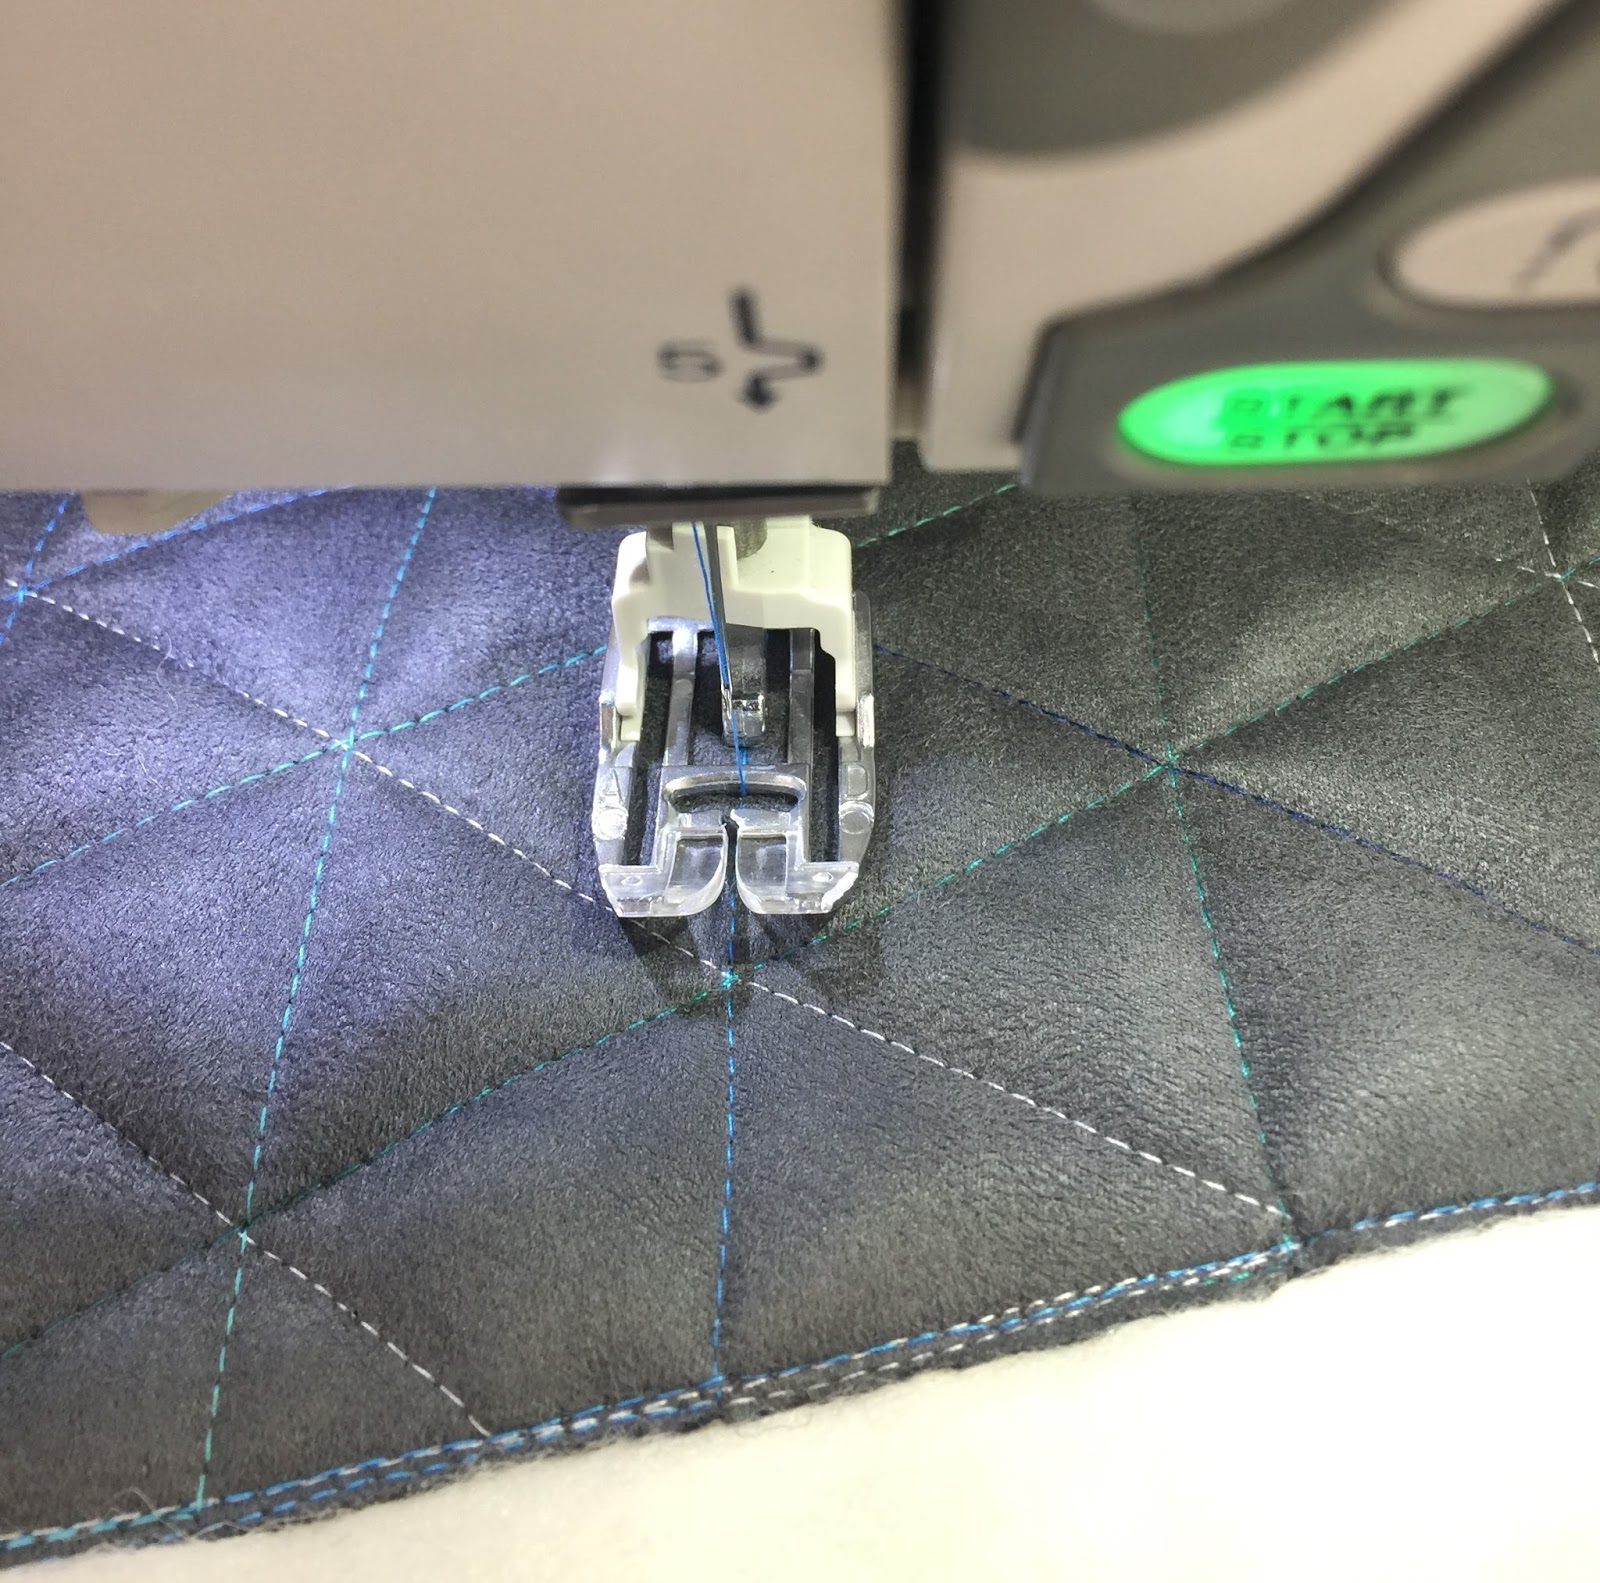 |
| Janome Dual Feed Foot quilting geometric lines on faux leather |
If you haven’t tried quilting on leather or faux leather before, I’d recommend getting a few scraps of some cheap faux leather–my local Joann’s has lots of remnants on clearance that I grab whenever I can–and do some quick samples. I usually do my best work on “trash” fabric when there’s no pressure to mess up expensive fabrics. I’ll make sure my pieces are big enough to make a little cosmetic bag or something with later on, because 9 times out of 10, I end up wishing I could save my sample!
This really is a quick sew–and you can easily alter the bag measurements to make the bag any size you like, upgrade it to add some pockets on the interior and exterior, or whatever your needs are. Check out the full tutorial on the American Quilter’s Society Blog and have fun with it! Go and conquer your fears of quilting on some different fabrics, and happy sewing!
Gifts for mom – the generational pillow
A few weeks ago around Mother’s Day, I was contemplating what handmade gifts would be truly appreciated by mom. As a new mom, I was excited to celebrate my first mother’s day, but didn’t really care about getting any gift (I honestly wanted some house chores done as a gift, and maybe some honey-do’s!), so I was thinking about gifts with meaning. I was seeing lots of advertisements on social media for jewelry and diamonds and just lots of STUFF. I’m not much of a jewelry person, but the diamonds got me thinking about birthstones and some of the jewelry I had seen a few years ago. I remembered one of my friends receiving a ring that had her kids’ birthstones set in it, and how much she loved it. How could you translate that representation into a quilt? And how many people have time to whip up a “quick” quilt, by the time they are pondering mother’s day gifts?
I thought a decorative pillow for the couch or bed might be more practical and manageable on a short time frame. So I teamed up with Janome to create a generational pillow that would be a great design for using the birthstone jewelry idea and making something for the home. You can view the free tutorial on the Janome Projects Website
I used the Janome Horizon Memory Craft 9400QCP to sew this project, and sewing the curves was a breeze. I’m completely spoiled by this machine and will be hard pressed to sew on anything else ever again. It even has an additional light that you can pull out for a better lit area when sewing. It’s extremely helpful, especially if you are sewing dark fabrics and using dark thread. Another favorite perk from this machine is that when you stop sewing, the needle remains in the down position. Which is absolute heaven when you are sewing anything tricky that you don’t want to shift too much when the presser foot is lifted.
In the free tutorial, there are three options for the pattern–you can select birthstone colors for 3, 4, or 5 people (or even more-but you’ll have to do the math for that on you own 😉
If you have a couple of people with the same birthstone, you can use different tones of that stone for a little variety. Some months even have multiple birthstones (or so I was told in my reading up on different months…), so you could go that route as well. Happy sewing, and see you next time!
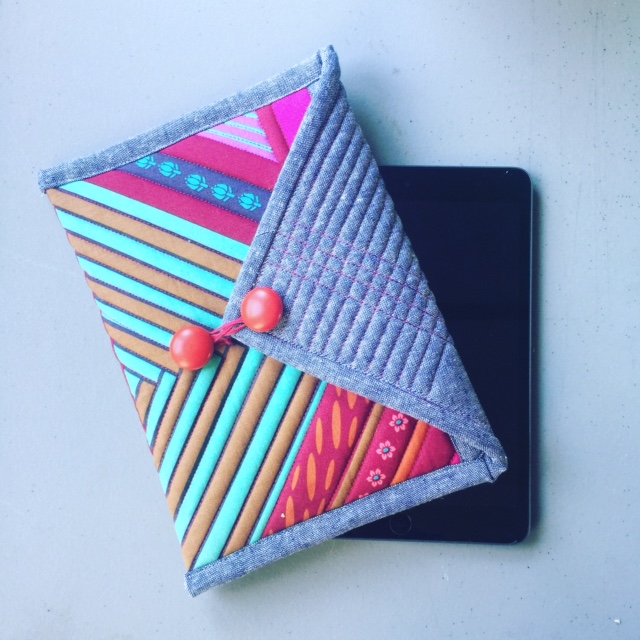
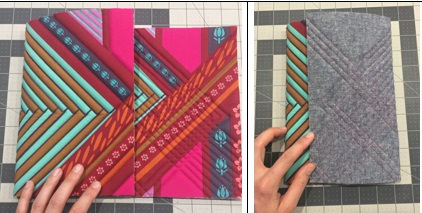
Select a size iPad Clutch free pattern
Good morning! Things have been a whirlwind in the last month! I have some really exciting things that I’ve been working on at Kustom Kwilts & Designs that I can’t wait to share with you in the very near future, and I’m so excited that I can finally share this free tutorial with you that I teamed up with Janome to bring you. Find the full tutorial HERE- at the AQS blog
There are some specific things I look for when creating a handmade gift for someone. I like a quick project that looks like it took a LOOOOOOOOOOOONG time. This is one of those! The supply list is fairly short, so you can easily grab a few fat quarters from your stash and get this project going today, in time for Mother’s Day next week, or whip up several for those really awesome teachers in your child’s life. The tutorial allows for you to select from several sizes of tablets, so you should be able to select the size your person uses and get going right away!
I’ve been sewing on the newest Horizon Memory Craft 9400QCP, and this machine is a true workhorse. I love everything about it, and quilting on this machine has been a lifesaver. It creates absolutely beautiful stitches and really makes my projects look professional.

I hope you’ll take a minute to check out this free pattern–you’ll love the simple style and elegant finish you can achieve with basic or complex quilting. You can really make this your own and put your special touch on it to brighten someone’s day. I hope you enjoy your weekend!
XO,
Joanna