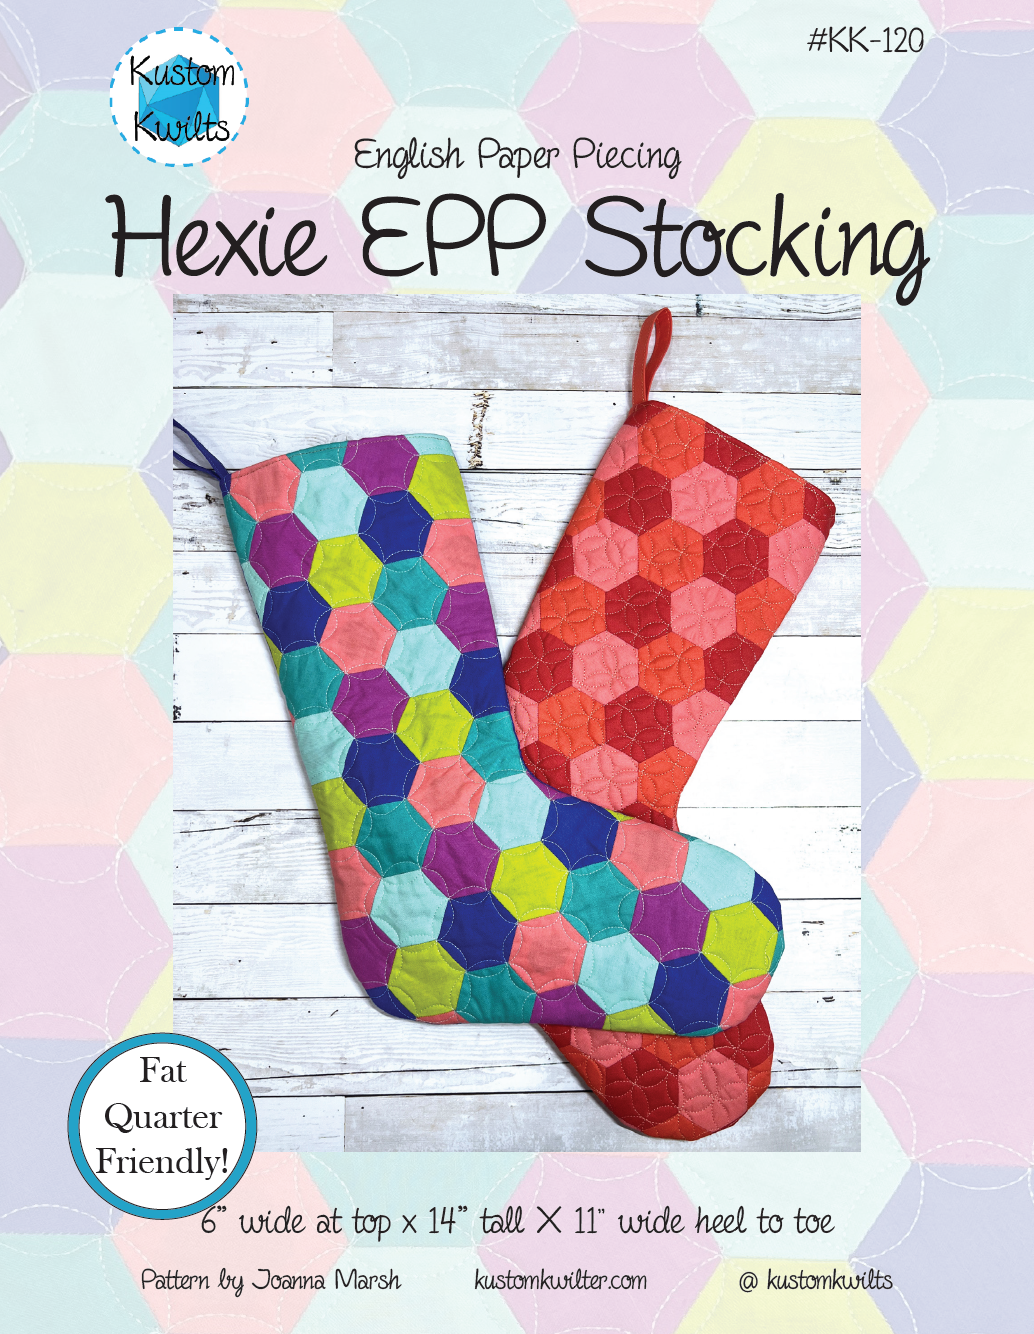
Spellbound Quilt Pattern by Joanna Marsh – English Paper Pieced Pattern

A colorful poster of different shapes and sizes.

The Spellbound EPP quilt is a fun and unique English Paper Piecing Pattern.  The simple, yet bold design allows you to build your sewing and quilting skills, while still providing a big impact.  Try this pattern with solids or stripes for a modern take.  Fabrics requirements are calculated using solids so you have a starting point for how much fabric you may need for the quilt, along with backing construction methods for each.  This pattern is great for your favorite fabrics to really make them shine!  Fussy cutting your fabrics will make this quilt the star of the show.  Fabrics used for the cover quilt are Tula Pink Linework for the center stars and various Tula Pink fabric lines for the surrounding outer stars.  Kona cotton Black was used for the stretched hexagons that outline each star set.

PDF Pattern includes

  • Instant download of the pattern with the option to print and cut out the cutting templates.
  • This option does not include the EPP paper set, but does include full size images of the paper pieces within the pattern.
  • Detailed coloring/planning sheet.
  • Helpful cutting instructions and detailed piecing diagrams.
  • The finished size is Throw – 63″ x 70″.
  • Skill level is intermediate, and does require some basic knowledge of English paper piecing.  The pattern has step-by-step instructions with pictures to guide you through.
  • Instructions for assembling the quilt backing.
  • The listing does not include the actual quilts in the photos.
  • Pattern assumes the quilter has basic knowledge of piecing and quilting.

Full Kit includes

  • 8.5″ x 5.5″ booklet pattern includes a coloring page and fabric amounts required (basic calculations with solids–fussy cutting will require adjustments).
  • A physical paper pattern, template and paper set that requires shipping – ONLY AVAILABLE TO addresses within the US and Canada.
  • Detailed coloring/planning sheet.
  • Helpful cutting instructions and detailed piecing diagrams.
  • The finished size is Throw – 63″ x 70″.
  • Skill level is intermediate, and does require some basic knowledge of English paper piecing.  The pattern has step-by-step instructions with pictures to guide you through.
  • Instructions for assembling the quilt backing.
  • Complete set of English Paper Piecing papers to finish the quilt
  • Complete set of three acrylic fussy cutting templates with 3/8″ seam allowance.
  • The listing does not include the actual quilts in the photos.
  • Pattern assumes the quilter has basic knowledge of piecing and quilting.

Printed Pattern and Template Set includes

  • 8.5″ x 5.5″ booklet pattern includes a coloring page and fabric amounts required (basic calculations with solids–fussy cutting will require adjustments).
  • A physical paper pattern and acrylic template set that requires shipping – ONLY AVAILABLE TO addresses within the US and Canada.
  • Detailed coloring/planning sheet.
  • Helpful cutting instructions and detailed piecing diagrams.
  • The finished size is Throw – 63″ x 70″.
  • Skill level is intermediate, and does require some basic knowledge of English paper piecing.  The pattern has step-by-step instructions with pictures to guide you through.
  • Instructions for assembling the quilt backing.
  • Complete set of three acrylic fussy cutting templates with 3/8″ seam allowance.
  • This option does not include the EPP paper set (does include full size images of the paper pieces within the pattern).
  • The listing does not include the actual quilts in the photos.
  • Pattern assumes the quilter has basic knowledge of piecing and quilting.

PREORDER – Complete Papers Set Only includes

  • Complete set of English Paper Piecing papers to finish the quilt – Ideal if you purchased the pattern already.
  • These are not currently in stock, but will be ordered as they are purchased and will ship within 7-10 days.

The purchase of this pattern is limited to one person per pattern, and should not be copied or distributed.  Items made from this pattern may be sold on a small scale.  Please credit the pattern design as Kustom Kwilts Patterns.

Posted on

Hurricane Quilt Pattern

A quilt with the words hurricane on it.

Today is the Hurricane quilt pattern Release Day! And I love to celebrate pattern releases with a sale, so you can get the Hurricane quilt pattern on sale through 8/10/2021 and use the code HURRICANE for 20% off everything else in my shop. You’ll want to keep reading until the end because there are kits, too! Also, there are some sweet free patterns in there too, if you haven’t checked them out!


Inspiration

Before we had kids, my husband and I started our work careers in Houston, TX. In the few years that we lived there, we had countless tropical storm warnings and a handful of pretty serious hurricanes. One particularly memorable storm was IKE. I had just started a new position at a brand new high school (really–it was the school’s first year to be open) and we didn’t know if we should stay and ride it out or evacuate. We ended up leaving after the storm hit and we lost power to stay with my parents a few hours away, since we didn’t know when the power would be restored (spoiler, it came back on within a day…womp, womp). My new high school sustained a lot of damage and, if I remember right, closed for two weeks for repairs.

I can’t stand bad weather…but love to make the best of it

If you’ve ever evacuated an area in hurricane/tropical storm territory, you’ve probably noticed the little graphic painted on the highway shoulder and marked on road signs to indicate a storm route evacuation. I really can’t stand storms and bad weather, and I remember thinking how much I liked the little symbol and the hundreds of painted ones we passed on our way out of town–in spite of what it stood for. The symbol for those storms has always stuck with me and I needed to create a scrapbook of sorts with the symbol. So the hurricane quilt pattern was born and it ALMOST makes me not hate those destructive storms and what they stand for. I like to think of it as a way to turn lemons into lemonade 🙂 .

The PDF and print copies are here for you to make your own stunning Hurricane quilt. I’ve made sure this pattern is jam packed full of all the resources you might need or want, including:

Hurricane Quilt Pattern Features

  • Easy to read cutting diagrams
  • FIVE sizes, including:
    • Baby
    • Throw
    • Twin
    • Queen
    • King
  • Easy to read color-coded charts and diagrams
  • Cutting chart/checklist
  • Clearly written instructions and colorful diagrams
  • Backing prep diagrams for each size
  • Coloring/planning sheet
A picture of different sizes and colors of the same pattern.
Size options
Continue reading Hurricane Quilt Pattern
Posted on 2 Comments

Get your Graffiti Quilting on!

A machine is cutting out designs on fabric.

If you’re ready to add another tool to your quilting arsenal, graffiti quilting is an awesome one to have. A few years ago (when I was prego with Gemma), Karlee Porter visited our guild to teach her Graffiti Quilting workshop. Also, I love Guns N Roses. I just saw them in concert a few days before this, so the shirt I bought there was getting some heavy use! Ever since I found Karlee, I’ve been a serious fan girl–so I jumped at the chance to take the class. I learned so much from that workshop and the techniques Karlee taught stuck with me and influence my personal quilting style.

Continue reading Get your Graffiti Quilting on!
Posted on

Cabin Fever Quilt Pattern

Today is Cabin Fever Release Day! I’m so excited to share this modern log cabin quilt with you today, as it’s a design I planned out about two years ago. It’s always difficult to be patient waiting for this day! The PDF and print versions are now available :)–and a limited amount of kits.

The inspiration for this quilt came from a few things…even though the name conjures images of being stuck inside. (Which, admittedly, we can all probably relate to currently.) First, I wanted to make a quilt that came together fast and looked great with solids or prints. I like to try out new quilting motifs, and this quilt is so much fun to practice on. Secondly, our daughter was one at the time. A lot of times, I felt the repetition of house chores and potty training (who was I kidding? She still wears a pull up to bed sometimes–and I’m fine with that 😉 made me a little cagey. So I jokingly named it Cabin Fever. The geese represent breaking free from routine and they’re ridiculously fun to quilt.

A colorful quilt with many different designs.

Funny enough, I didn’t realize how appropriate the name would be at the time, but here we are!

The Cabin Fever quilt instructions come in two sizes, baby and throw. These quilts go together really quickly, and they’re a nice break from traditional block-based quilts. The pattern comes with some fun and easy tips for making flying geese quickly.

Tula Pink Solids / Kona Cotton Equivalents

This colorful version is one of my favorites. I’ve been using all Tula Pink solids and stripes to work on another quilt, and I stumbled across a perfect stack of colors just as I was about to make an all blue version. Sadly, after I made it, I realized the Tula Pink solids can be a bit hard to find, so I matched them closely to Robert Kaufman Kona Cotton Solids. Thank goodness for color cards! I quilted the outer border with some ghost geese to make it appear the entire border had flying geese. Then I did some fun ruler work in each strip of color. I love how the straight lines pop so much on solids! This is the baby version, which measures 52″ x 52″. It’s a really nice size, and I use this one to cover up on the couch while I english paper piece.

Blue & Grey Cabin Fever

This colorway is the very first one I had planned out but didn’t end up making until just recently. I love how the brightness of the blues contrast with the darkness of the grey. I haven’t decided just how to quilt this one yet. Some nice ruler work and custom quilting would really pop against those solids, but I have a new edge to edge design I’m itching to try out. This is the throw size, which measures 81″ x 81″.

Peaches and Pinks Cabin Fever

This was the very first Cabin Fever Quilt I made. I mixed in prints with Kona cotton solids, but I’ve added a color chart in just solids. The great thing about Robert Kaufman fabrics is they generally use the names of the coordinating solids in a lot of their prints. It’s easy to mix and match prints from different collections to what the coordinating solid would be. This is another throw size.

Ruby Star Society – Clementine

Have you seen Miss Melody Miller’s new collection for Ruby Star Society called “Clementine”? I love it so much!! She’s a wizard when it comes to color, and these ethereal pinks and blues are insanely good together. I used Rashida Coleman Hale’s Speckled as the sashing/background fabrics. My daughter Gemma saw me putting this one together and claimed it before I could say no. I let her pick out a color of Shannon Cuddle. Her favorite color is pink, so it was a no brainer. And then she got to pick the edge to edge design that I quilted. They’re subtle, but they’re little heart rainbows. This is the softest quilt, so cozy and squishy.

A yellow iron sitting on top of a rainbow colored table.

I can’t wait to see what fabric collections or solids you guys pick for your Cabin Fever quilts! I love seeing the amazing different quilts that y’all make and the incredible fabric selections you make. Have fun with this one–I know I do 🙂 If you want to see more of the photos I’ve been posting of Cabin Fever, you can head over to Instagram and check them out!

-Joanna

Posted on

Trippy Triangles Quilt pattern release

A pink and blue background with green triangles.

I’m stoked to finally introduce to you the Trippy Triangles Quilt pattern! This quilt has been a pet project of mine for the last year (and then some). From picking just the right fabrics–I changed my fabrics several times before I finally got with it stitching–to fussy cutting, etc. and I’ve loved every minute of it. I’m currently working on another version and planning yet another with some fun fussy cutting 🙂

The thing with EPP

Here’s the thing with English Paper Piecing: It’s an obsession of mine. Aside from longarm quilting (which I do almost all day), EPP is my favorite way to pass the time. I always have a little EPP kit in my purse so that if I’m caught waiting at the doctor’s office, or getting my car inspected, or whatever, I always have a little something to keep me busy AND productive. I hate wasting so much time on my phone when I could be sewing something, right!? It’s such a convenient way to pack a little sewing kit and get things done when you otherwise couldn’t.

Continue reading Trippy Triangles Quilt pattern release

Trippy Triangles Bundle

A bundle of papers with pictures and text.

This bundle includes a complete kit to make the  Trippy Triangles quilt.

  • Bundle includes the following items:
    • Printed copy of the Trippy Triangles Pattern
    • Set of Trippy Triangles Acrylic Templates
    • Complete set of paper pieces for the Small/Throw Size depending on the kit selected
  • These ship only to addresses in the US and Canada.

The Trippy Triangles quilt is so much fun to make with limitless possibilities for modern, vibrant design.  Grab your kit today and get stitching!


Posted on

English Paper Piecing – Getting started and basic supplies

A woman standing next to a quilt and a cutting mat.

If you’ve spent any amount of time on my blog or Instagram, you know by now that I LOVE sewing and quilting. SO much so that I like to have a travel-friendly project I can take with me, whether it’s in the car, waiting at the doctor’s office, taking my daughter to the dentist, etc., to help pass the time. While English paper piecing is fun, it is much slower than powering up your sewing machine and zipping through a few seams. There’s something meditative about it that helps the craziness of the world to fade away for just a moment and let you appreciate the thoughtfulness of a stitch. English paper piecing appealed to me first when I was still an ag teacher. A lot of times, I’d be on a school bus with kids and nothing to do for hours while we traveled to judging contest OR I’d be stuck in a hotel room at night, not able to go to sleep and wishing for something productive to do. So I started dabbling in EPP. My husband bought me the La Passacaglia kit (Pattern by Willyne Hammerstein) for my birthday and I was totally hooked. I want to take the time to share my favorite English Paper Piecing supplies and tips in the video below.

Continue reading English Paper Piecing – Getting started and basic supplies
Posted on 1 Comment

Typecast English Paper Piecing

A collage of different types of letters on a wooden surface.

Have you guys seen Sheri of Whole Circle Studio’s newest pattern? It’s called the Typecast of Characters, and it’s an amazingly fun English Paper Piecing pattern that lets you create the entire alphabet and customize it to your heart’s desire. You can snag your copy of the pattern guide and paper packs here.

Continue reading Typecast English Paper Piecing
Posted on 4 Comments

Easy Zip Pouch Tutorial

A wooden table with sewing supplies and a quilted zip pouch.

OLFA is celebrating their 40th Anniversary this year and has teamed up with Aurifil to create the Slice and Stitch Challenge! I was asked to be part of the challenge, and I’m so excited to included in this talented group of makers, showing you how to use handy tools to create things you’ll love :). I don’t know about you, but if you sneak into my sewing room, you’re sure to find several OLFA tools (and cutting mats) and LOTS of yummy Aurifil thread. Some of my favorite (and quite possibly underappreciated) tools are specialty rotary cutter blades. You can (carefully) pop one of these blades into your regular rotary cutter and quickly achieve a decorative finish that will look like it took you forever to cut…but that can be our little secret! I also just LOVE the new OLFA RUBY rotary cutter…I use it daily (photos below are from OLFA’s website). For the Slice and Stitch challenge, I saw those decorative blades paired with Aurifloss and knew immediately I just had to make a zip pouch!

You can see the dreamy Aurifloss colors I chose for the hand quilting on my zip pouch. Love those blues with a punch of bright colors! Let’s get moving and start sewing up your own zip pouch!

A circle of thread in different colors on a table.
Exact Aurifloss colors are listed below

Supplies needed:

  • Zip pouch template, printed at 100%
  • 10″ zipper
  • Aurifloss in your favorite colors (I used #1320 Bright teal, 2225 Salmon, 2220 Light salmon, 4020 Fucshia, 5005 Bright turquoise, 2735 Medium blue, 1147 Leaf green, and 4644 Smoke blue)
  • OLFA 45 mm Wave rotary blade and OLFA 45 mm Deluxe Handle Rotary Cutter
  • (2) 2.5″ x 9.5″ pieces of cork leather
  • Hand quilting needle
  • 1 FQ lining fabric, sub cut into
    • (2) 6.5″ x 9.5″
  • 1 FQ Solid fabric for the exterior, sub cut into
    • (2) 6.5″ x 9.5″
  • (2) 8″ x 11″ pieces of batting
  • Binding Clips
  • Turning tool (optional)
  • Basting spray/safety pins
  • Chalk marker or Hera marker
  • Zipper foot, sewing machine
  • Thread for piecing and basic sewing supplies
  • Iron and pressing mat

Hand Quilt it!

To begin, you’ll need to take the two exterior pieces of fabric cut at 6.5″ x 9.5″ and center each one on top of a piece of batting. Use a Hera marker or chalk pencil to mark your hand quilting lines, then hand quilt a pattern or random stitches onto each exterior piece. I like to make my stitches about 1/4″ in length, and spaced the same distance apart.

A pair of scissors and some thread on top of a table.

Grab your template:

Now you’ll take the cork pieces, and the bottom portion of the template printed from your supply list and line the template up along the bottom 9.5″ of the cork. Use a standard OLFA 45 mm Rotary blade to trim along the curved edge. I used my OLFA Ruby Rotary Cutter for this part. Once you’ve trimmed the curved portion, take the Wave Rotary blade and trim just along the curved edge to leave a cute wavy edge.

A cutting board with some fabric and scissors

Take one of the quilted exterior pieces and place the decorative cork on the bottom 9.5″ edge. Use clips to hold in place, or use some wash away hem tape to secure. At this point, I like to take an air erasable marker and echo the line of the wave just below the wavy edge of the cork – about 1/8″ from the curvy edge – as a stitching guide. Take this piece to the sewing machine and topstitch along the guideline you drew with a coordinating thread. Then stitch around the remaining edges of the cork, about 1/8″ away from the raw edge to secure it in place. Don’t worry — the cork won’t fray, so it’s great for special decorative finishes with the OLFA rotary cutter!

Take your zipper and place it lined up with the top edge of one exterior, as shown in the picture below. Mark the end of the zipper (the end with the metal stopper) where it meets the end of the right side of the fabric, then mark about 1/4″ in from that mark as well. Take the zipper to the sewing machine and use a zig zag stitch to sew a new zipper stop on the mark furthest in. Trim away the rest of the zipper on the outermost mark.

Install the zipper

Take the newly trimmed down zipper and place it RSD on top of one side of the hand quilted exterior. Use binding clips to clip the zipper in place. Take one of the lining pieces and place it RSD on top of the zipper, the replace the clips to include all three layers. Use a zipper foot to sew through the three layers with a 1/4″ seam allowance, beginning at one end of the fabric and sewing to the opposite end, all the way to the edge of the fabric.

Press the lining and exterior away from the zipper with your iron, and topstitch 1/8″ away from the folded edge of the fabric.

A close up of the back of a blue purse

Repeat the steps above with the remaining exterior and lining pieces.

Assembling the zip pouch

Open the zipper part way, then match the exteriors, placing them right sides together. Pull the linings together and match them, right sides together. Pin or clip in place, and mark about a 5″ opening along the bottom center of the lining to leave open in the next step. Pull the zipper pieces towards the lining, as shown below.

Sew all the way around the perimeter of the zipper pouch, leaving the 5″ opening unsewn. Clip the corners for crisp turning. Turn the zipper pouch right side out through the opening in the lining. You can use a turning tool for crisper turning, if needed. Fold the opening of the lining in 1/4″ and press. Clip in place. Topstitch the opening closed, then push the lining down inside the pouch.

And you’re done! Fill this pretty pouch up with all the sewing things you need on the go 🙂

Posted on 2 Comments

Cheeky Churn Dash Quilt Along – Week Six

A quilt along with the week six block of the month.


Quilt Along – Week Six

We’re moving right along into Week Six of the Cheeky Churn Dash Quilt Along!  Head over to the Original QAL Post to review the details and schedule, if you need to.

A quick review of what we’ve done so far–scroll to the bottom of this page for links to each weekly post.

Congratulations to Erica M. for snagging the Week Four prize-a Quilter’s Planner from The Quilter’s Planner!  This prize was sponsored by the awesome people at The Quilter’s Planner.  These were Erica’s trimmed and squared up HSTs from Week Four:A book and some fabric sitting on top of a table.

How to Participate:

Post Your progress on Instagram using the hashtag #cheekychurndashquiltalong

Be sure to include the hashtag when you post to Instagram so everyone else can see what you’re up to, and if you’re in the US, you can enter to win prizes ?

Stay in the loop!

If you haven’t signed up for the weekly emails that will go out for the Quilt Along, sign up here.  There might be some added info and bonus content for you as a little treat!

Alright, so here’s the breakdown for Week Six:

A close up of six blue and white triangles

  • In Week Five, we assembled sections 1, 3, 7, and 9.  Here’s the action list to complete for Week Six!
  • And here is where irritating elevator music starts playing until the start of Week Seven ;)  (Or, if you’re a mom, it might be Momma Shark da da da da….)
  • If you fell behind, go ahead and use this free week to catch up with us!
  • If you’re an overachiever–I see you there in the front with your quilt nearly done–You can work ahead, if you like.  Just make sure you follow the original schedule (linked at the top of this post) so you have pictures to post to Instagram for the prizes.
  • This week, you can post a picture of anything Cheeky Churn Dash related on Instagram using the #cheekychurndashquiltalong hashtag.  Be sure you post your IG picture with the hashtag before the start of Week Seven to qualify for this week’s prize.  Week Six’s prize is sponsored by Aurifil.  The amazing folks at Aurifil are giving away a small spool thread set, and man…their thread is top notch.  A huge thank you to Aurifil for sponsoring Week Six’s prize!A black and white logo of the word " aurifii ".
  • A box of thread in different colors

Next week, we’ll be assembling sections 2, 4, 6, and 8.

Cheeky Churn Dash Quilt Along Posts:

Week One – Introduce yourself and gather your fabrics

Week Two – Starch and cut your fabrics

Week Three – Assemble and press the HSTs

Week Four – Square up and trim all HST blocks

Week Five – Assemble sections 1, 3, 7, and 9