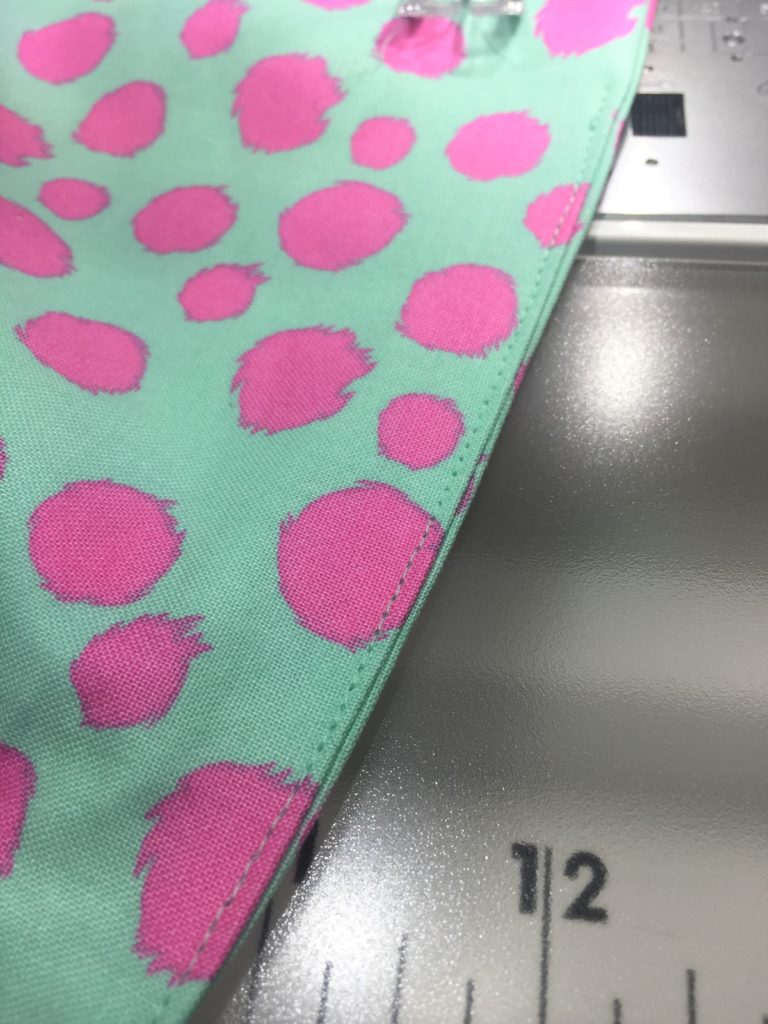
Want to learn how to quilt swirls? Sometimes it’s difficult to determine what should go in the negative space of a quilt. I really like using swirls to quilt empty space because it gives texture and movement. It can also double as smoky swirls or wind looking swirls to create a darker look, or mimic the weather.
Continue reading Learn how to quilt swirls – video tutorialTypecast English Paper Piecing
Have you guys seen Sheri of Whole Circle Studio’s newest pattern? It’s called the Typecast of Characters, and it’s an amazingly fun English Paper Piecing pattern that lets you create the entire alphabet and customize it to your heart’s desire. You can snag your copy of the pattern guide and paper packs here.
Continue reading Typecast English Paper PiecingHow to quilt feathers – video tutorial
Have you ever been at a loss for how to fill negative space in a quilt? I know I’ve sometimes struggled with what quilting motif is the right one, and I wanted to share some of the fills I use the most. I made a quick video tutorial on how to quilt feathers and I think you’ll really love some of the tips I give in it 🙂
Continue reading How to quilt feathers – video tutorialHonest Fabric Designs – Moroccan Tiles
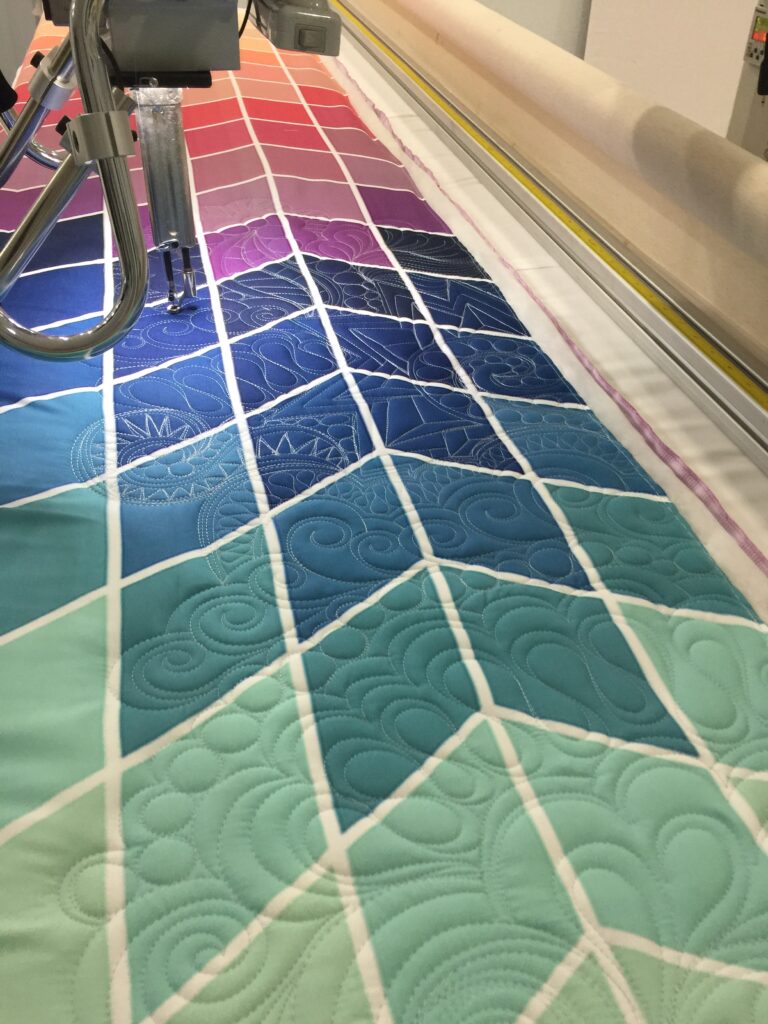
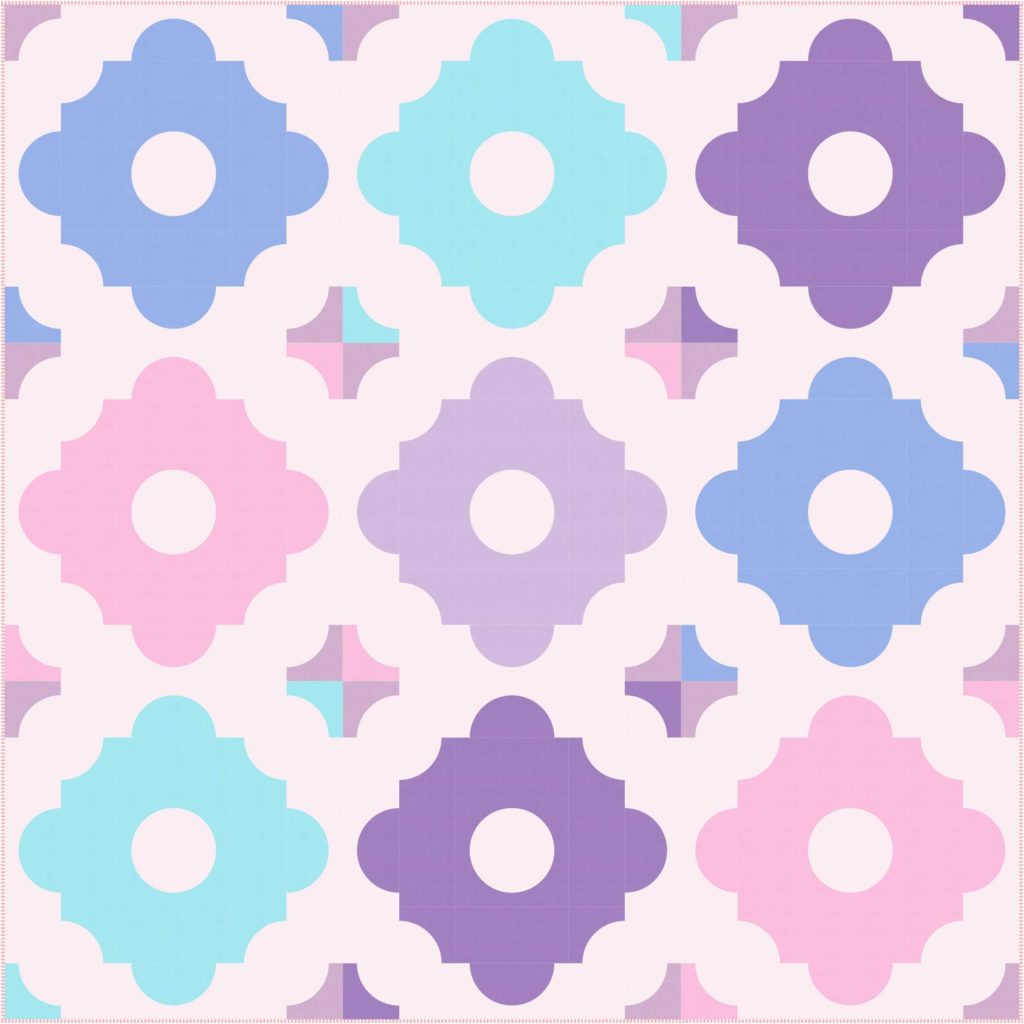
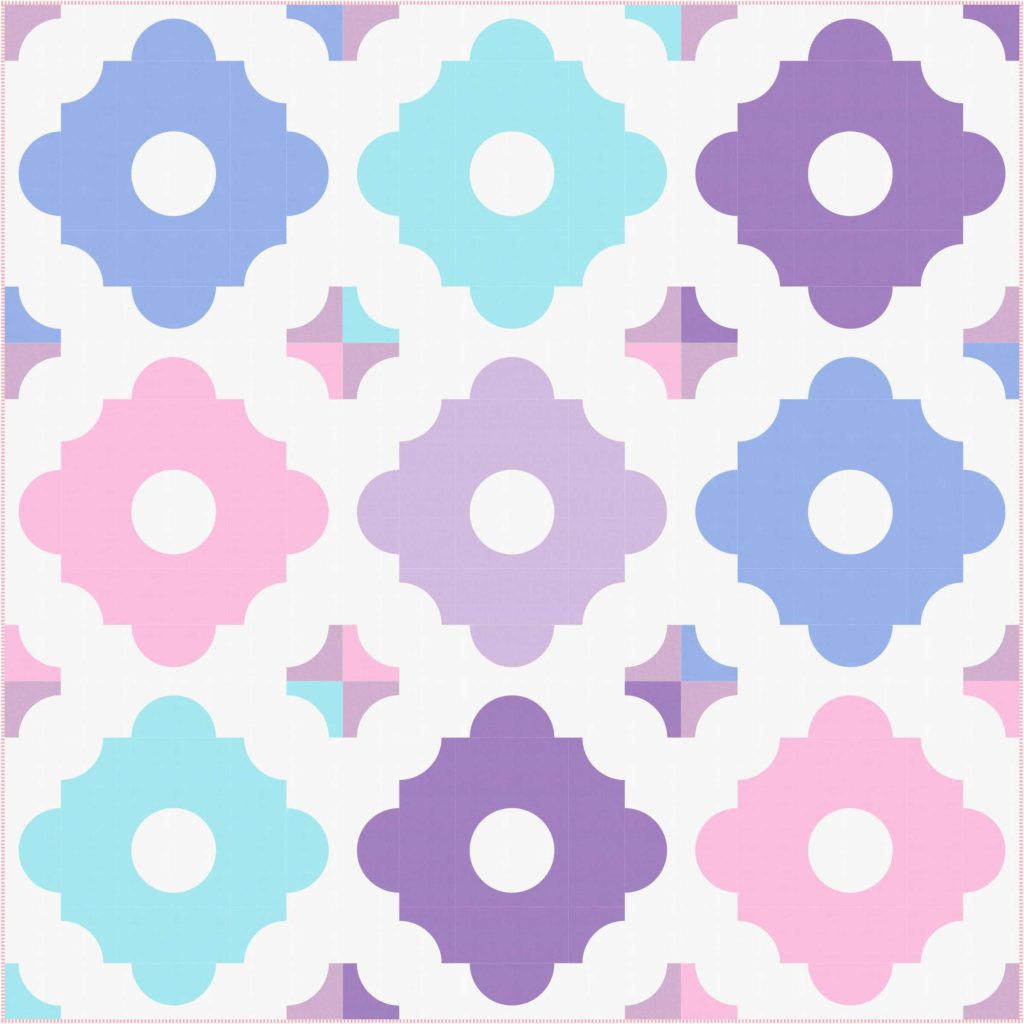
I’m so excited to finally share some news with you!! I’ve joined the fabulous designers at Honest Fabric to bring you some vibrant custom printed whole cloth quilt tops!! I know some people think piecing curves is a real bummer (it’s really SO much fun!!). So if that’s you–and you’ve been dying to get your hands on a Moroccan Tiles Quilt, you’re in luck. You can head over to Honest Fabric and choose from 6 different color ways, in three different sizes. I;m so exited to finally share these Honest Fabric Designs with you!
Honest Fabric – Moroccan Tiles wholecloth quilts
There are 6 unique colorways for this design and I just LOVE how they turned out. Honest Fabric is having a sale through May 31 so you can pick up any of these awesome designs for 25% off with code 25off. A few months ago, I ordered some before I was a contributor from my friend Nelson Salsa. I picked up his “Tilt” design so I could try out some new quilting designs. I also bought Kwik Color Washed Diamonds by Karie Jewell, Fox Dreams and River Walk by Anne Sullivan.
These designs are going to be so much fun to quilt up, and it takes the stress off and just lets me quilt without worrying about spending so much time piecing. All the designs I purchased from other Honest designers don’t currently have patterns out to piece them, so I would otherwise miss out on having a piece of the great artwork from these designers.
I’m really happy with the quality of the printed fabric that Honest Fabric delivers. The fabric is soft and supple and colorfast. I’ve quilted up one of Karlee Porter’s designs that I purchased called Explosion.

I did some graffiti style quilting on Karlee’s whole cloth design and used Quilter’s Dream Wool batting to really make the quilting POP. It was SO much fun to quilt, and I didn’t have to worry about bulky seams or any of the piecing! It was heaven.
Anyhow, I hope you’ll check out some of the creative designs over at Honest Fabric. Take a break from piecing to quilt up some of these amazing printed quilt tops. Have fun, and happy sewing!
Binding on the Longarm
Do you follow me on instagram? If you do, you might have seen I’ve been having a LOT of fun with videos lately. I’ve been doing some time lapse videos of some basic straight line quilting AAAAAND decided I’d do a real time video of how I bind mini quilts on my longarm. It’s seriously so easy that if you haven’t tried this yet, you’ll really kick yourself!
If you’ve ever quilted a mini quilt on the longarm, there’s a fun shortcut you can use to quickly attach binding to the front of the quilt after you quilt it. I did a short video tutorial showing how to attach binding on the longarm, and I hope you’ll go check it out! Now just a quick note…I am obviously not a professional videographer…or whatever that’s called, and I even treat you to a view of my gorgeous locks of hair that were quickly and haphazardly thrown up into a very unglamorous mom bun. That’s right. ENJOOOOOY 😉
When I bind my quilting samples on the longarm, I usually stick to pretty small sizes. You could definitely do this with a large quilt, just keep in mind that you’ll be doing some scrolling and advancing of the quilt to finish the job. It’s also a good idea to mark the large quilt so you have a good idea of where the squared portion of the quilt will be so you attach the binding straight. I only do this for quilts that are for myself–because for me this is something to do quickly as a shortcut and not great for accuracy, as I don’t spend a lot of time making sure I’m putting the binding on squarely.
To make the binding, I cut strips 2.5″ wide x the width of the fabric and then sew them together, end to end to create the length I need (I usually do the perimeter of the quilt + 12″ to make sure I have enough). The tutorial shows how to attach the binding to the front of the quilt. After quilting, you’ll need to trim away and square up, then flip the folded edge of the binding to the back and finish. I finish all mine by hand because I’m a weirdo and love hand binding!
Binding on the longarm details
I’m using an Innova 22″ longarm (hand guided) with a lightning stitch stitch regulator. The fabric panel I quilted was a custom panel I ordered from My Fabric Design, and the thread I used for the quilting was Glide by Hab+Dash (previously Fil-Tec). If you’d like to see a time lapse video of the quilting of this panel, you can check it out on instagram HERE.
I hope you find this tutorial helpful–and I’d love to hear your feedback! Are you up for trying this out soon? Let me know if you do and how it goes! Happy sewing 🙂
Easy Zip Pouch Tutorial
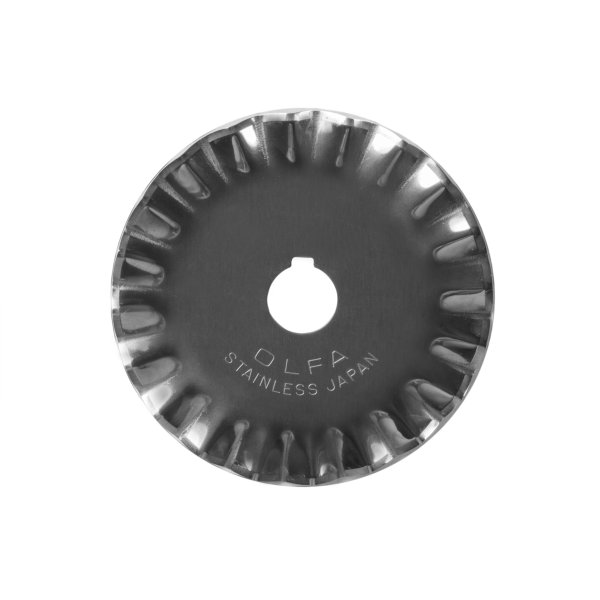
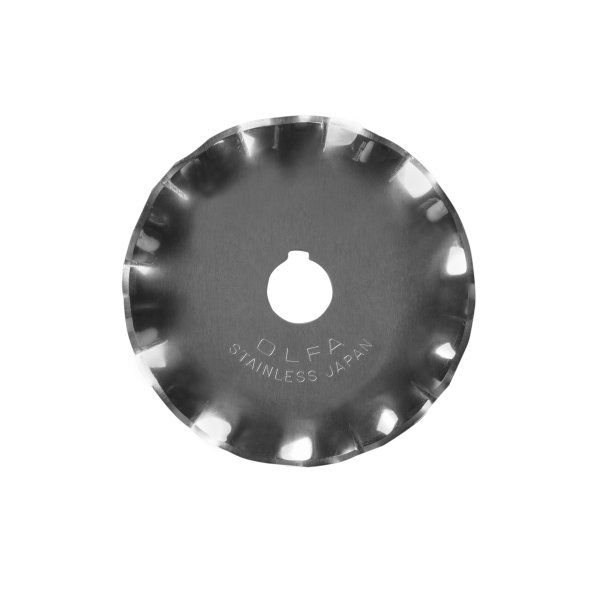
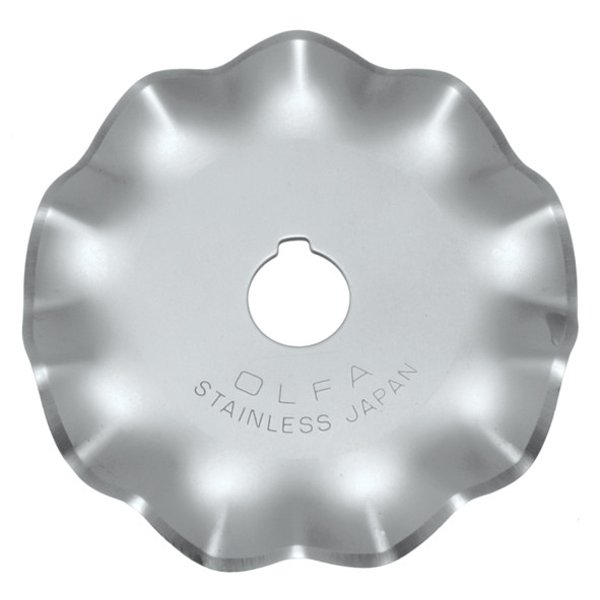
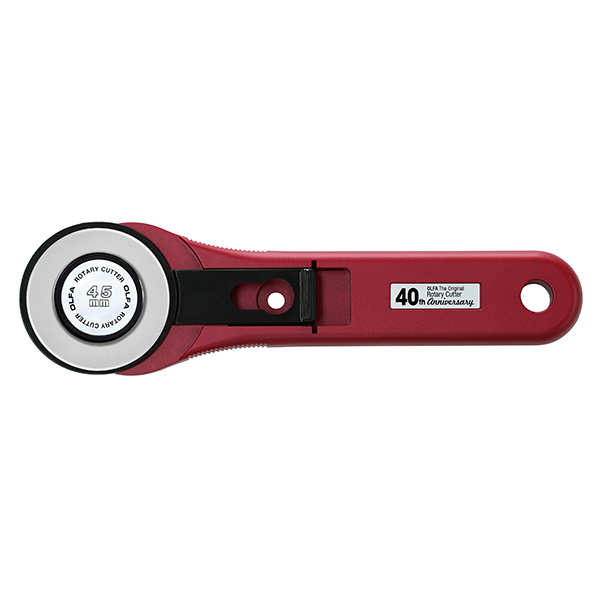
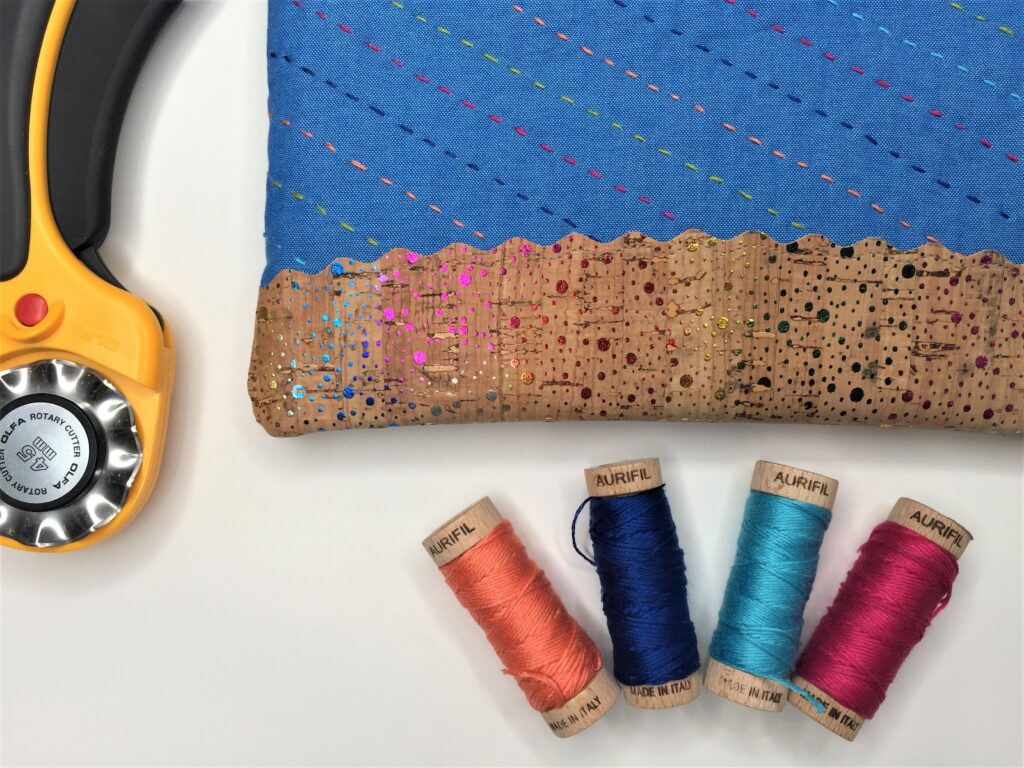
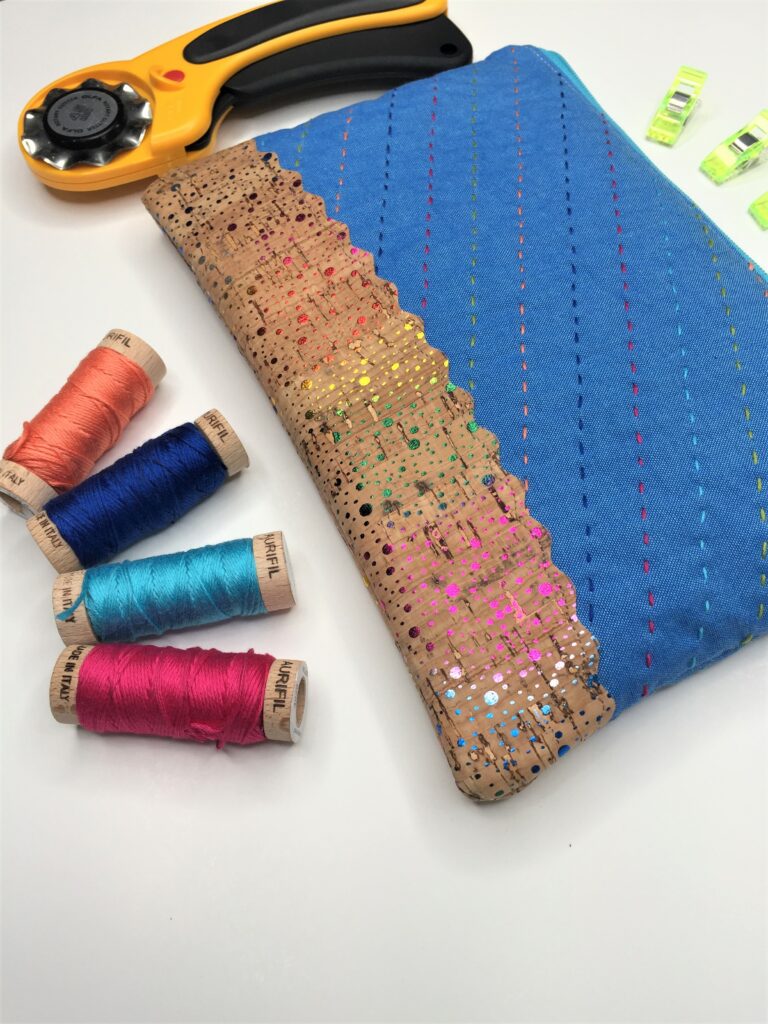
OLFA is celebrating their 40th Anniversary this year and has teamed up with Aurifil to create the Slice and Stitch Challenge! I was asked to be part of the challenge, and I’m so excited to included in this talented group of makers, showing you how to use handy tools to create things you’ll love :). I don’t know about you, but if you sneak into my sewing room, you’re sure to find several OLFA tools (and cutting mats) and LOTS of yummy Aurifil thread. Some of my favorite (and quite possibly underappreciated) tools are specialty rotary cutter blades. You can (carefully) pop one of these blades into your regular rotary cutter and quickly achieve a decorative finish that will look like it took you forever to cut…but that can be our little secret! I also just LOVE the new OLFA RUBY rotary cutter…I use it daily (photos below are from OLFA’s website). For the Slice and Stitch challenge, I saw those decorative blades paired with Aurifloss and knew immediately I just had to make a zip pouch!

Pinking blade Scallop blade Wave blade Ruby Rotary Cutter
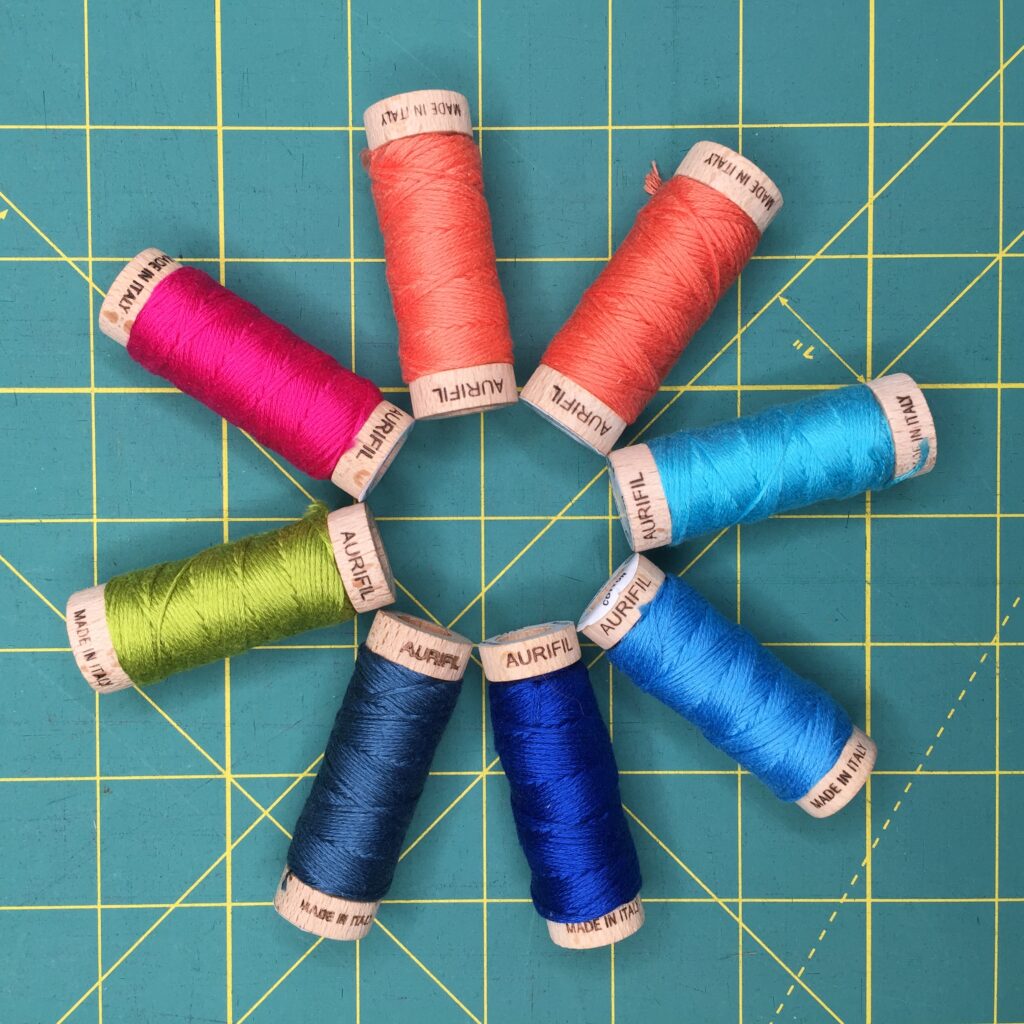
You can see the dreamy Aurifloss colors I chose for the hand quilting on my zip pouch. Love those blues with a punch of bright colors! Let’s get moving and start sewing up your own zip pouch!
Supplies needed:
- Zip pouch template, printed at 100%
- 10″ zipper
- Aurifloss in your favorite colors (I used #1320 Bright teal, 2225 Salmon, 2220 Light salmon, 4020 Fucshia, 5005 Bright turquoise, 2735 Medium blue, 1147 Leaf green, and 4644 Smoke blue)
- OLFA 45 mm Wave rotary blade and OLFA 45 mm Deluxe Handle Rotary Cutter
- (2) 2.5″ x 9.5″ pieces of cork leather
- Hand quilting needle
- 1 FQ lining fabric, sub cut into
- (2) 6.5″ x 9.5″
- 1 FQ Solid fabric for the exterior, sub cut into
- (2) 6.5″ x 9.5″
- (2) 8″ x 11″ pieces of batting
- Binding Clips
- Turning tool (optional)
- Basting spray/safety pins
- Chalk marker or Hera marker
- Zipper foot, sewing machine
- Thread for piecing and basic sewing supplies
- Iron and pressing mat
Hand Quilt it!
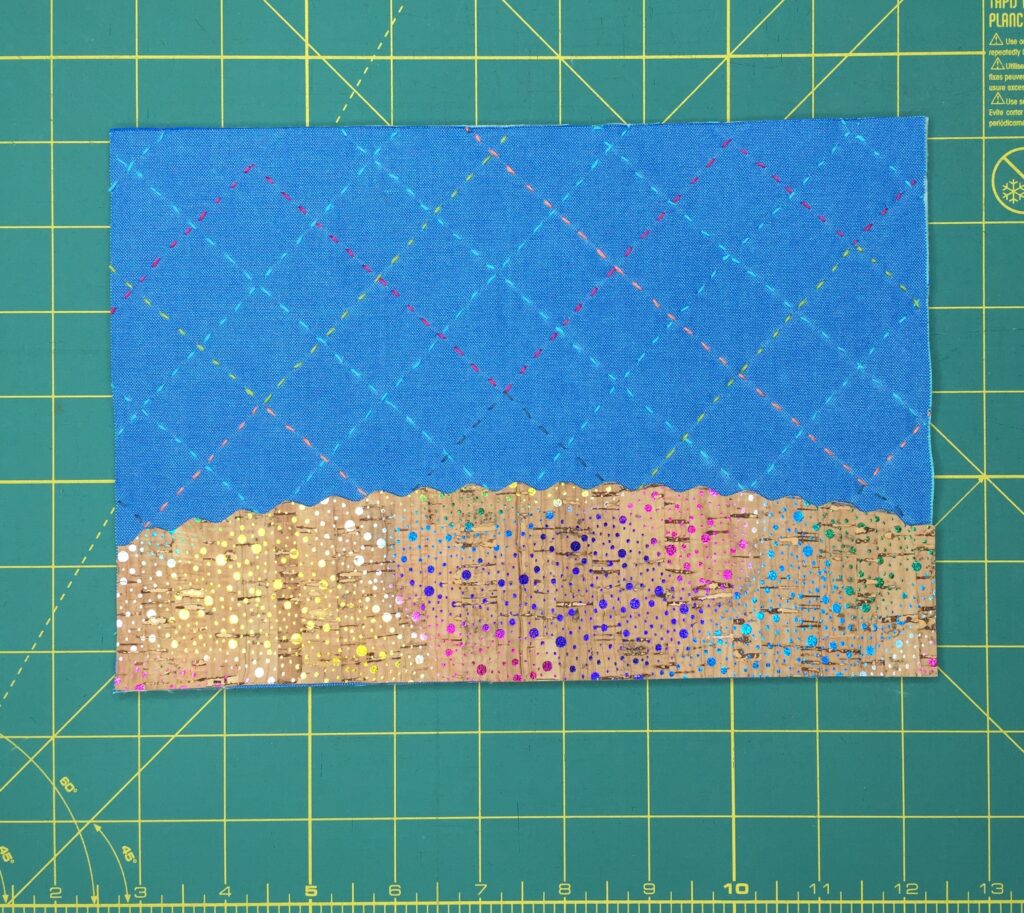
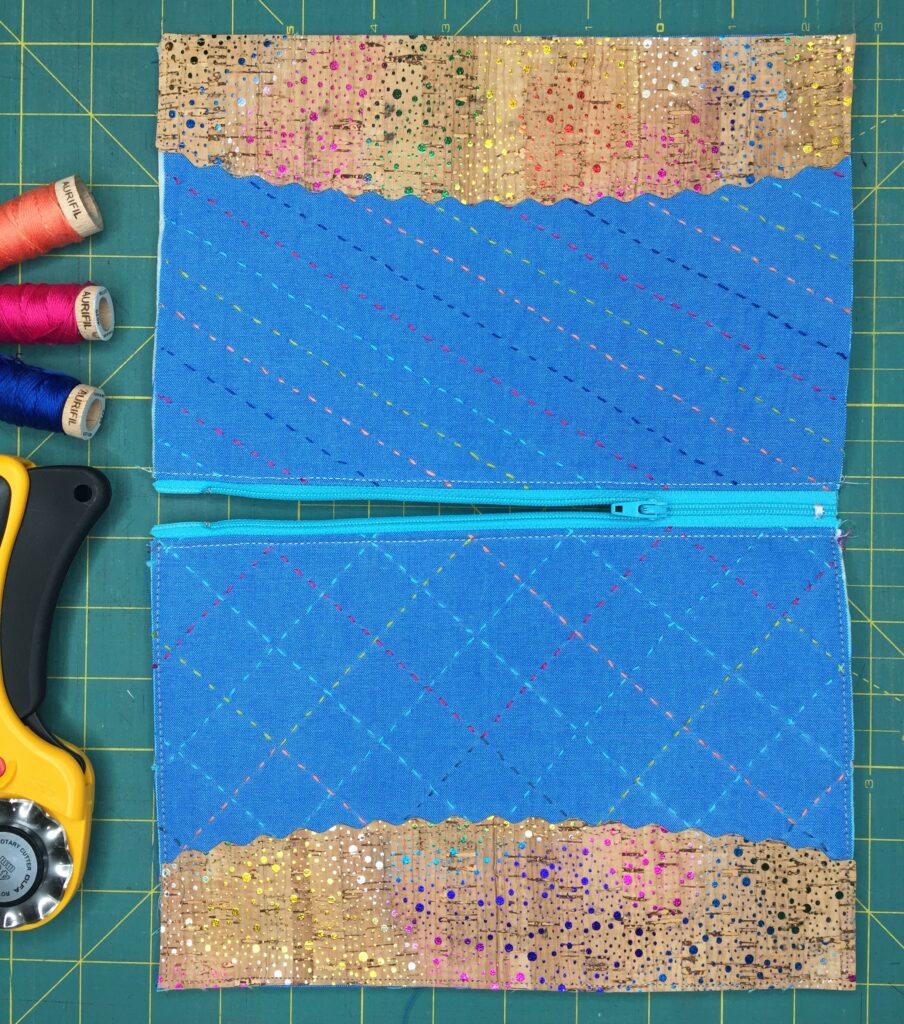
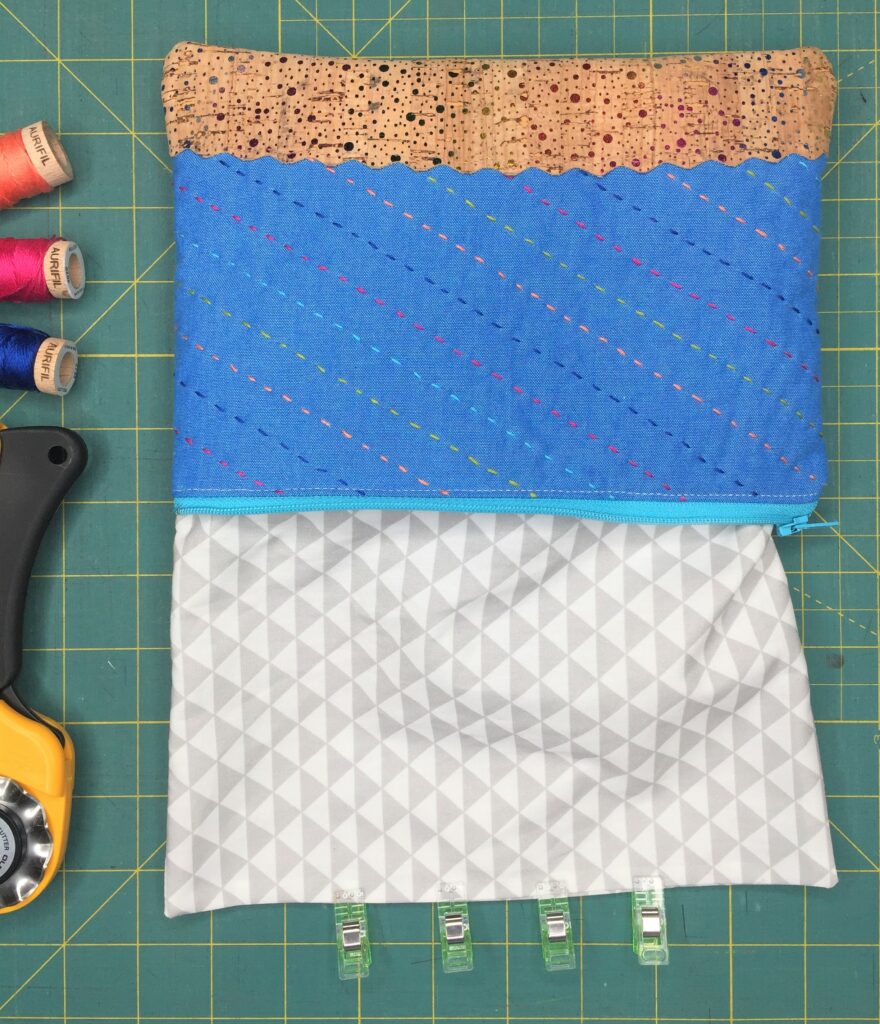
To begin, you’ll need to take the two exterior pieces of fabric cut at 6.5″ x 9.5″ and center each one on top of a piece of batting. Use a Hera marker or chalk pencil to mark your hand quilting lines, then hand quilt a pattern or random stitches onto each exterior piece. I like to make my stitches about 1/4″ in length, and spaced the same distance apart.

Grab your template:
Now you’ll take the cork pieces, and the bottom portion of the template printed from your supply list and line the template up along the bottom 9.5″ of the cork. Use a standard OLFA 45 mm Rotary blade to trim along the curved edge. I used my OLFA Ruby Rotary Cutter for this part. Once you’ve trimmed the curved portion, take the Wave Rotary blade and trim just along the curved edge to leave a cute wavy edge.
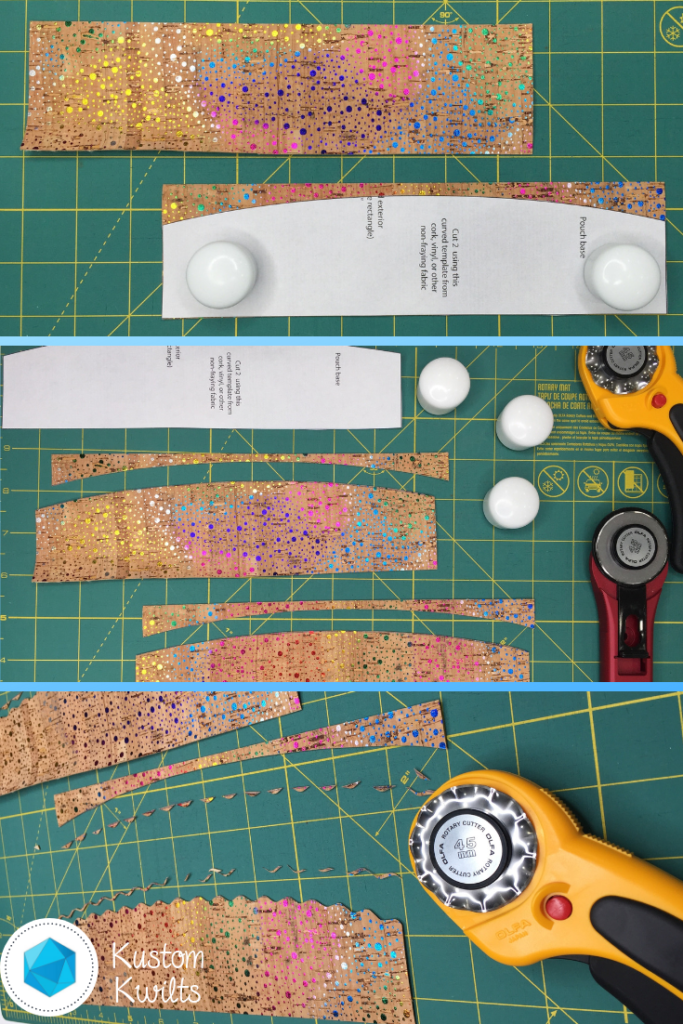
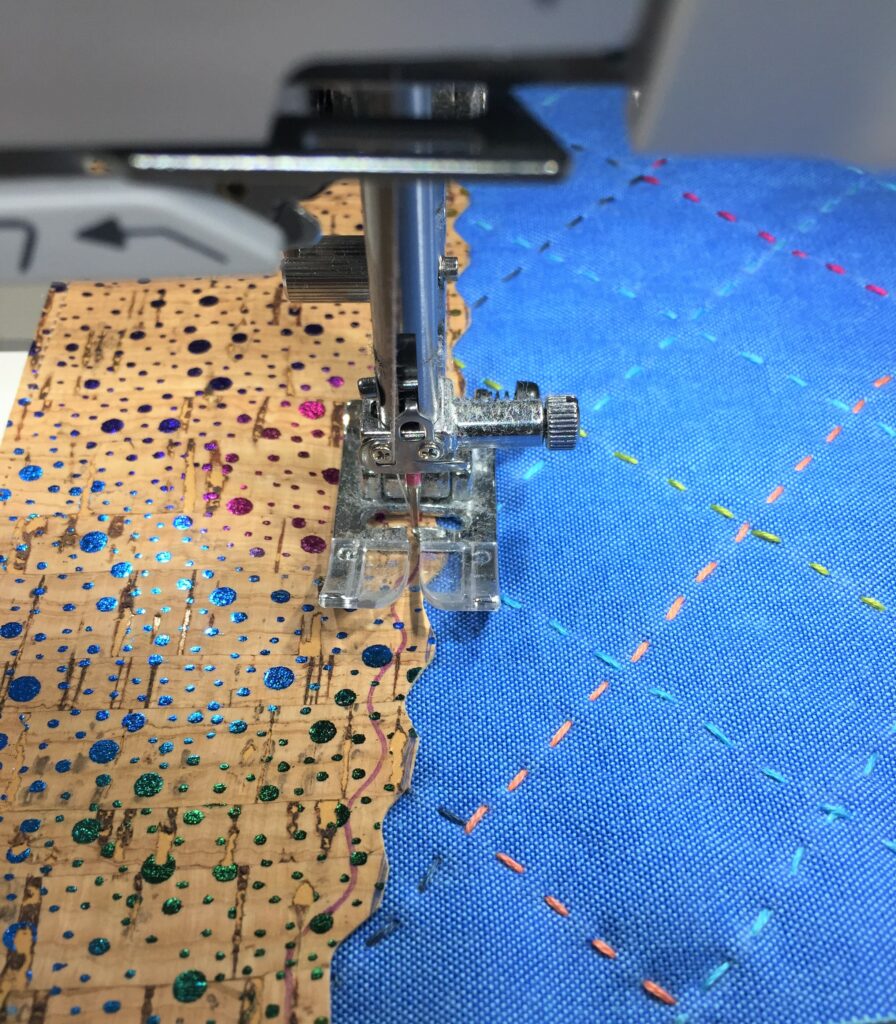
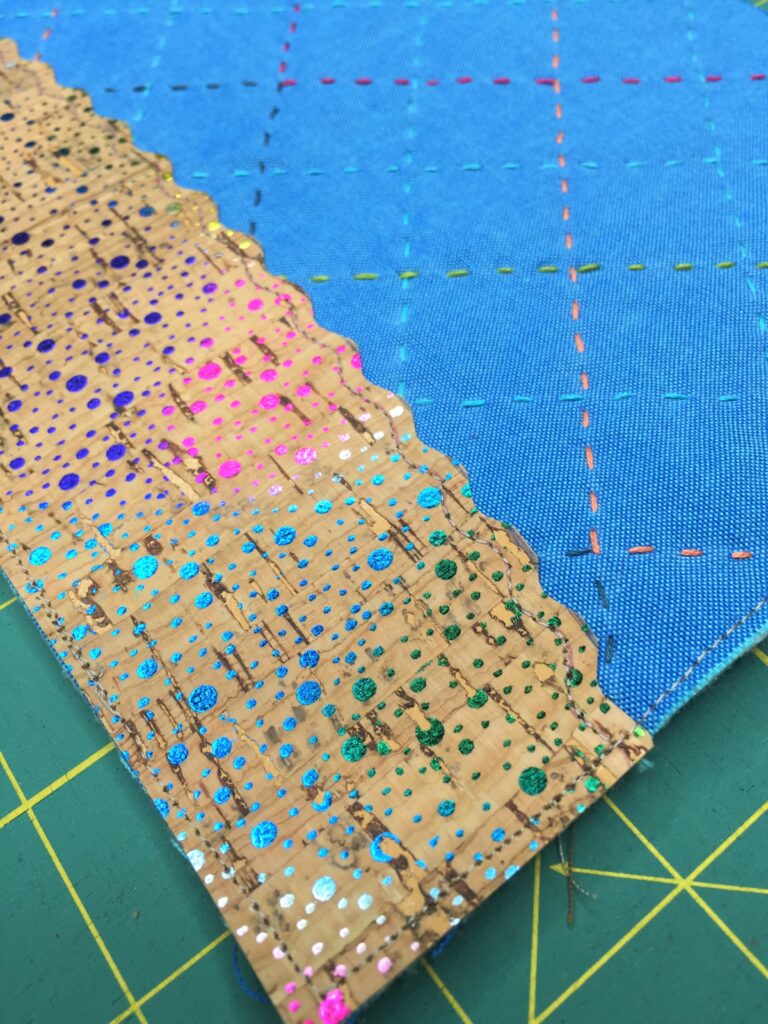
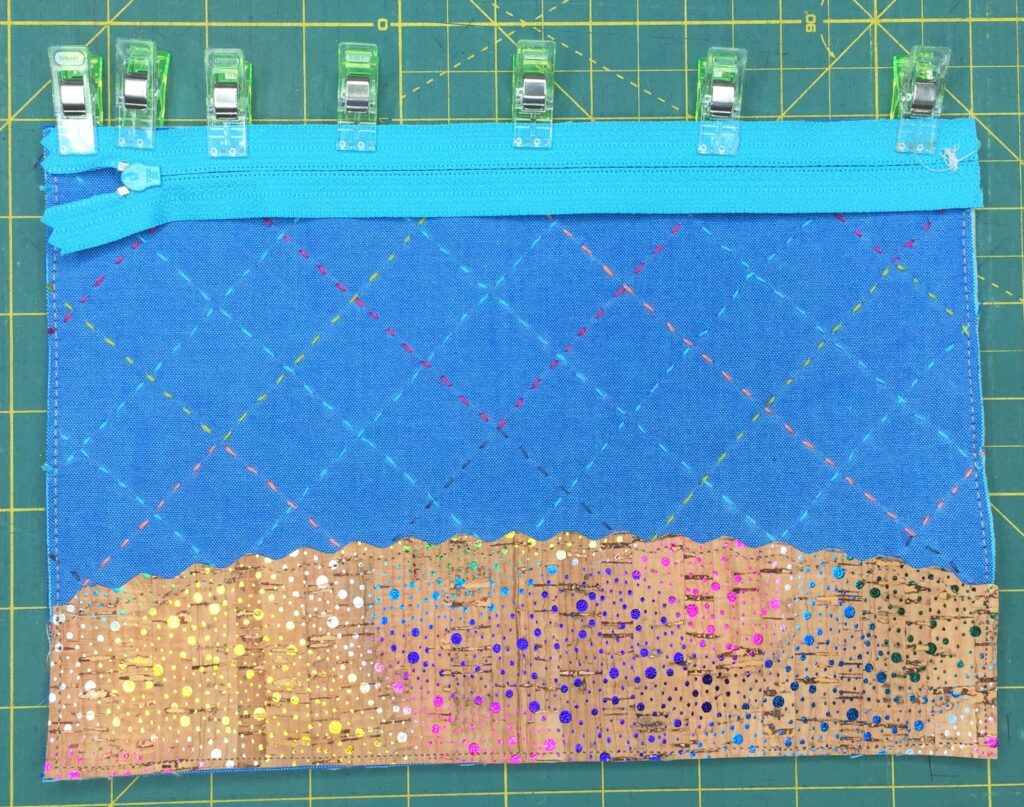
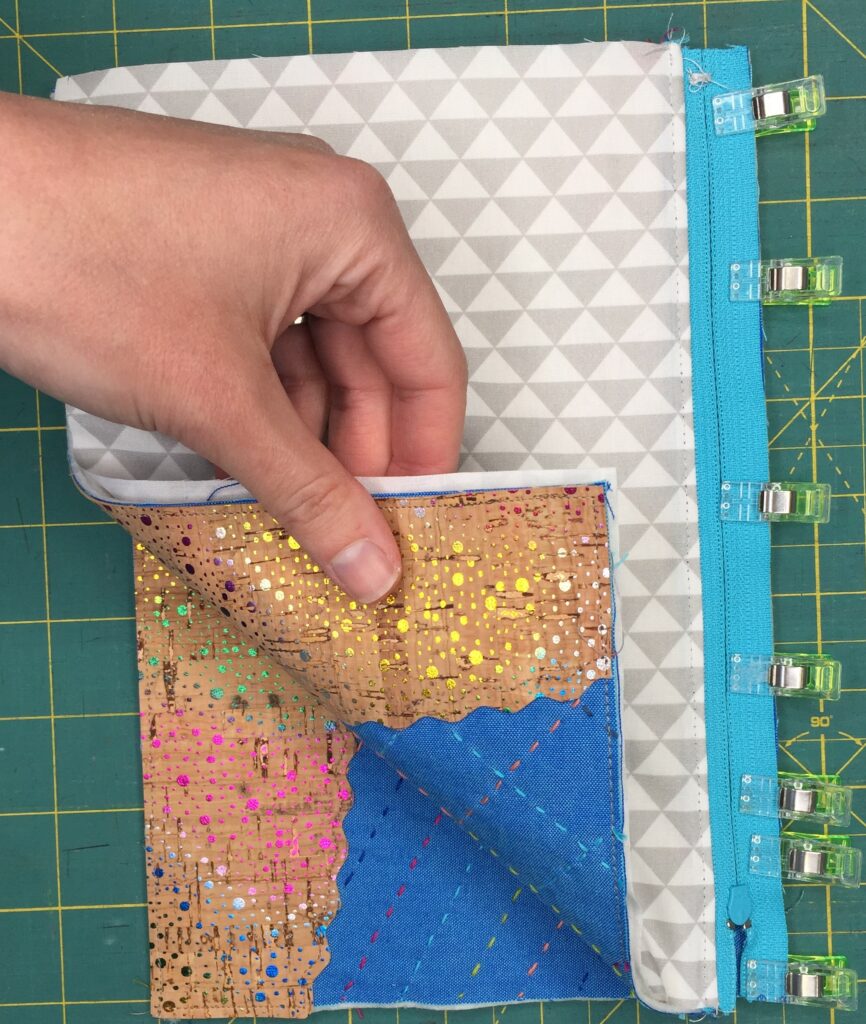
Take one of the quilted exterior pieces and place the decorative cork on the bottom 9.5″ edge. Use clips to hold in place, or use some wash away hem tape to secure. At this point, I like to take an air erasable marker and echo the line of the wave just below the wavy edge of the cork – about 1/8″ from the curvy edge – as a stitching guide. Take this piece to the sewing machine and topstitch along the guideline you drew with a coordinating thread. Then stitch around the remaining edges of the cork, about 1/8″ away from the raw edge to secure it in place. Don’t worry — the cork won’t fray, so it’s great for special decorative finishes with the OLFA rotary cutter!
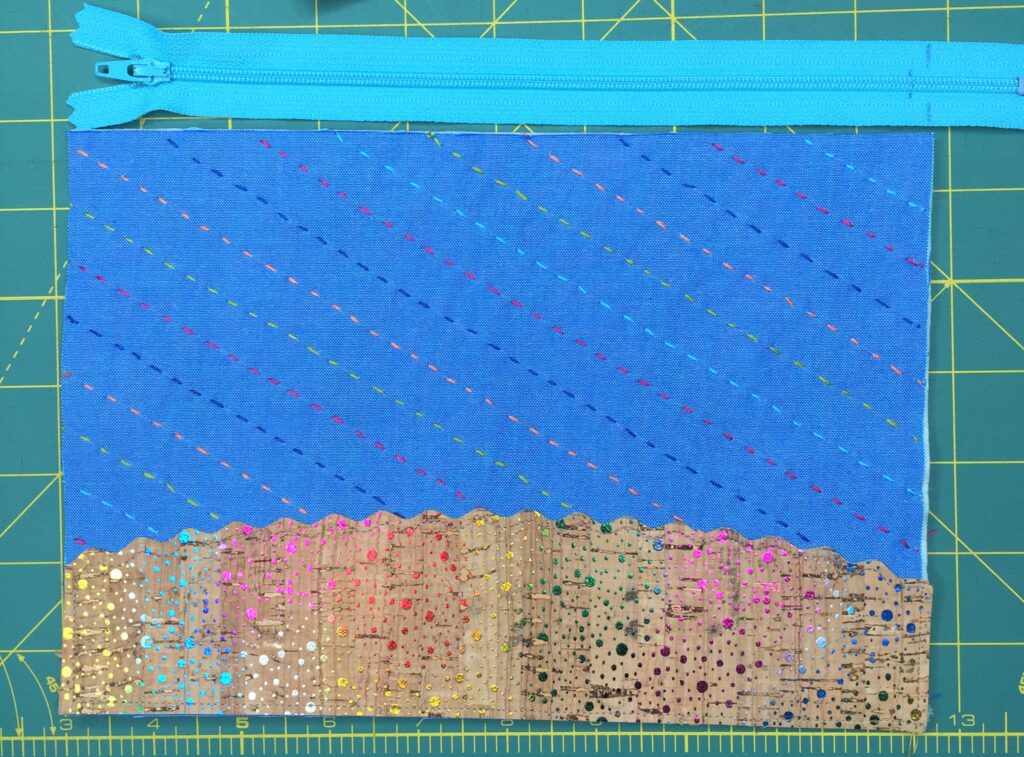
Take your zipper and place it lined up with the top edge of one exterior, as shown in the picture below. Mark the end of the zipper (the end with the metal stopper) where it meets the end of the right side of the fabric, then mark about 1/4″ in from that mark as well. Take the zipper to the sewing machine and use a zig zag stitch to sew a new zipper stop on the mark furthest in. Trim away the rest of the zipper on the outermost mark.
Install the zipper
I opted to quilt each exterior a little differently 🙂

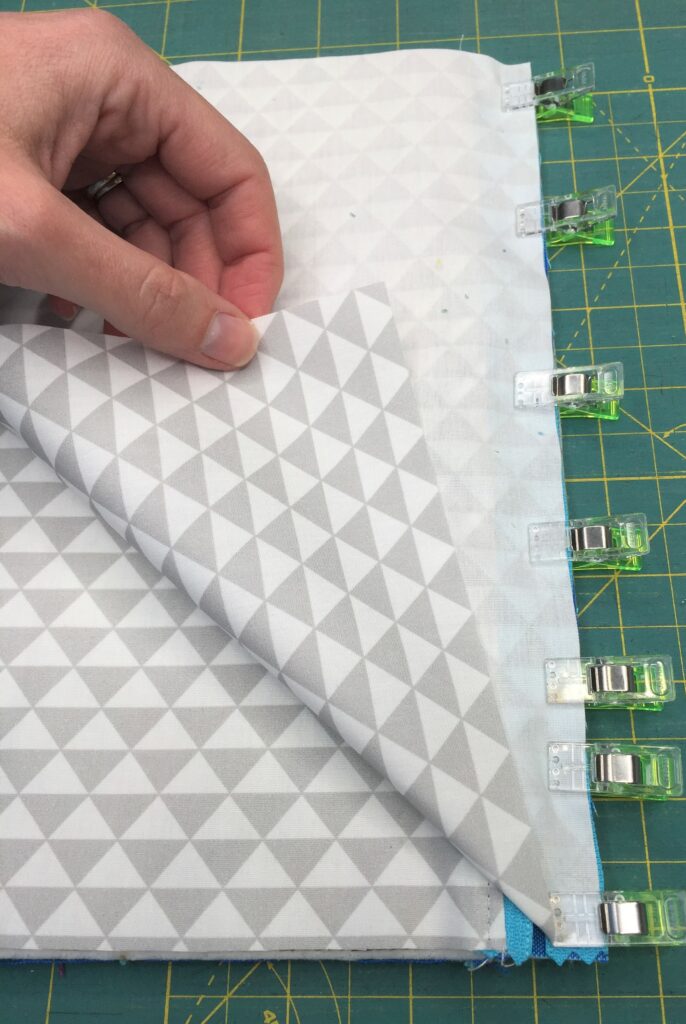
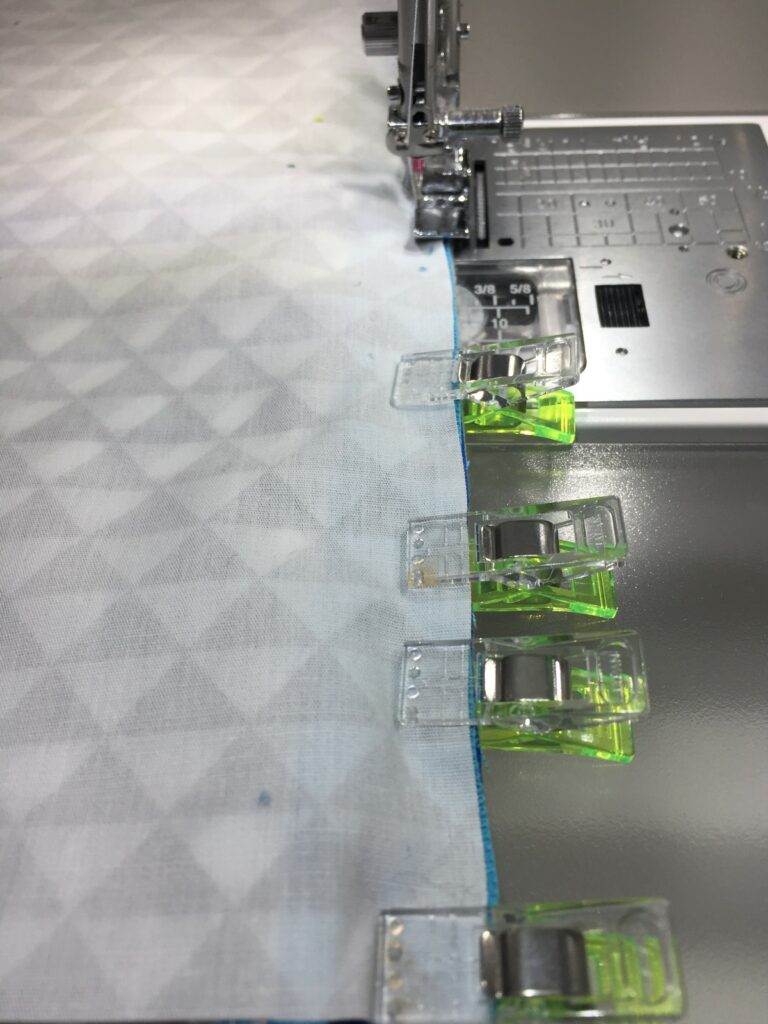
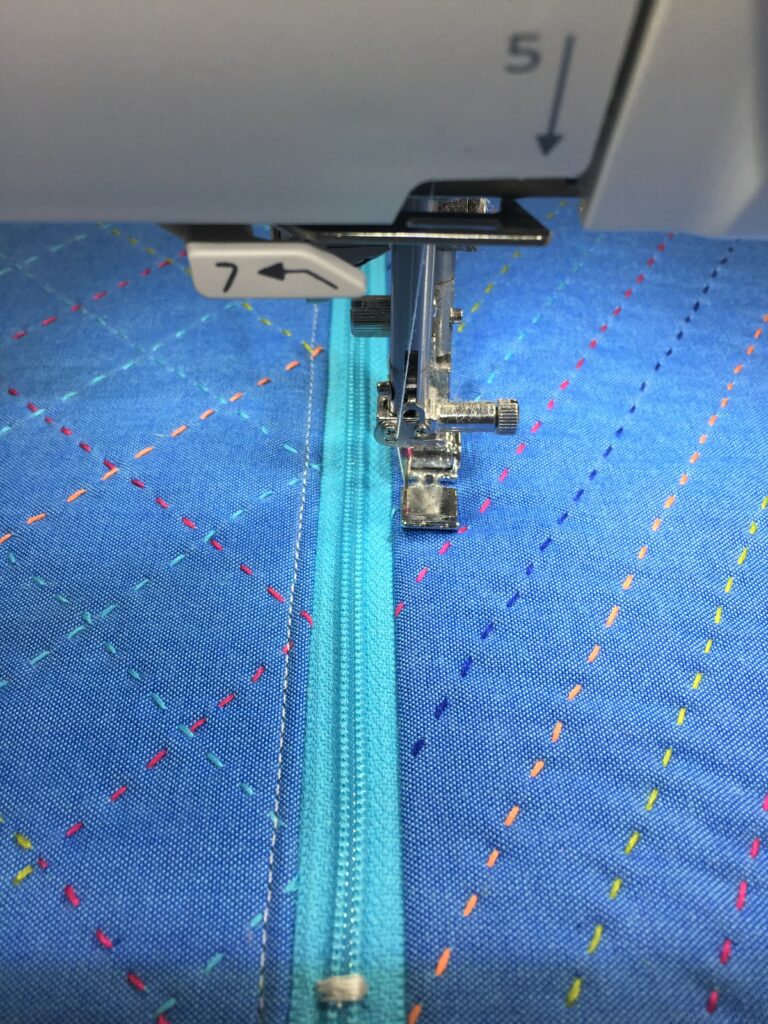
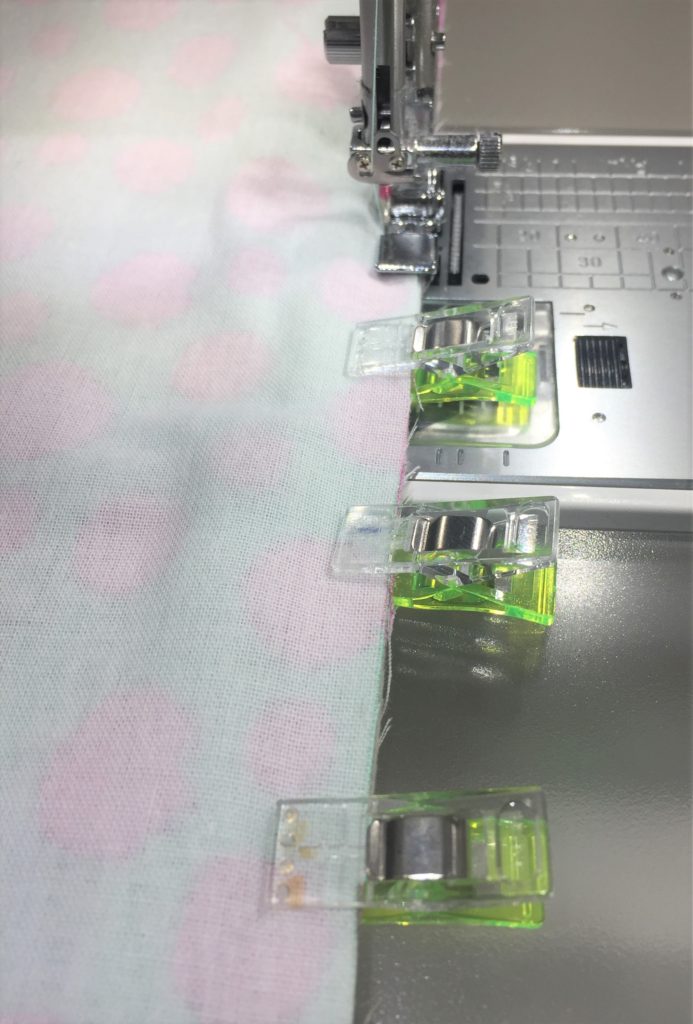
Take the newly trimmed down zipper and place it RSD on top of one side of the hand quilted exterior. Use binding clips to clip the zipper in place. Take one of the lining pieces and place it RSD on top of the zipper, the replace the clips to include all three layers. Use a zipper foot to sew through the three layers with a 1/4″ seam allowance, beginning at one end of the fabric and sewing to the opposite end, all the way to the edge of the fabric.
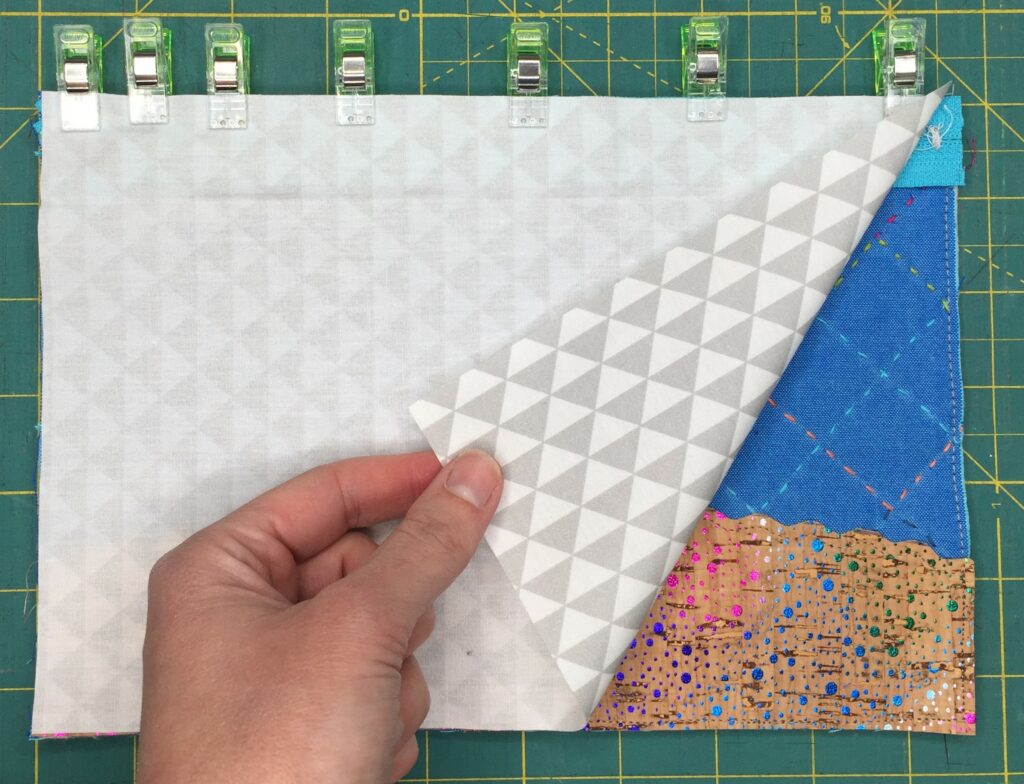
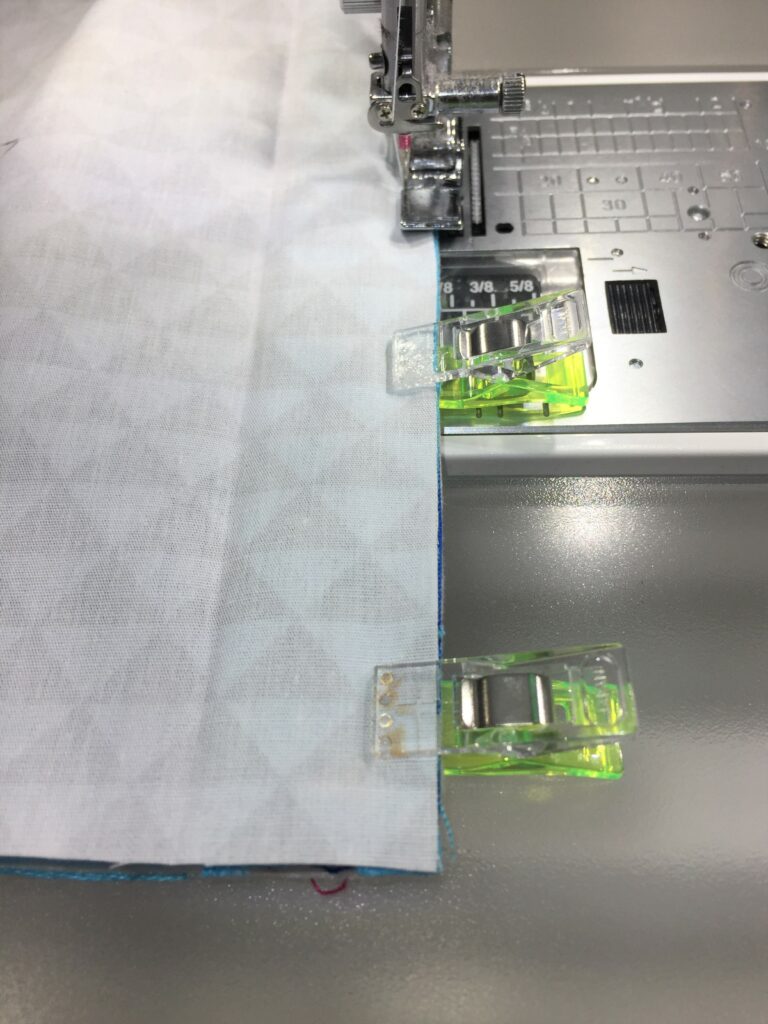
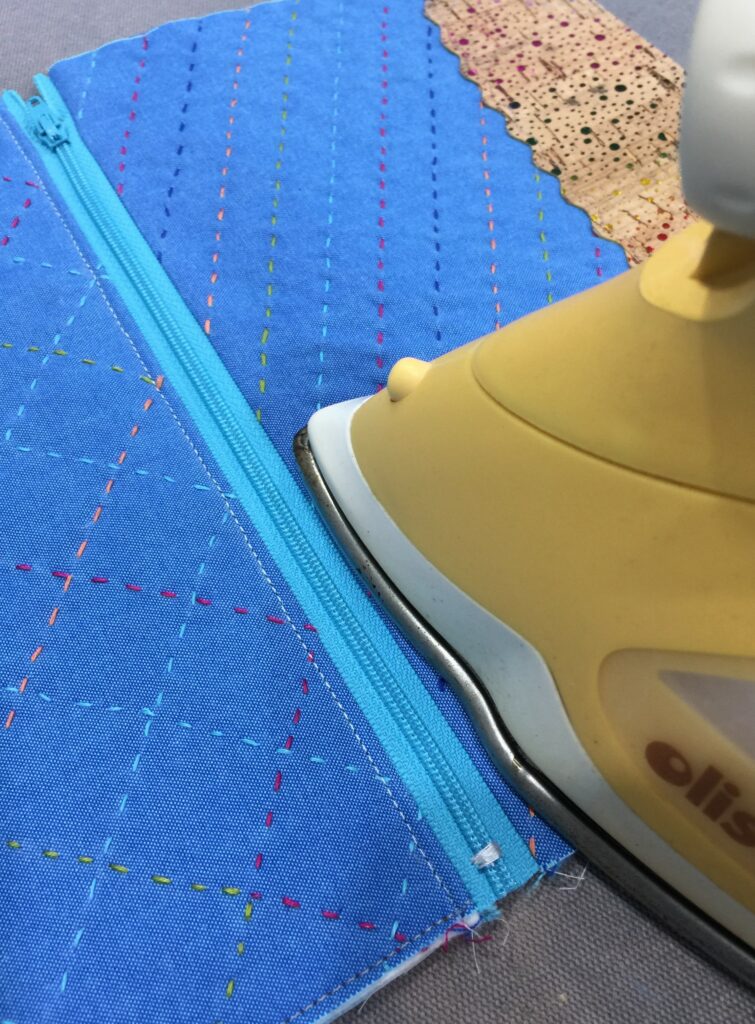
Press the lining and exterior away from the zipper with your iron, and topstitch 1/8″ away from the folded edge of the fabric.
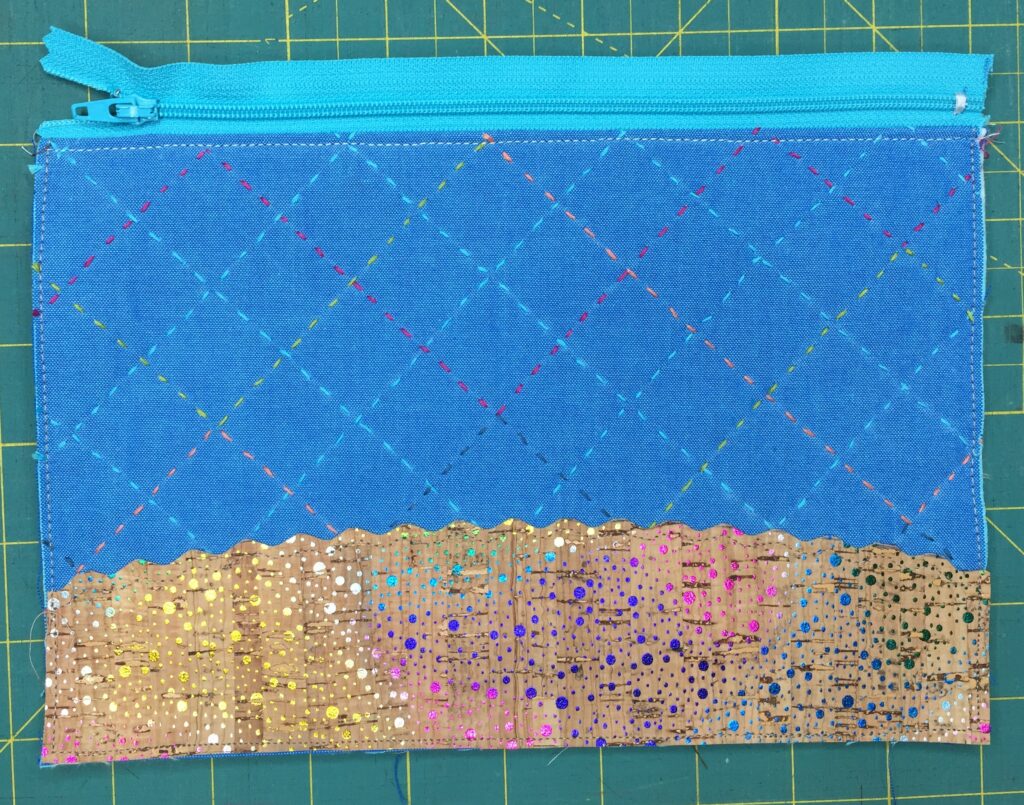
Repeat the steps above with the remaining exterior and lining pieces.
Assembling the zip pouch
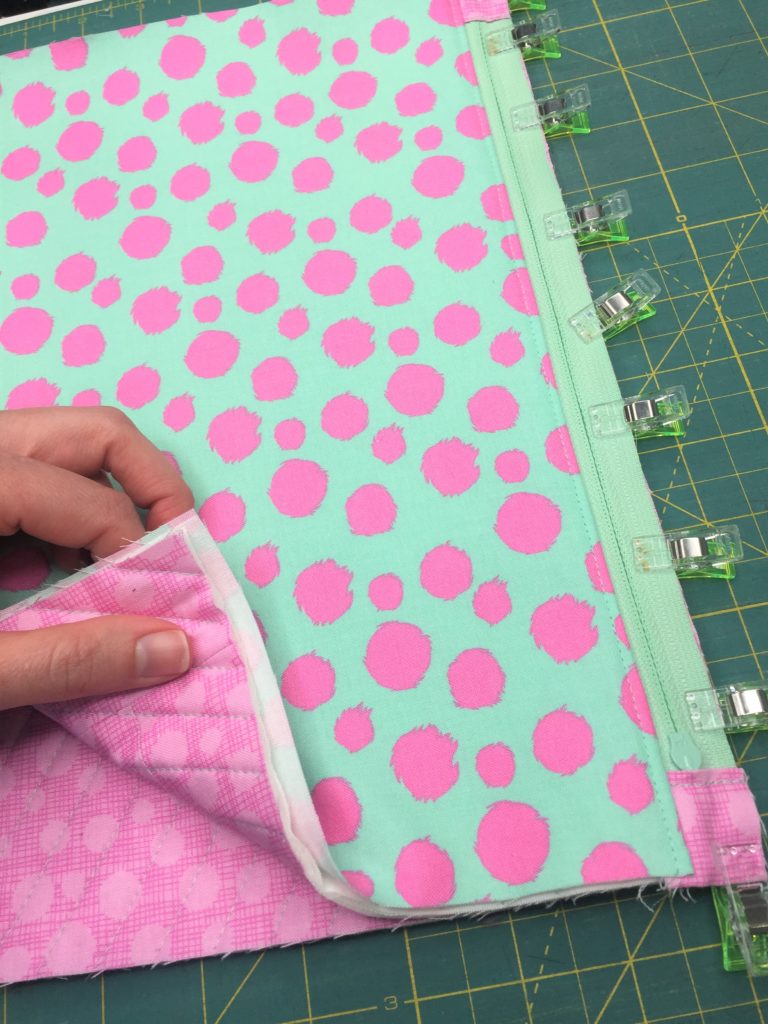
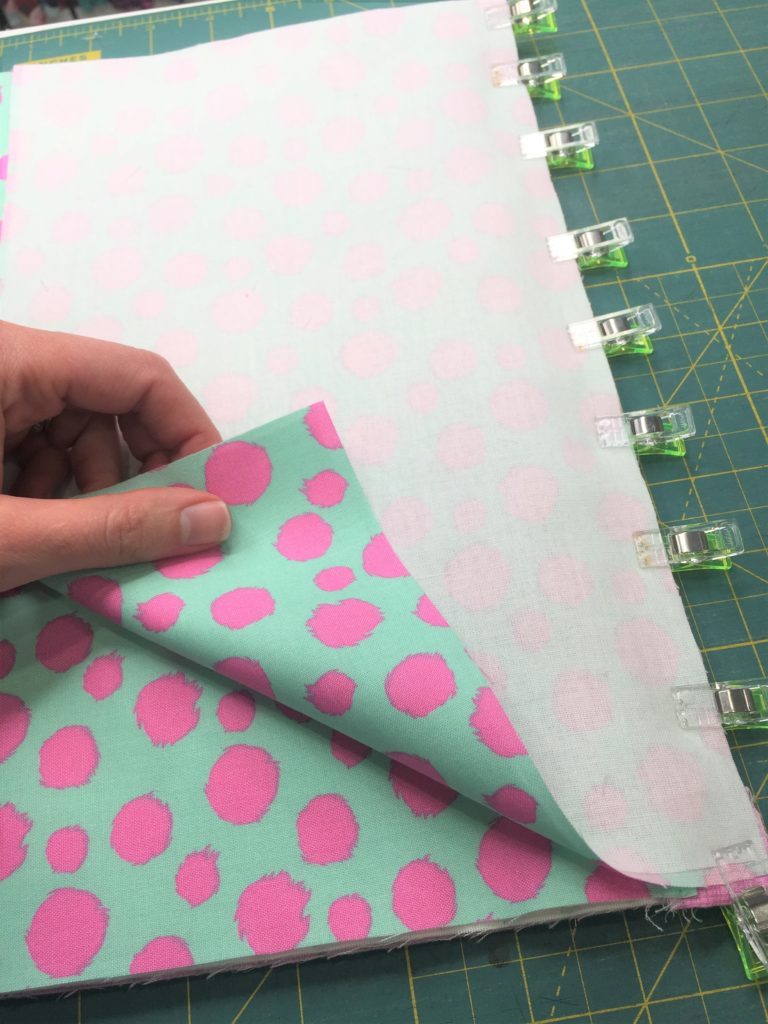
Open the zipper part way, then match the exteriors, placing them right sides together. Pull the linings together and match them, right sides together. Pin or clip in place, and mark about a 5″ opening along the bottom center of the lining to leave open in the next step. Pull the zipper pieces towards the lining, as shown below.
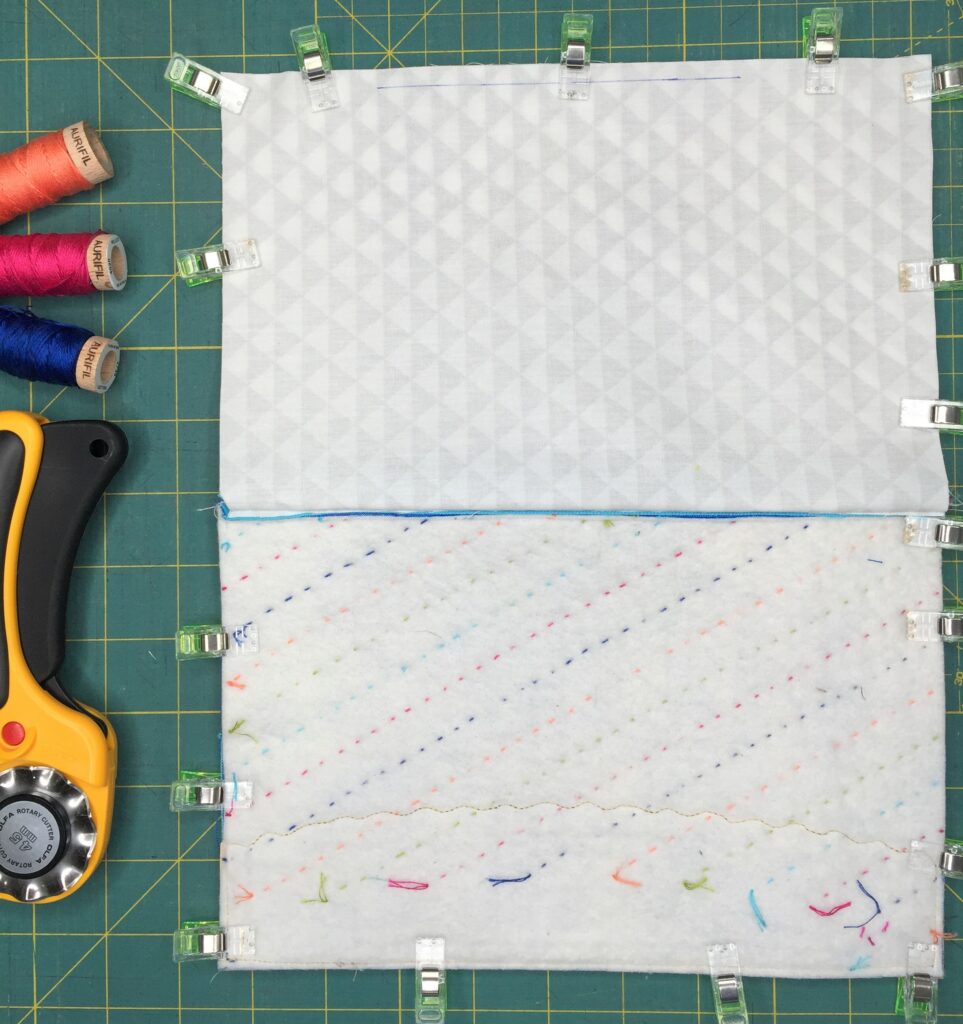
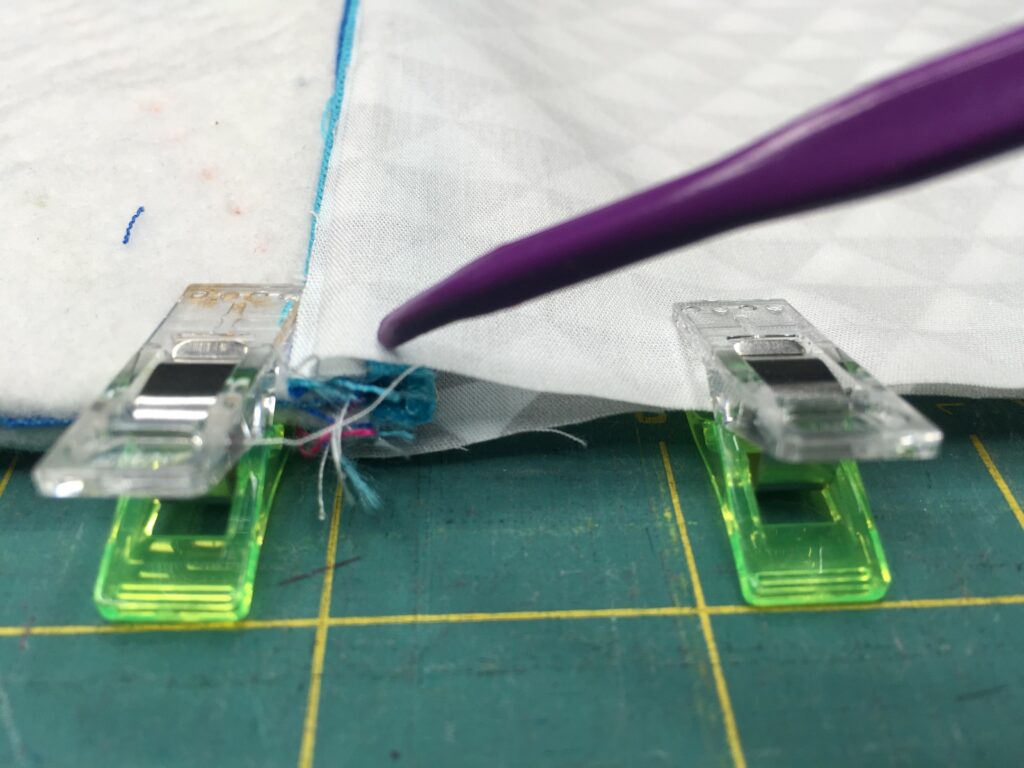
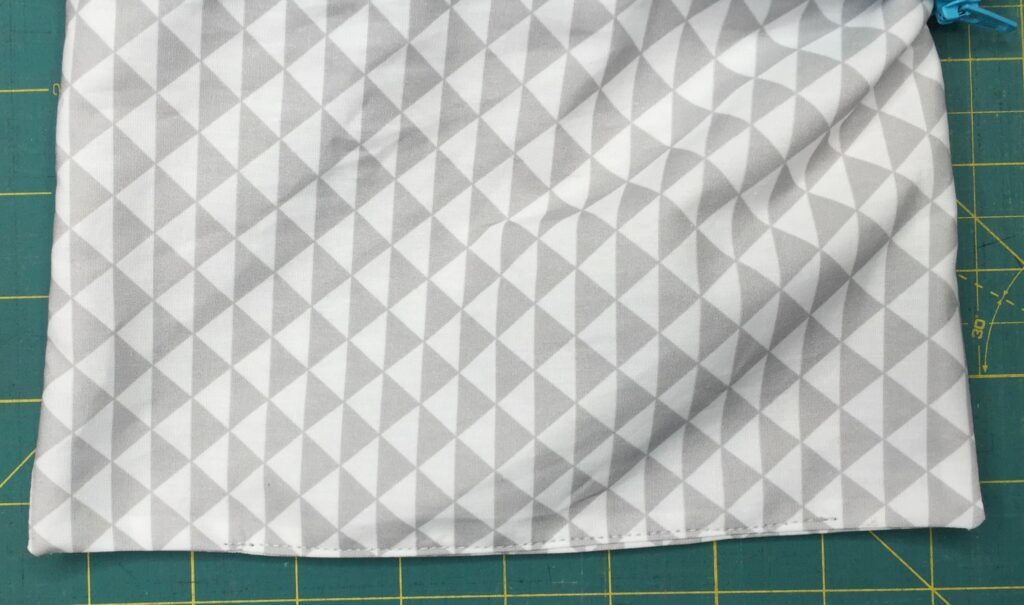
Sew all the way around the perimeter of the zipper pouch, leaving the 5″ opening unsewn. Clip the corners for crisp turning. Turn the zipper pouch right side out through the opening in the lining. You can use a turning tool for crisper turning, if needed. Fold the opening of the lining in 1/4″ and press. Clip in place. Topstitch the opening closed, then push the lining down inside the pouch.
And you’re done! Fill this pretty pouch up with all the sewing things you need on the go 🙂
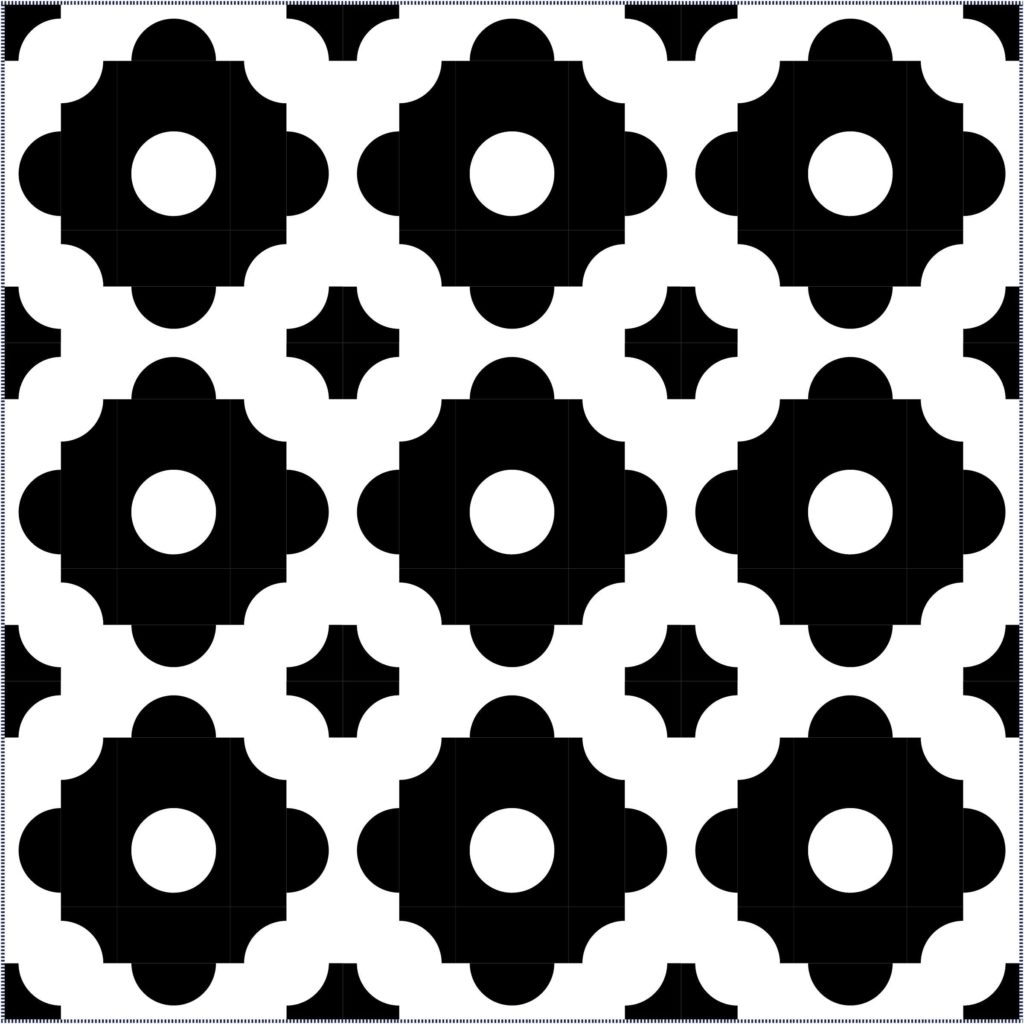
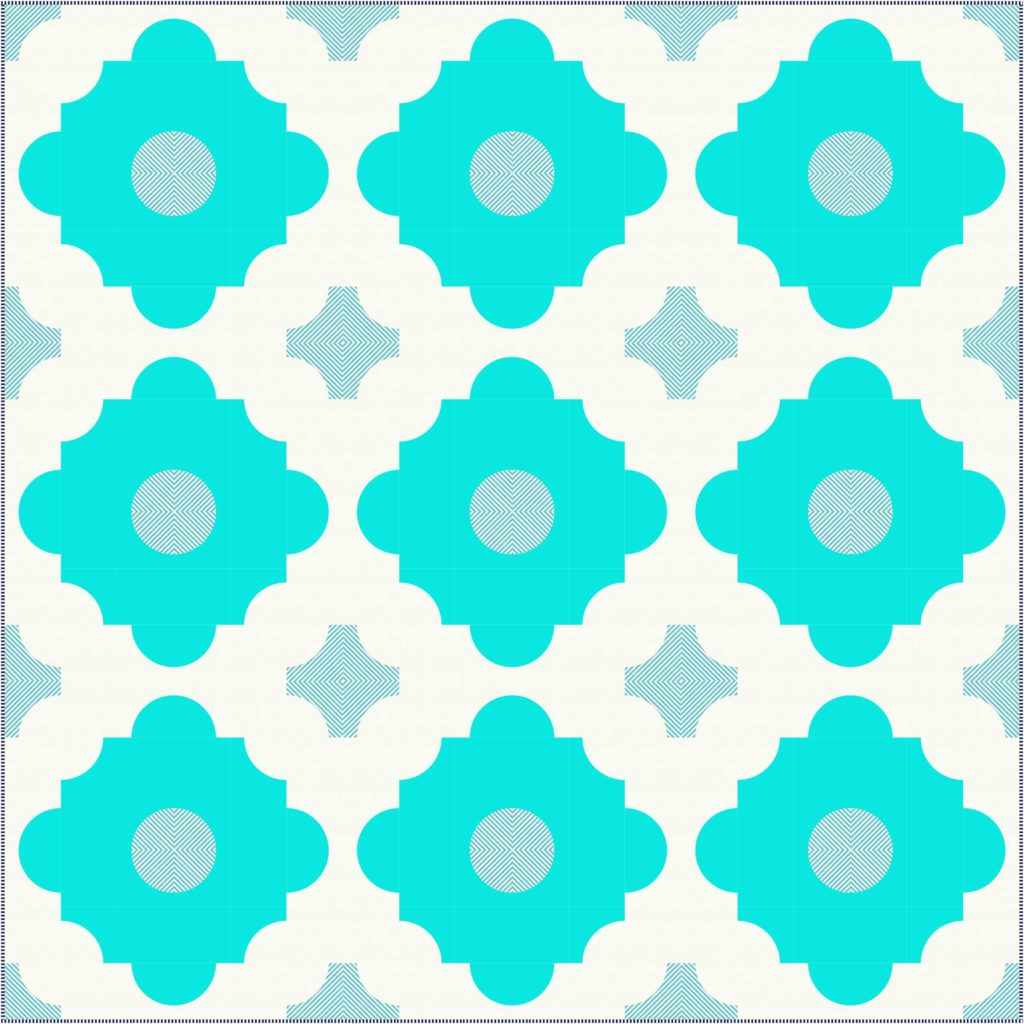
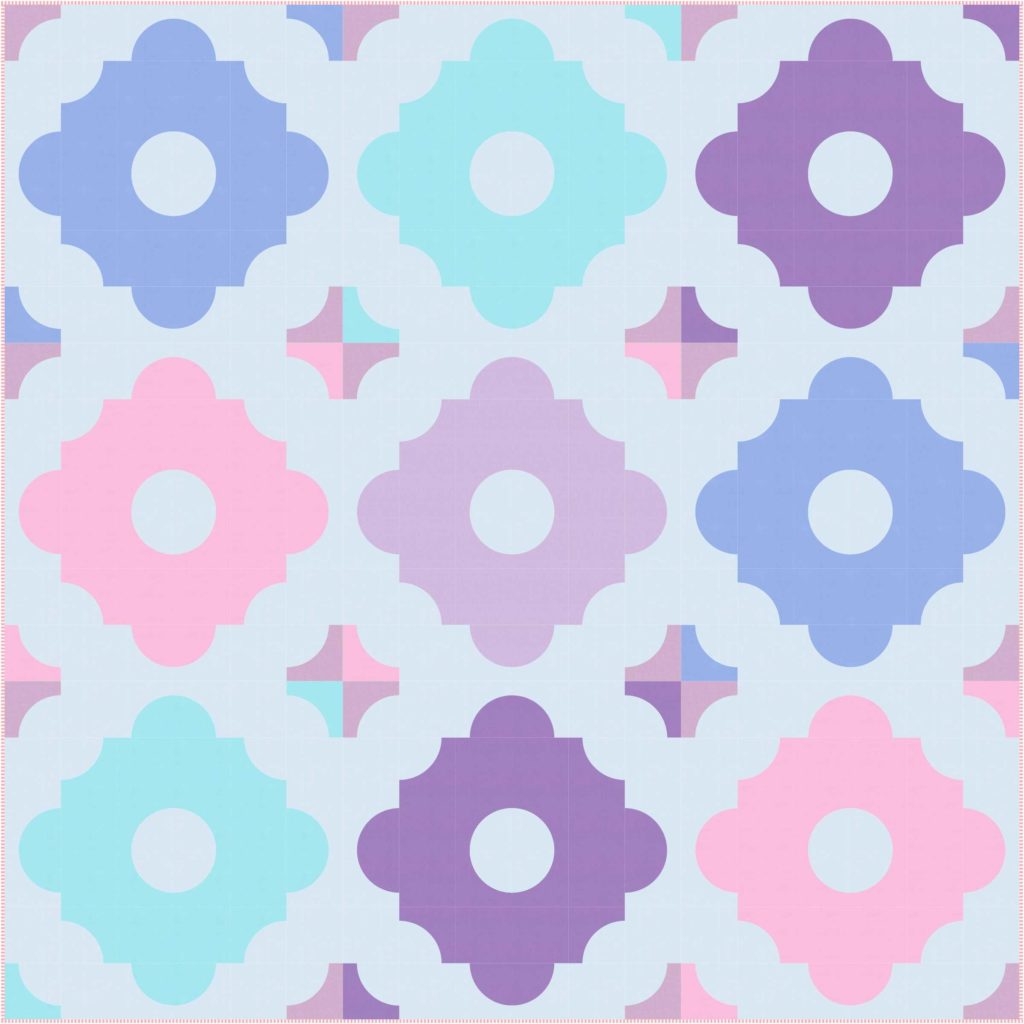
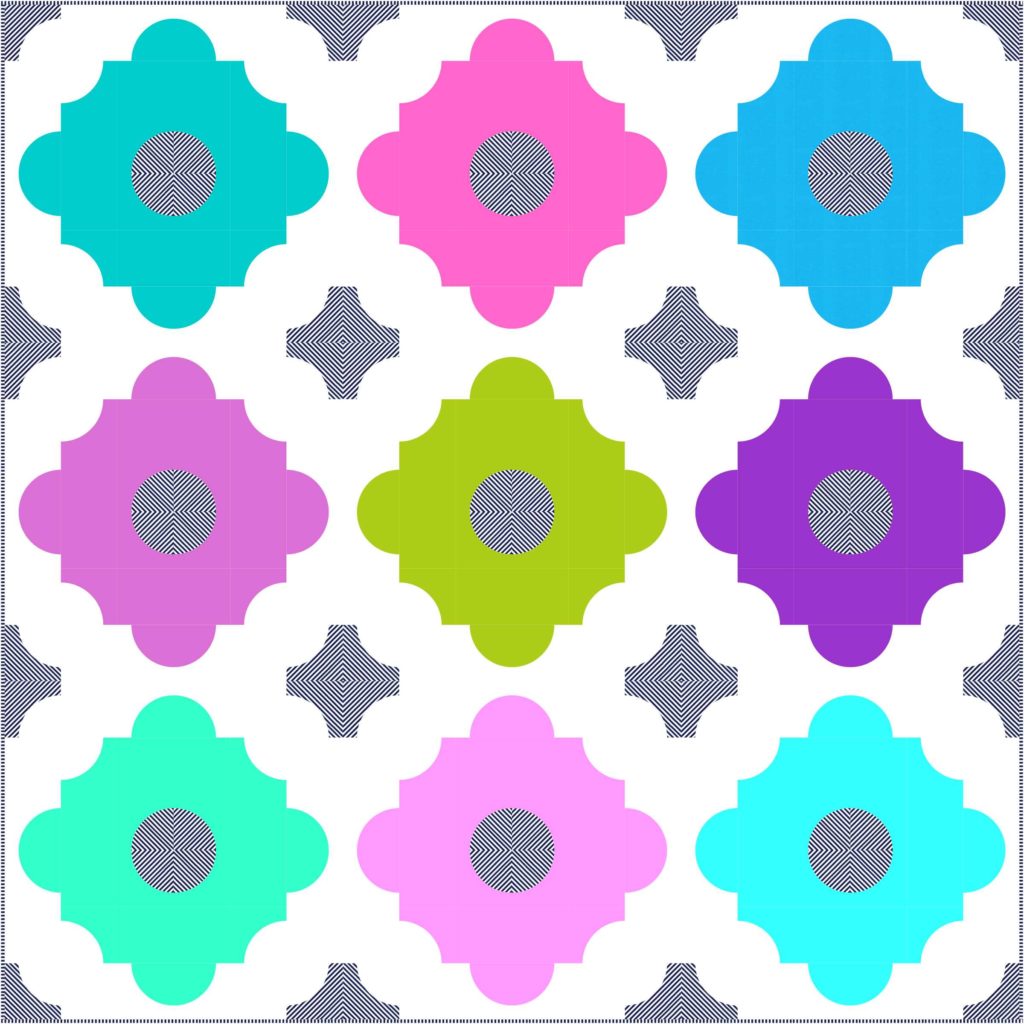
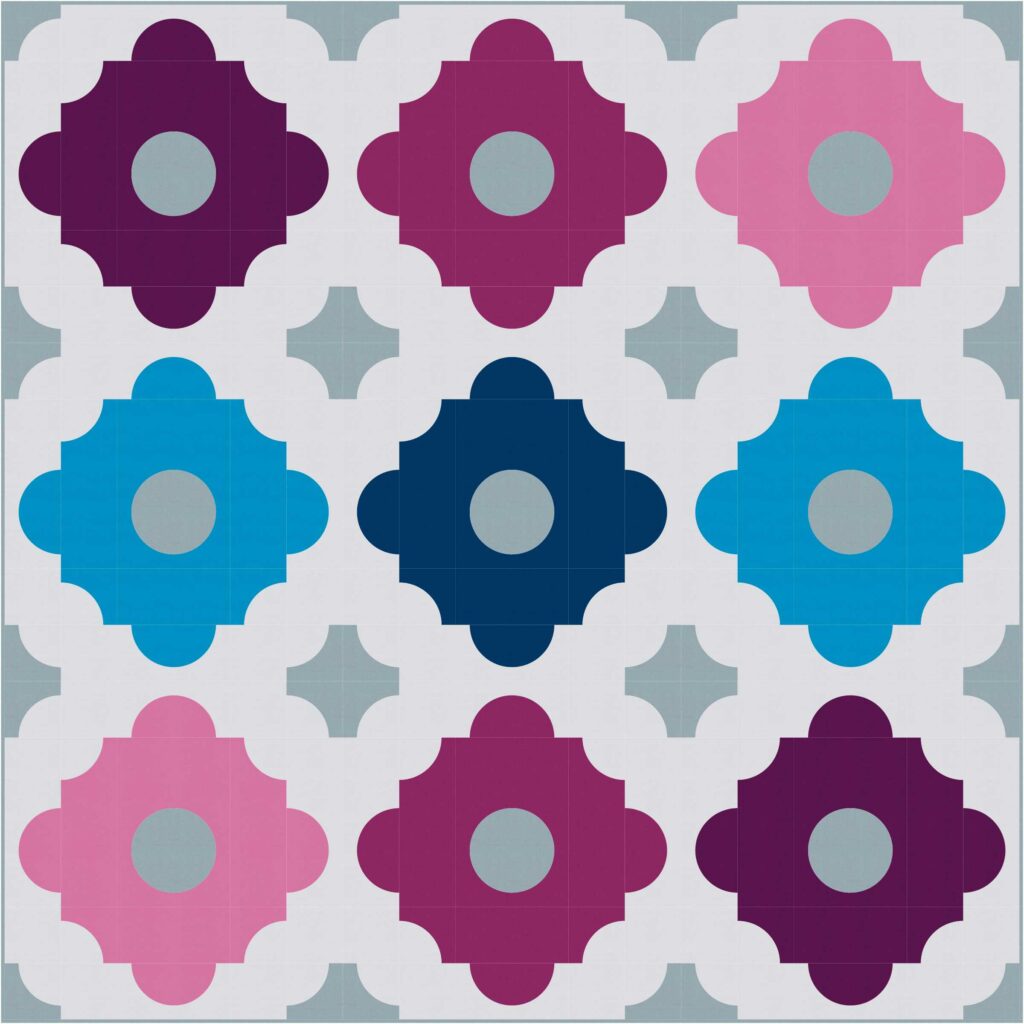
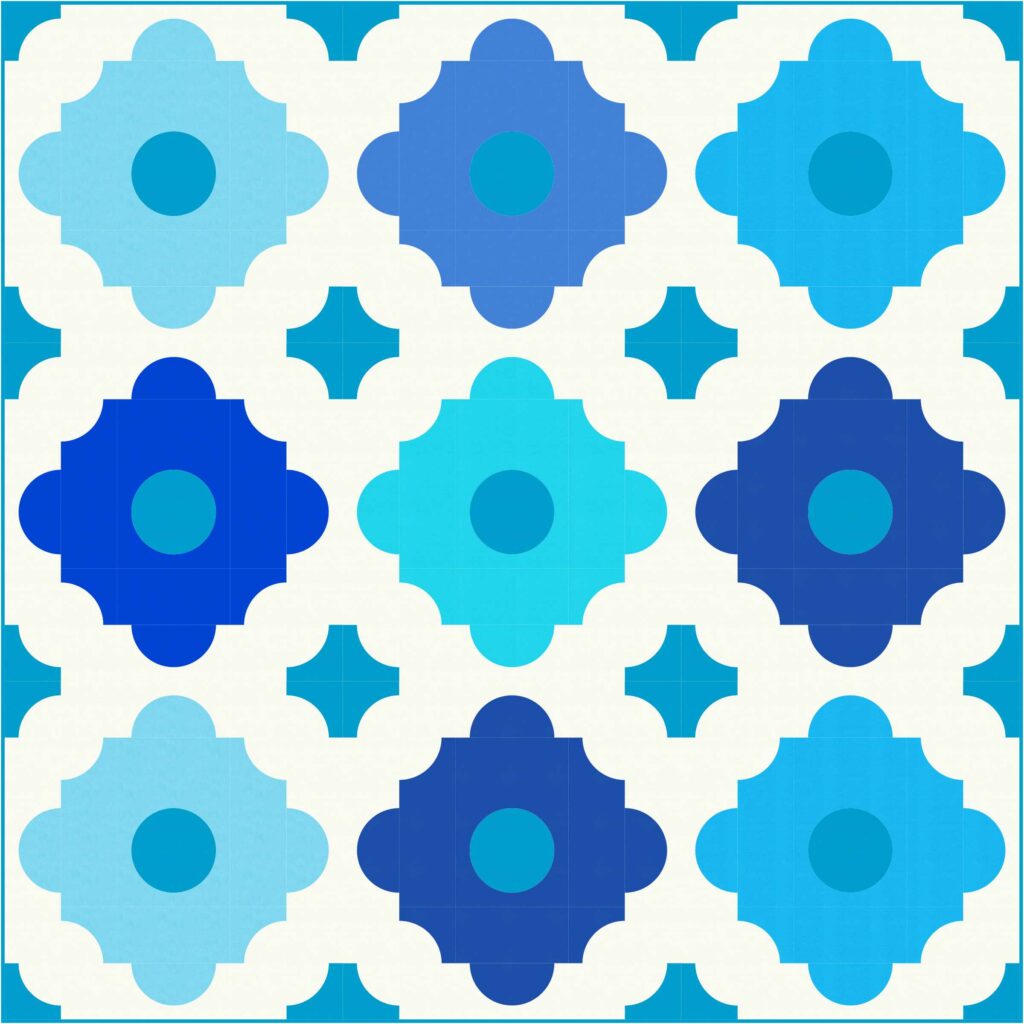
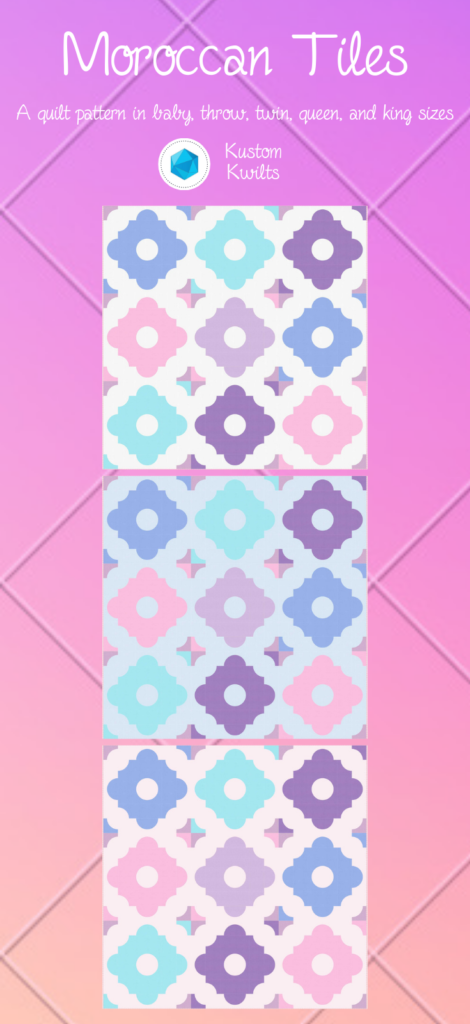
Moroccan Tiles PDF Quilt Pattern Release
You guys! Today is the day for the Moroccan Tiles Quilt Pattern release!!! I don’t know if I’ve ever been as excited about a quilt pattern as I am about this one. I’m hoping to have all the beds in our house decked out with this quilt be the end of the year!
The Moroccan Tiles PDF Quilt Pattern includes these features:
- Clear instructions and fabric requirements for baby, throw, twin, queen, and king quilt sizes
- Coloring page to help plan your quilt
- Step-by-step instructions with pictures to guide you through
- Instructional videos for piecing curves and using the templates
- Instructions and diagrams for piecing quilt backs for all sizes
- Pattern includes printable templates for easy cutting
- The option to purchase acrylic templates separately
I designed this quilt when I was pregnant with our little girl, Gemma. It’s been a labor of love for me and I can’t even tell you how many colorways I went through. Sometimes I dream that there are 40 hours in a day so I could make each and every one (hey, I can dream, right?).
Moroccan Tiles is a modern quilt using straight lines and curves to create a tile-work quilt with a big impact. I love how much the quilt changes when you alter the colors, or fussy cut some stripes to play with the pattern. This pattern is for confident beginners to intermediate sewists, due to the curves in the quilt. Okay, I know I might have sent you running for the hills when I threw in that word “curves”, but I hope you won’t let that scare you away from making your own Moroccan Tiles! I’ve made several videos to go with this pattern to help you on your curve-sewing journey (the link to each video is in the pattern). You can take a peek HERE. There are 5 different videos to offer any extra assistance you might need if you’re a beginner (you can still watch them if you’re not a beginner 😉
Video previews
Since there are curves in this quilt, the pattern includes paper templates you can print with it. If that isn’t your jam, you can purchase acrylic templates for the quilt here (they’ll ship mid-March). If you’ve never used acrylic templates before, I’ve got a video to show you how:
And if you plan on fussy cutting your fabrics for your quilt, it will be easier to do so with the Acrylic Templates. The templates are transparent, so you can easily see where you’re cutting the print you want to stand out. The stripes on the Moroccan Tiles quilt pictured above were fussy cut (fussy cut means to cut the fabric with intention, being mindful of the orientation of the print). I can help with fussy cutting if you’ve never done that before–in this video:
And then I’ve got a couple of other videos to help you with the basics of sewing curves. If you click on the first video in this post, it will link to the entire playlist and show you all 5 videos that accompany this pattern. I think you’ll find them very helpful, and if you still have questions, you can always ask!
I’ve made up a couple of different colorways that I really love, and if you need some extra inspiration, you can check them out:
The Moroccan Tiles quilt pattern and acrylic templates (along with all other quilt patterns in my shop) will be on sale from February 28, 2019 through March 7, 2019, and the acrylic templates will ship mid-March. I can’t wait to see your Moroccan Tiles quilt, and I hope you’ll share with me via email or using the hashtag #moroccantilesquilt

Happy sewing, friends!!!
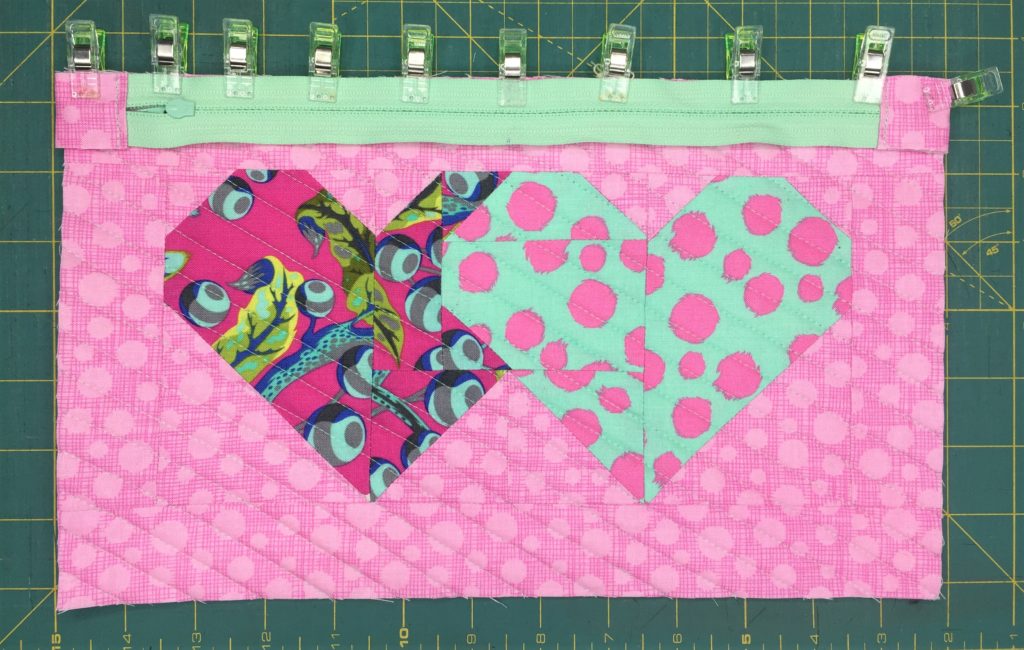
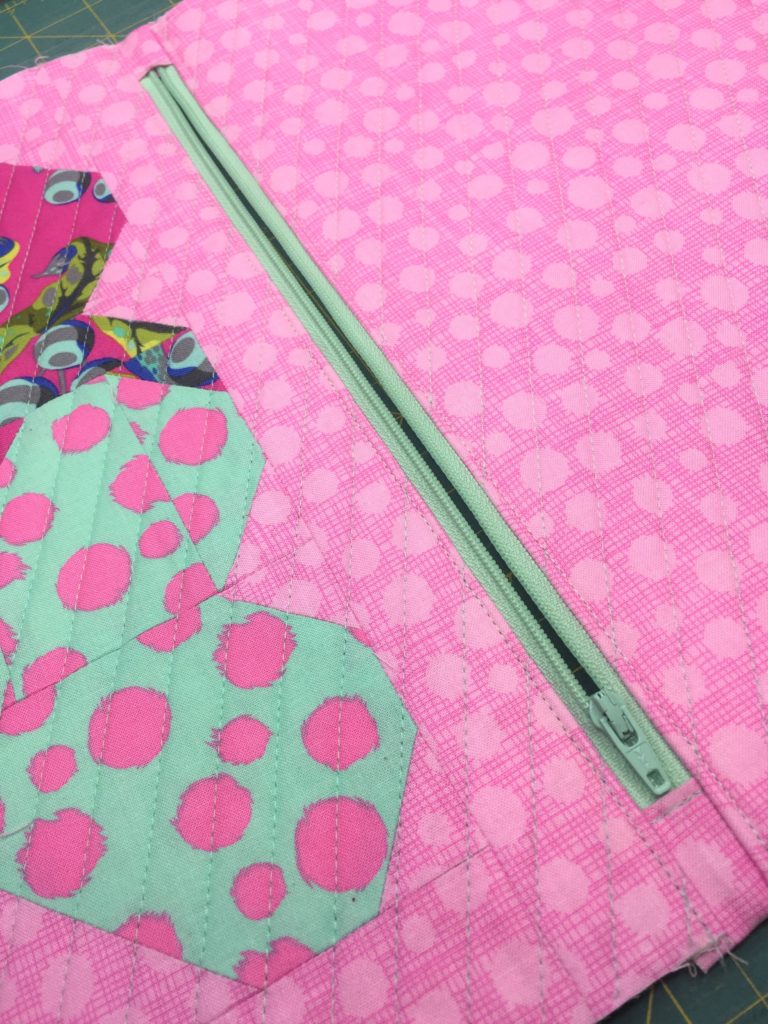
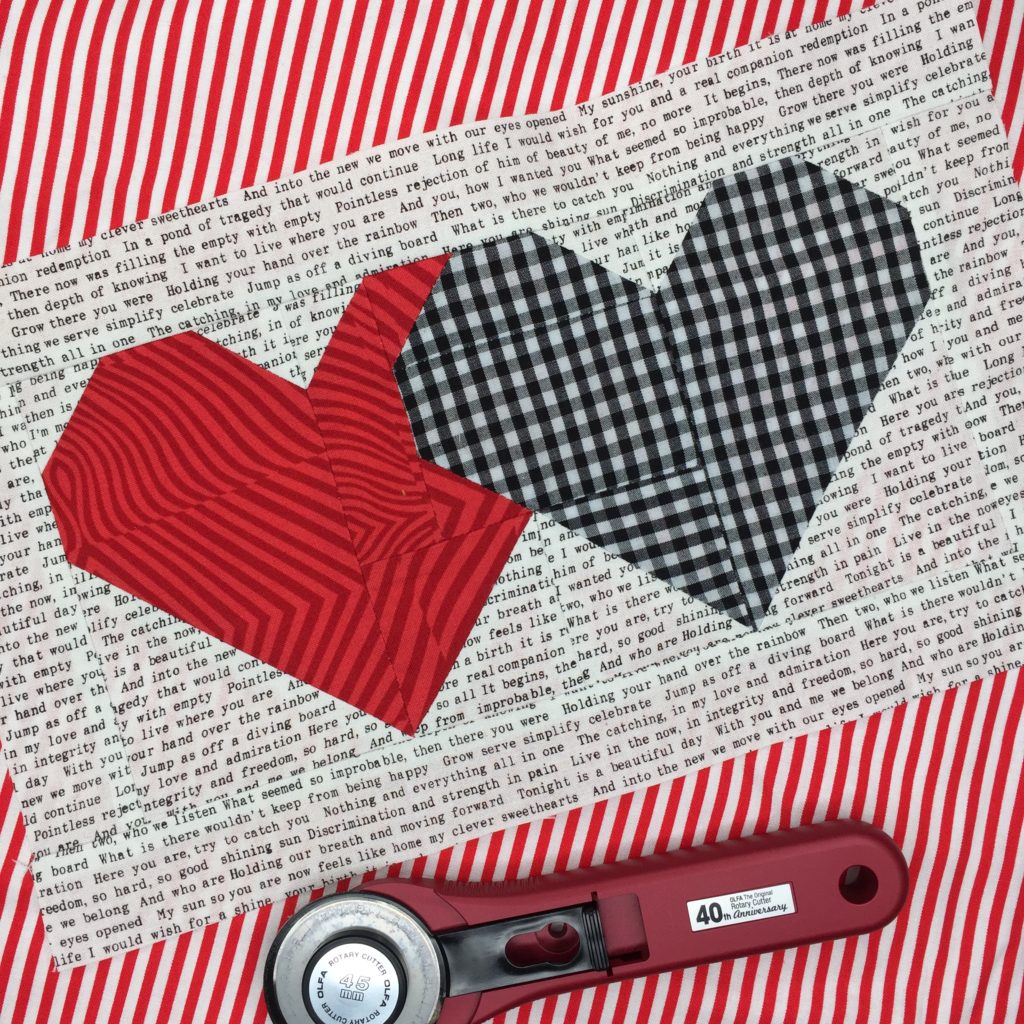
Total Eclipse Heart Pouch Tutorial
Grab your copy of the Total Eclipse Heart Block and check out this free zip pouch tutorial to turn it into a quick and easy zippered pouch for some serious cuteness!
Supplies
- Supplies/fabrics listed in the Total Eclipse Heart Block pattern – we’ll be making the 7″ x 12″ block.
- Additional fabric cuts:
- (2) 1.5″ x 4″ zipper ends cut from exterior fabric
- (2) 7.5″ x 12.5″ lining for zip pouch
- (2) 7.5″ x 12.5″ pieces of SF101 fusible interfacing for the lining
- (1) 7.5″ x 12.5″ for Exterior back of pouch (cut this at 8.5″ x 13.5″ if you plan to quilt it, then trim down to 7.5″ x 12.5″. You may also want to alter your border pieces on the Total Eclipse Heart Block and cut them at (2″ x 5.5″ and 2″ x 13.5″) if you’re quilting the front exterior or the quilt block.)
- If quilting, you’ll also need (2) 10″ x 15″ batting pieces.
- If not quilting, cut (2) 7.5″ x 12.5″ pieces of SF101 fusible interfacing for the exterior.
- 14″ closed end nylon zipper
- Erasable marking tool (I like to use Frixion pens)
- Turning tool or chopstick
Instructions
- To begin, follow the instructions in the Total Eclipse Heart Block pattern to make the 7″ x 12″ block. You’ll need to decide if you want to quilt your zipper pouch or not.
- If quilting – cut the border pieces at (2) 2″ x 5.5″ and (2) 2″ x 13.5″, instead of the 1.5″ width to give a little extra room for shrinkage. Then sew the pieces on as directed.
- Make a quilt sandwich, using 2 pieces of scrap fabric (these won’t be seen in the finished pouch) measuring 10″ x 15″ as the back of your quilt sandwich. Place the scrap piece wrong side up, place the batting piece on top of that, then center the 8.5″ x 13.5″ block on top of that and baste the layers together using your favorite method. Make another quilt sandwich with the 8.5″ x 13.5″ Exterior back piece. Quilt as desired, then square up the quilted pieces to measure 7.5″ x 12.5″.
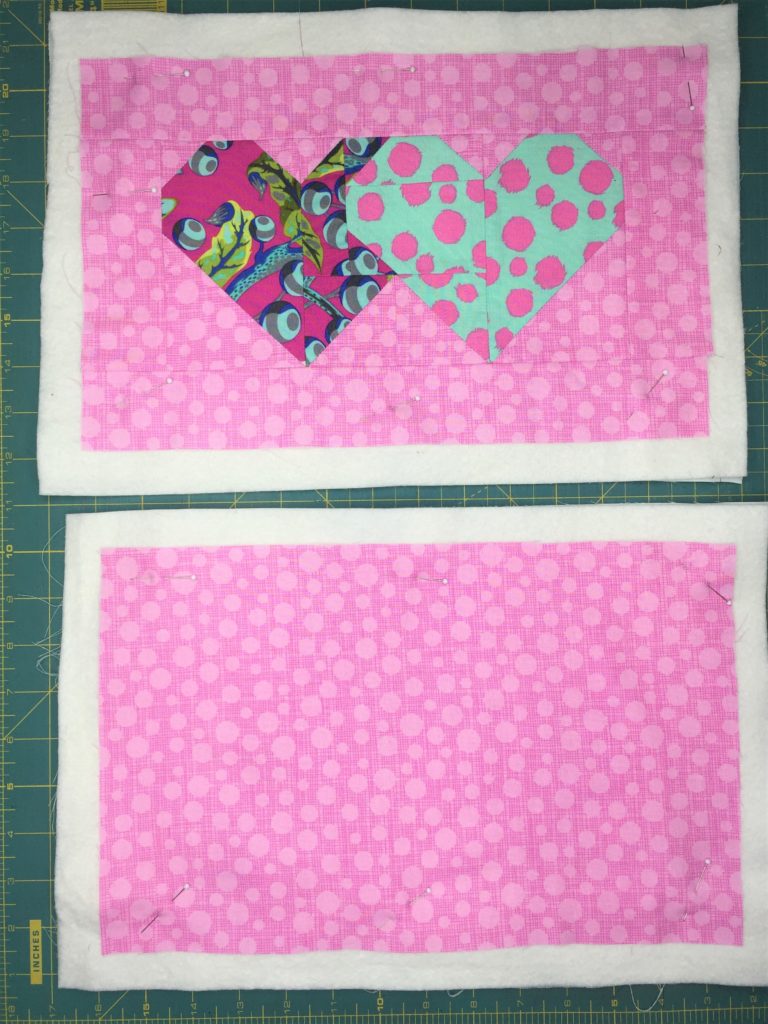
- If not quilting – Follow the cutting/sewing instructions to make the block, then apply the fusible interfacing to the wrong side of the 7.5″ x 12.5″ quilt block, following the manufacturer’s instructions. Do the same for the 7.5″ x 12.5″ Exterior back of pouch.
- Apply the fusible interfacing to the wrong side of each lining piece.
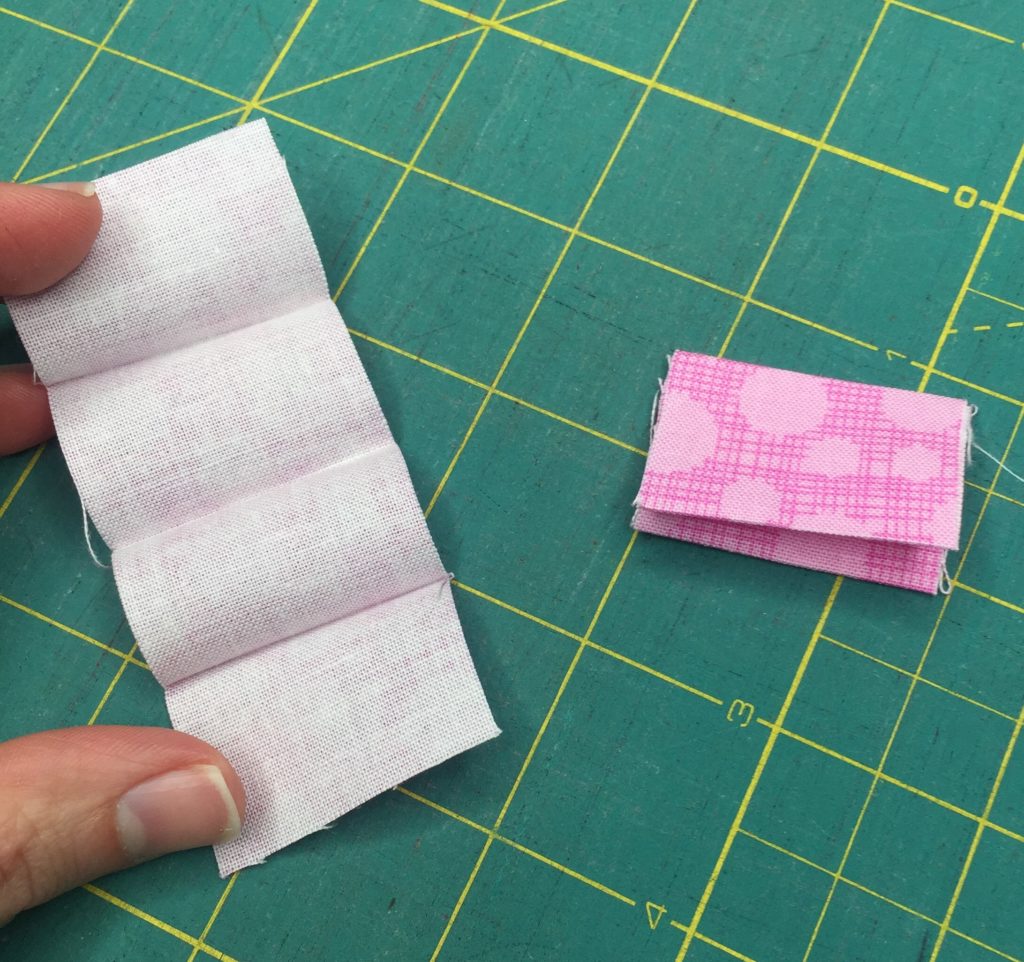
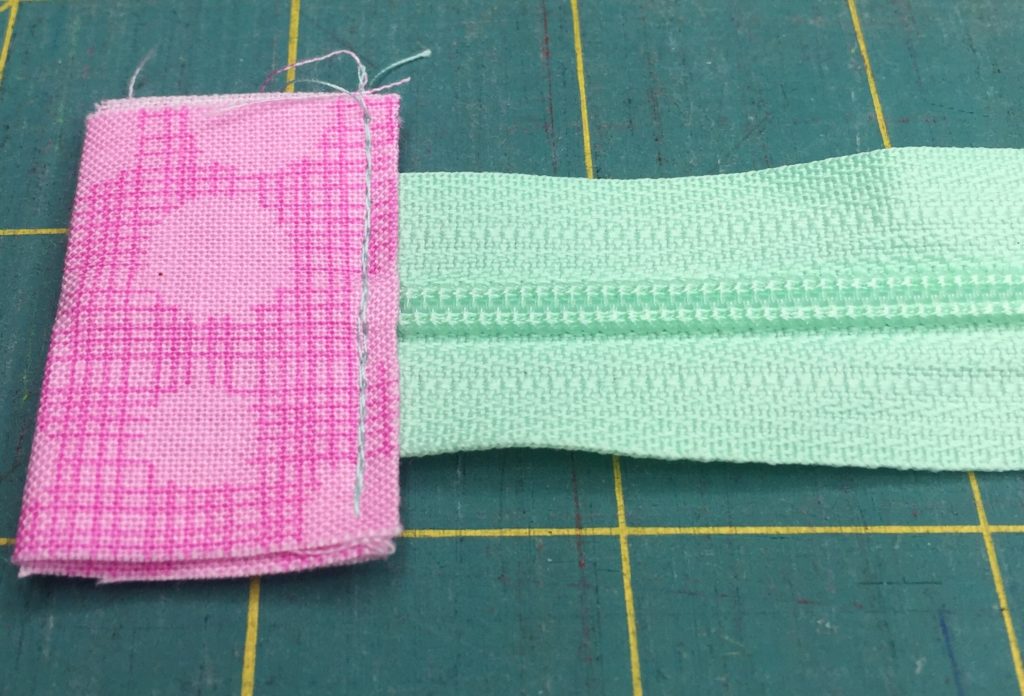
- Take the 1.5″ x 4″ zipper end pieces and fold the 1.5″ ends to meet in the center. Press. Fold them in once more to conceal all raw edges and press.
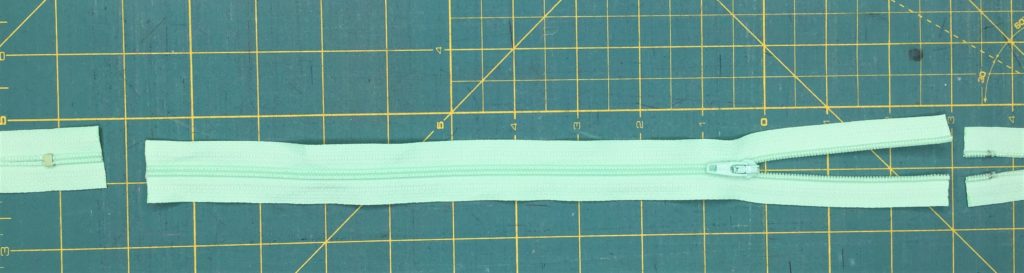
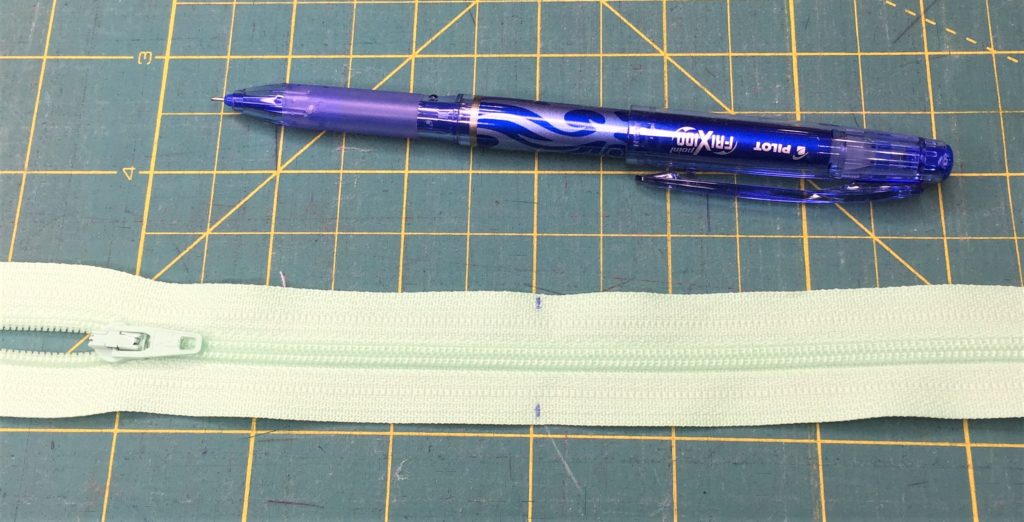
- Take the 14″ zipper and move the zipper pull in away from the metal teeth a little. Trim your zipper down to measure exactly 12.5″, and make sure you trim the metal bits off when you trim it down. Be very careful to not pull your zipper head off.
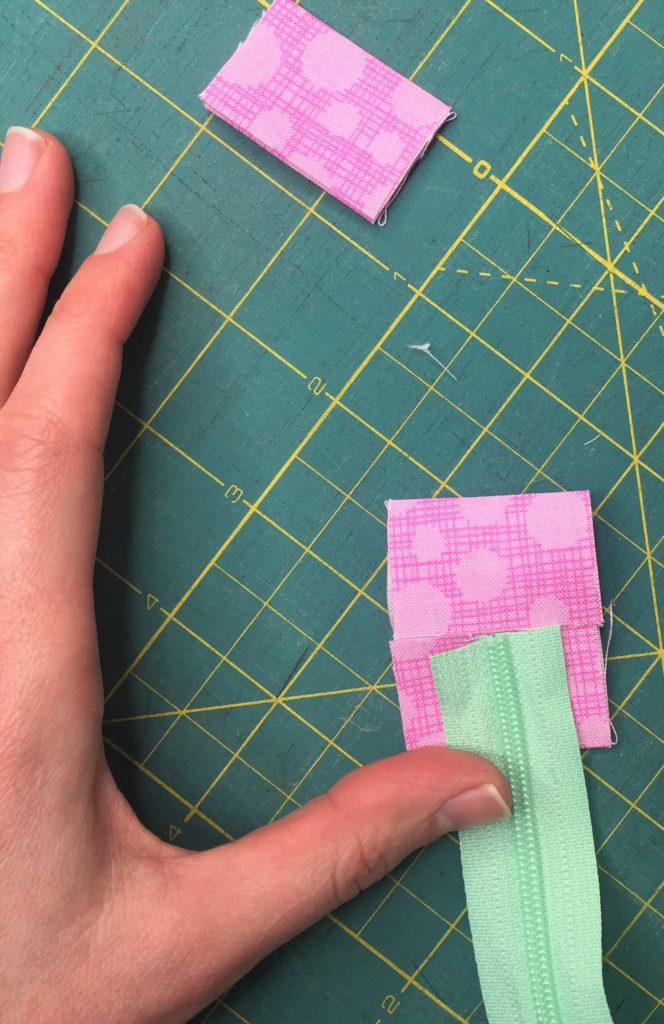
- Take the zipper end pieces and place one end of the zipper butted into the middle of the folded piece. Use clips or pin in place. Repeat for the other end of the zipper. Take to your sewing machine and topstitch 1/8″ from the folded edge to contain the zipper. Trim away the edges of the zipper pieces so they’re even with the zipper tape.
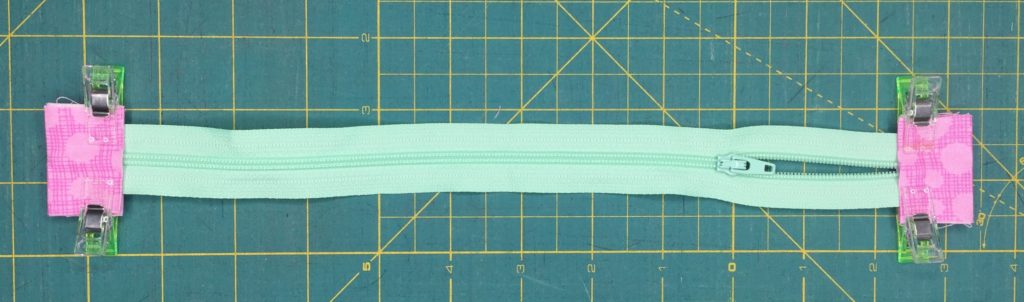
- Measure and mark the center top 12.5″ edges of all 4 of your fabric pieces. Measure and mark the center of the zipper.
Assembling the Zipper pouch
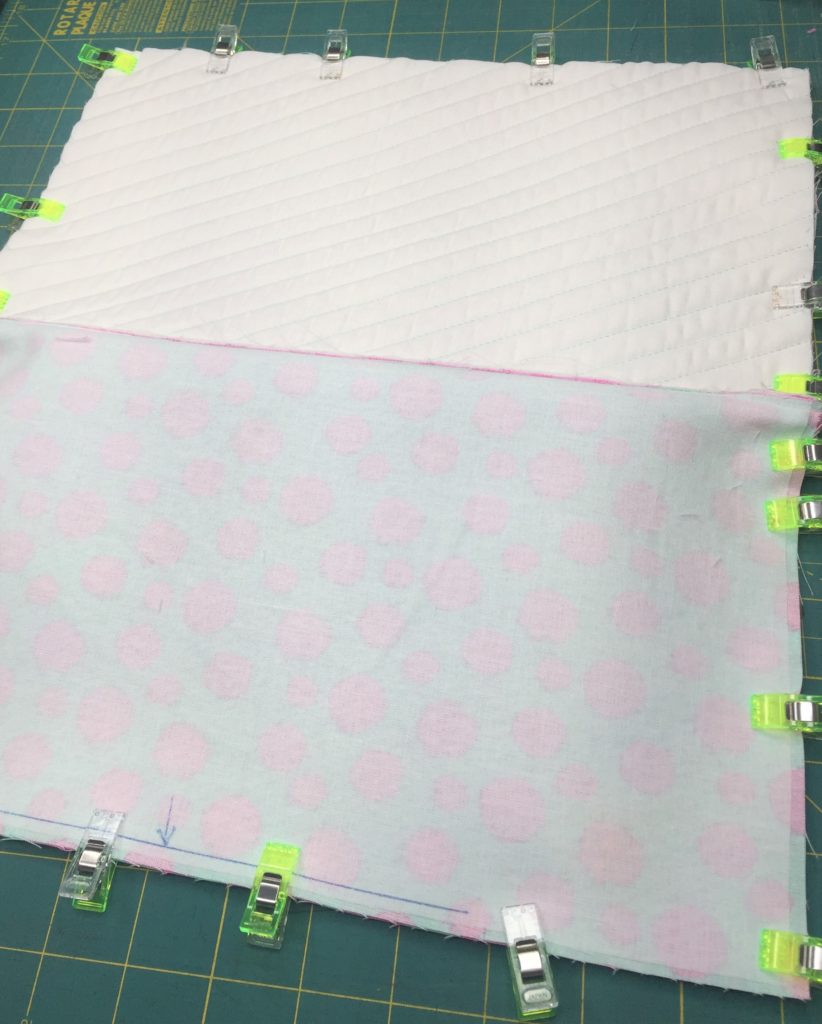
- Take the assembled quilt block (quilted or not) and place it right side up. Take the zipper and place it right side down, lining up the centers and the edge of the zipper tape to the top edge of the block. Use clips or pin to secure. Place one lining piece right side down on top of the zipper, sandwiching the zipper between the two layers and matching the centers again. Clip or pin in place. Use a zipper foot to sew through all three layers with a 1/4″ seam allowance. Press the fabrics wrong sides together away from the zipper and topstitch 1/8″ from the folded edge of the fabric.
Place zipper RSD on block Place lining RSD on zipper Use a zipper foot to sew through all three layers Press the lining and block wrong sides together, away from the zipper and topstitch.


- Take the exterior 7.5″ x 12.5″ piece (quilted or not) and place it
right side up. Take the zipper (now attached to the quilt block) and place it right side down, lining up the centers and the edge of the zipper tape to the top edge of the block. Use clips or pin to secure. Place the remaining lining piece right side down on top of the zipper, sandwiching the zipper between the two layers and matching the centers again. Clip or pin in place. Use a zipper foot to sew through all three layers with a 1/4″ seam allowance. Press the fabrics wrong sides together away from the zipper and topstitch 1/8″ from the folded edge of the fabric.
Exterior back RSU, zipper right side down Remaining lining piece, right side down Press fabrics away from the zipper and topstitch
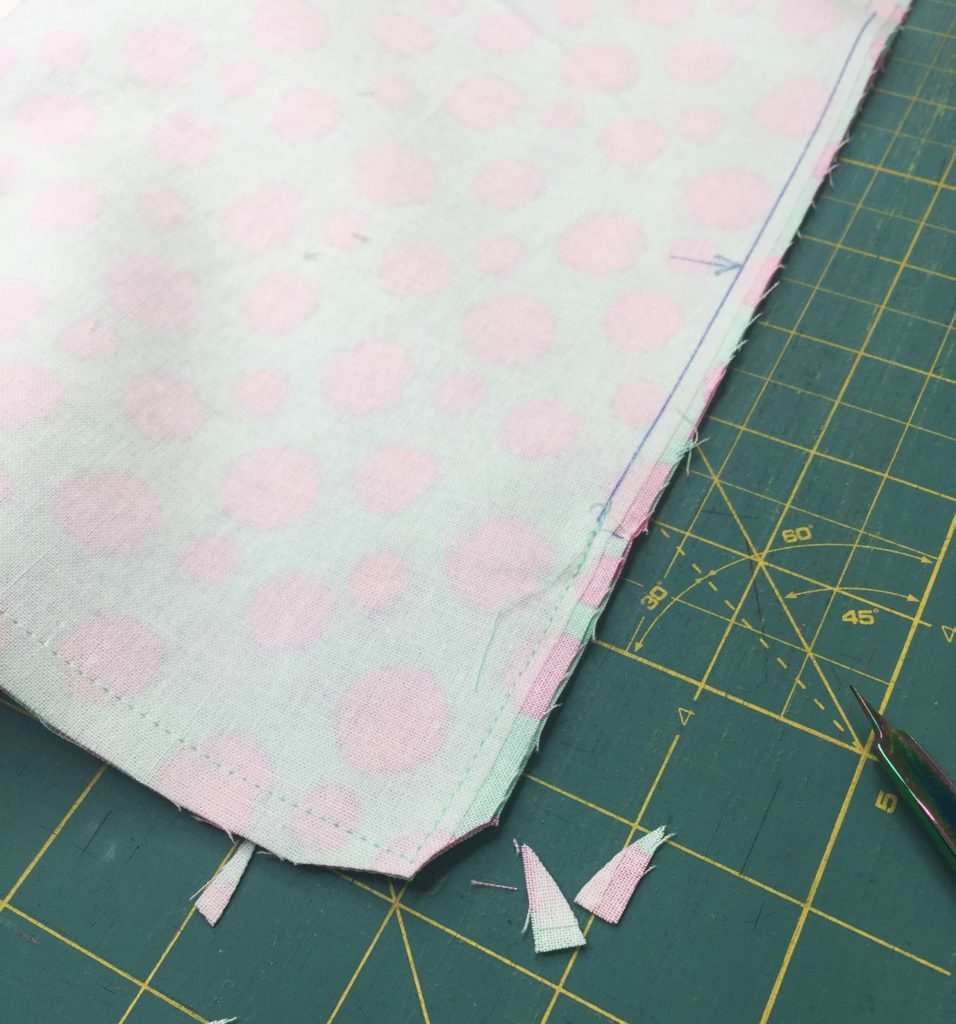
- Open the zipper. Pull the exteriors and linings apart from eachother and pin the edges of the exterior RST. Do the same with the lining pieces. Pin or clip in place. Mark a 5″ opening centered on the bottom of the lining. This will be left open for turning. Start sewing with your regular pressing foot, and sew all the way around the zip pouch, leaving the opening unsewn.
Open the zipper Place Exteriors RST and linings RST, and clip/pin. Leave a 5″ opening along the bottom of the lining pieces.
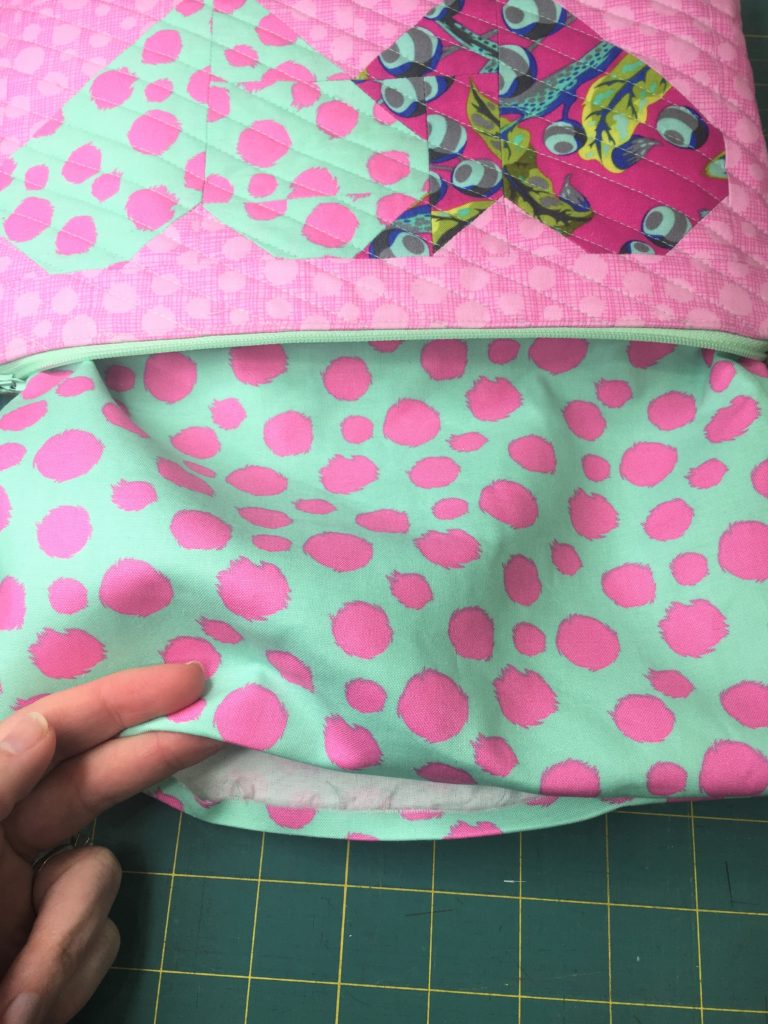
- Trim the corners away being careful not to clip the stitches. Turn the bag right side out through the opening in the lining and push the corners out with a chopstick or turning tool.
- Fold the raw edges of the opening in by 1/4″ and press. Clip the folded edges together and topstitch or whipstitch closed to close the opening. Push the lining down into the bag and you’re done! Fill that cute little zip pouch up with some goodies and it’s ready to be gifted.
Raw edges of lining folded inward 1/4″ Opening in lining – topstitched closed Lining pushed in

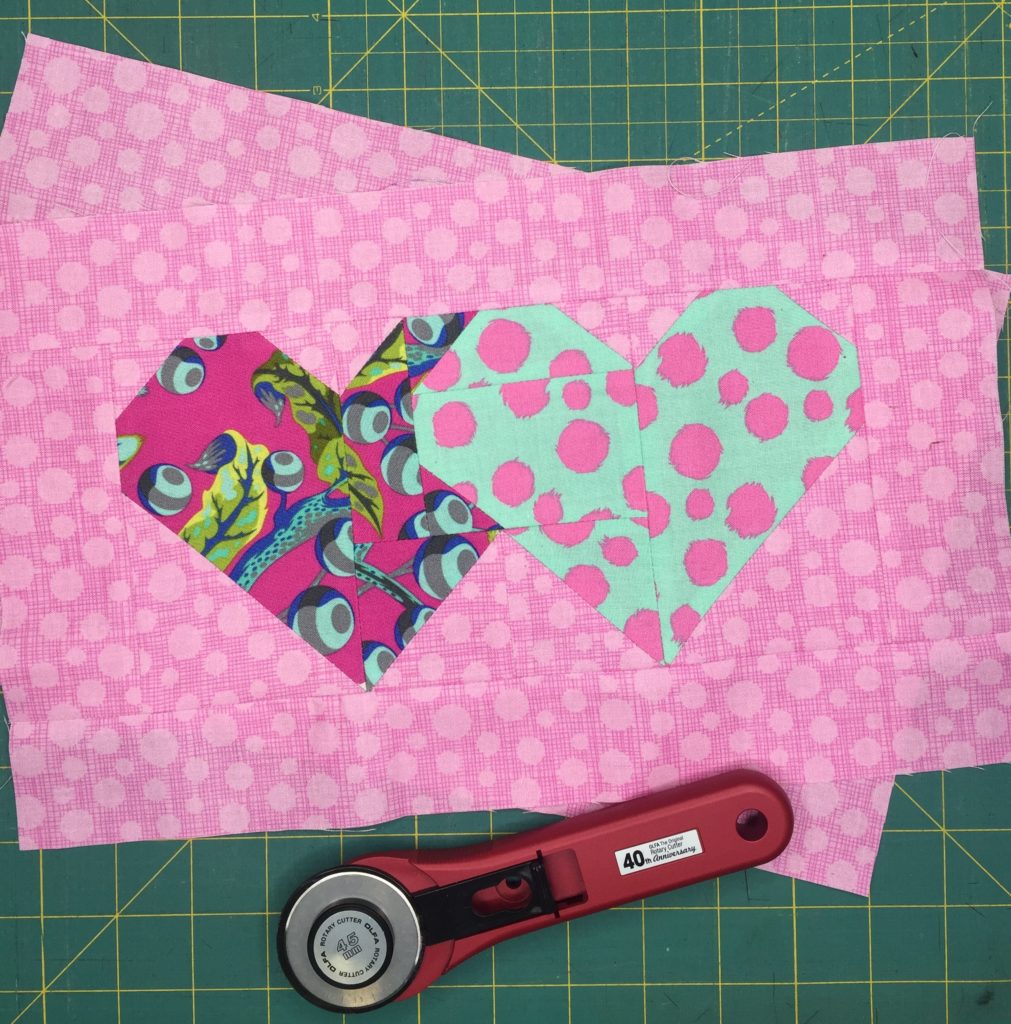
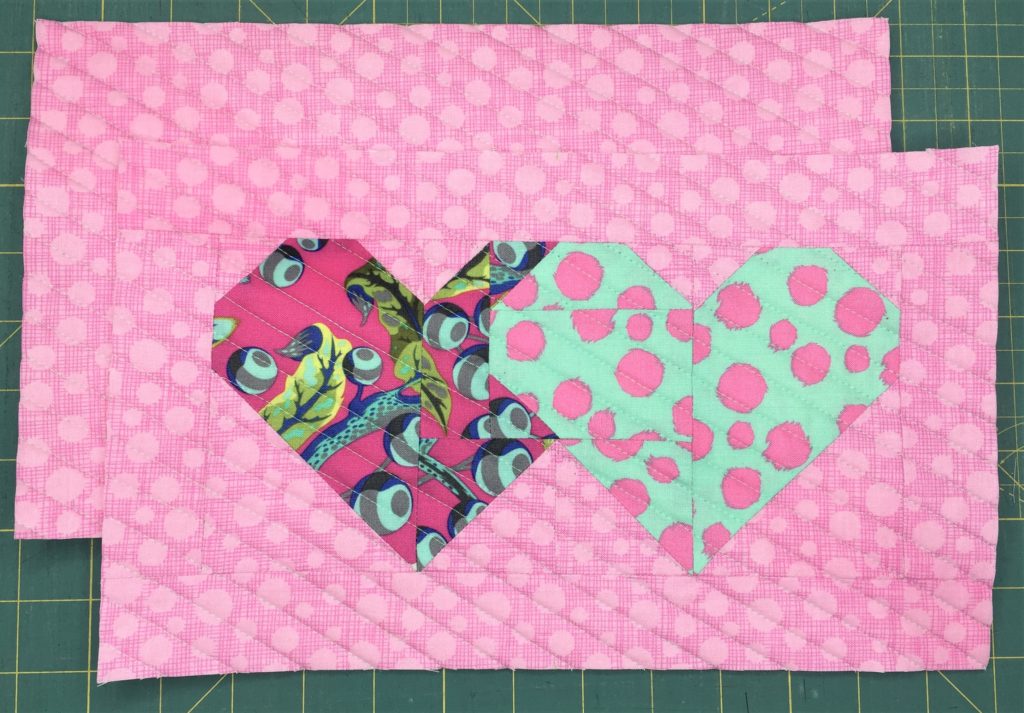
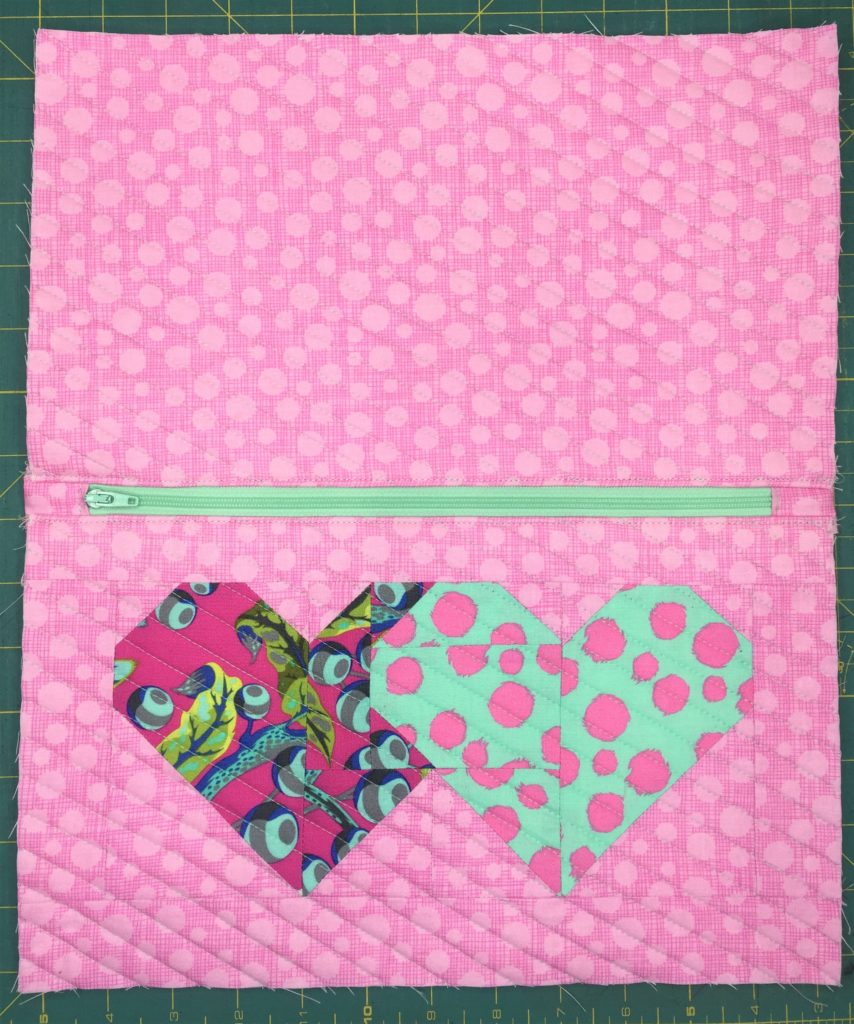
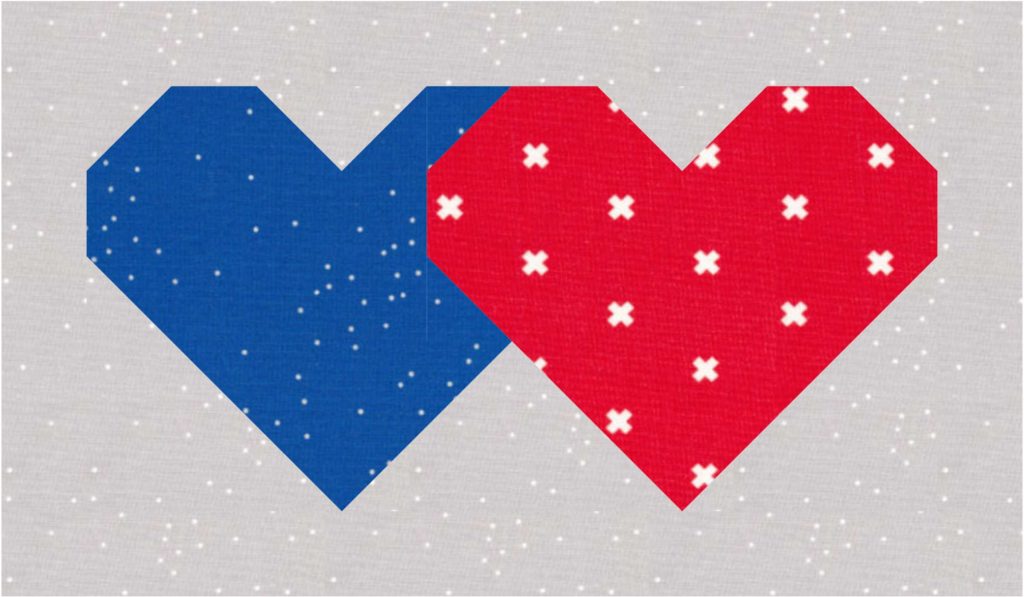
Total Eclipse Heart Block
Once upon a time, I was falling in love…
I’ve been working so hard on this heart block for you! This pair of hearts is so dear to me because it reminds me of one of my favorite songs (that was released my birth year–how’s that for coincidence?), and I swear, I’ve been singing it all week while I’ve been sewing these 😉 This is a great block to make for your love or your BFF, and you can pick the fabrics to fit each person to make it extra special!
You can get your pattern download HERE, and I hope you’ll share your finished block on Instagram using #totaleclipseheartblock . These cute blocks come in three sizes: 5″ x 10″, 7″ x 12″ and 12″ x 12″ for you to customize and make into whatever your heart desires.
If you want a sweet little discount, you can head over to subscribe to my newsletter to grab this one for free! You’ll get a welcome e-mail with your coupon code in it and you can start sewing asap.
Need a little inspiration?


I had so much fun making this block, and I hope you love making it too! I used my new 40th Anniversary Ruby Rotary Cutter from OLFA to cut all my pieces out, and I felt SO fancy 🙂
Inspired Free-Motion Quilting (and giveaway!)
This has been such a busy and exciting week for me! I had a little time away from sewing celebrating the Christmas season with our family (and our daycare was closed for almost two weeks–insert the screaming face emoji here ;). All joking aside, it was wonderful to get to spend so much time with the family and remember what’s important in life! I hope you were able to rest, recharge, and be around the people you love.
One thing I’m super pumped about is Amanda Leins and Bill Volckening’s new book Inspired Free-Motion Quilting. The book is described as “90 Antique designs reinterpreted for today’s quilter”. I do a lot of custom quilting, and this book is really inspirational, as far as brainstorming designs goes. There are pages of antique quilts with really amazing quilting designs, along with step-by-step instructions on how to execute and master each design. It’s a great reference for seasoned quilters and beginners alike. I’m so excited to be a part of the Inspired Free-Motion Quilting blog hop and team up with Mandy Leins and C&T Publishing to give away one free PDF copy (that means the giveaway is open internationally!!!) of this awesome book! Read to the end for details on how to enter.
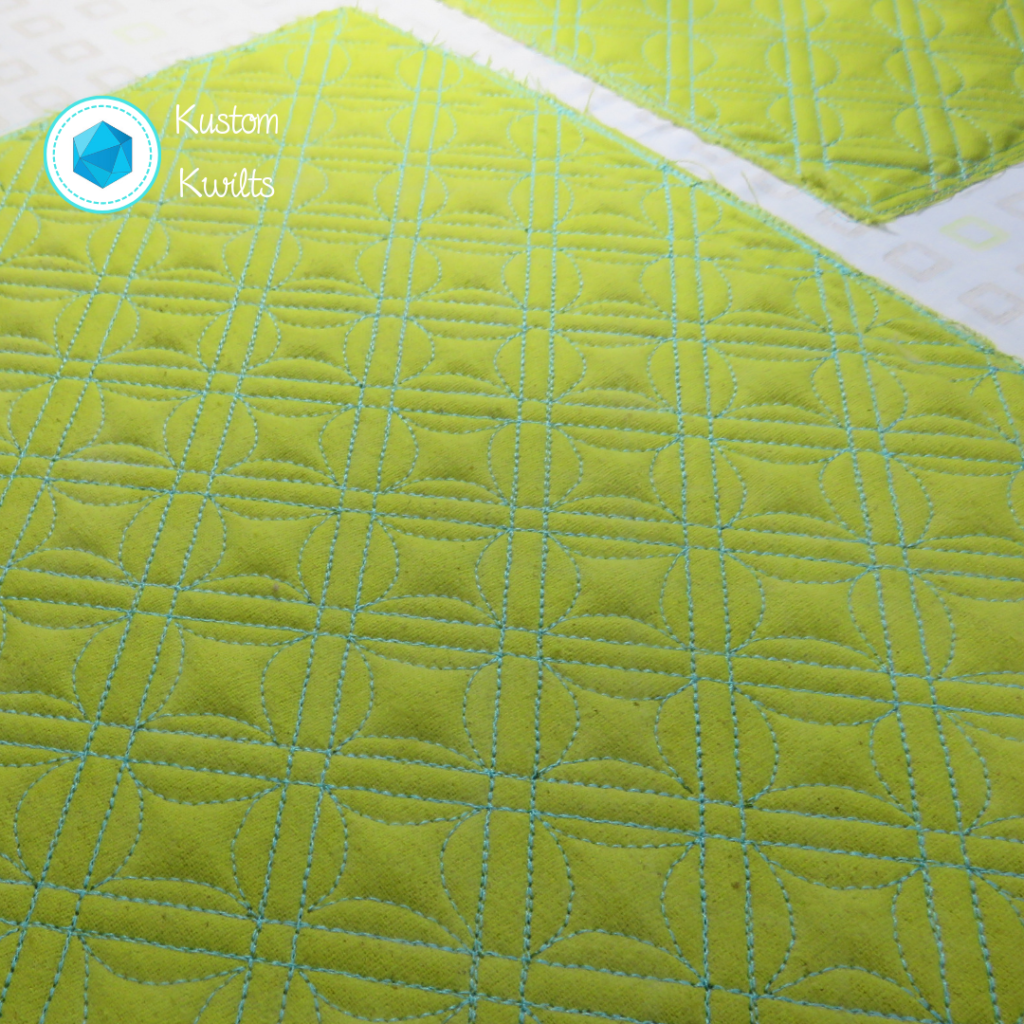
As soon as I was able to flip through Inspired Free-Motion Quilting, two designs immediately caught my eye that I knew exactly what I wanted to use them for. My two favorite motifs from the book are “Double lines and orange peel” and “Echoed Crosshatch”. I really enjoy making bags (in addition to the quilting I do), and I like to add a bit of decorative quilting to the exterior of the bag, if I’m able to. I had a new pattern I was really excited to try–The Gloss Cosmetic Bag by Sew Sweetness (Sara Lawson). The pattern is available with purchase of the Minikins Season 2 pattern bundle on Sara’s site.
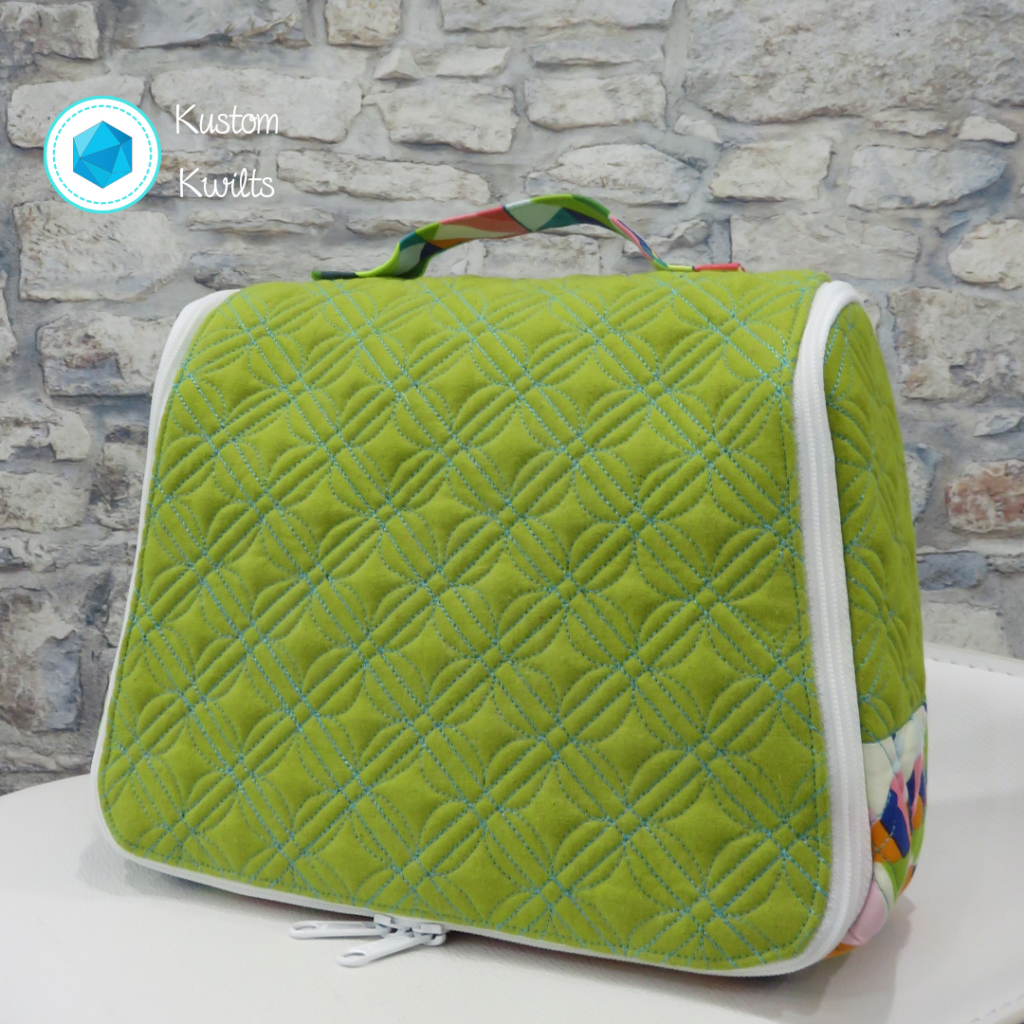
This is a really great way to spice up some solid fabric–and solid colors show off the quilting with less distractions than prints. I cut the green linen-canvas fabric I had slightly larger than the pattern called for and quilted it prior to assembling the pattern. I loved the instructions and diagrams that are included with the book–they really leave no room for error, even if you’re just starting out. I’m really thrilled with how impactful the design is that I selected from the book. I chose “Double Lines and Orange Peel” for a classic motif that would really look great on a cosmetic bag. I love the definition and texture it gives the solid–in what would otherwise be a really boring cosmetic bag. It’s not as easy to see in the picture, but I opted to skip the orange peels on the patterned fabric on the bottom of the case, and only quilted the echoed crosshatch.
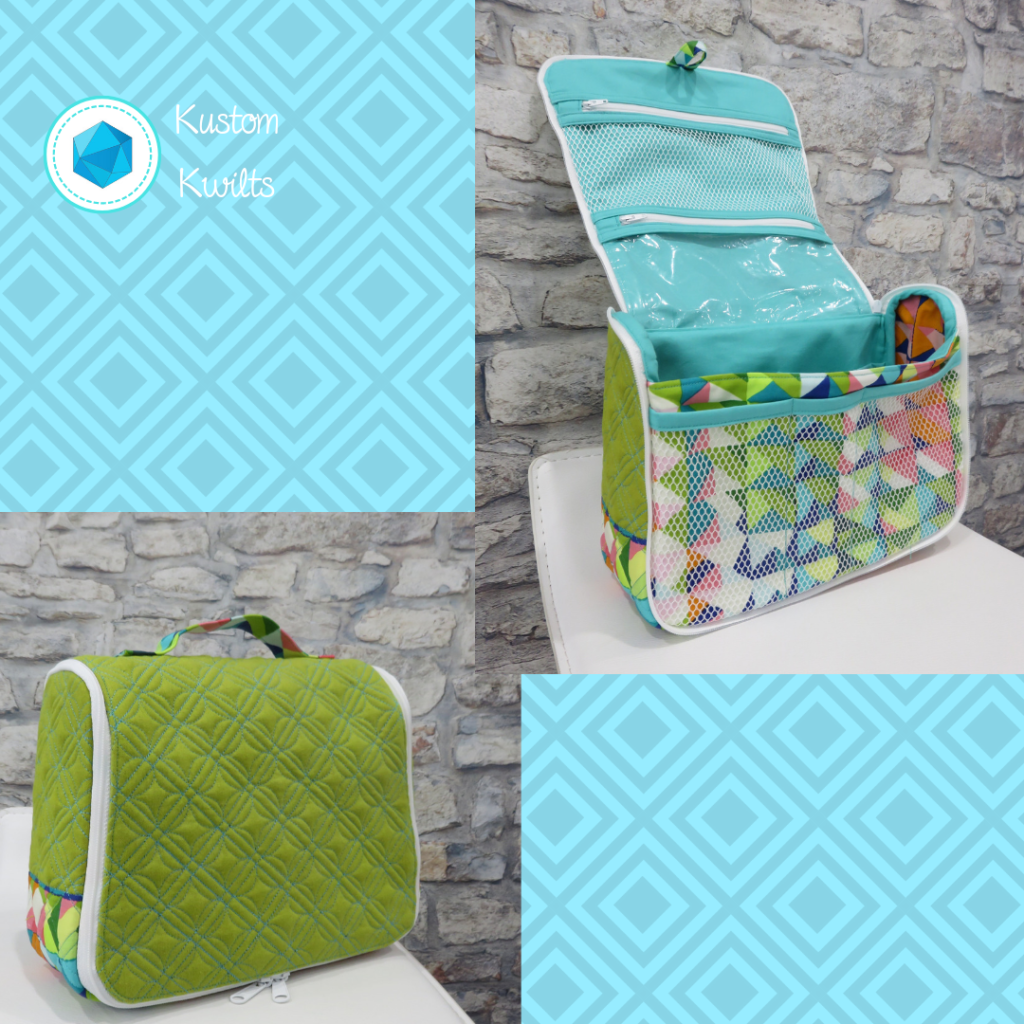
I quilted the bag components on my longarm, but it would be easy to do this sort of quilting on a domestic. Just pop on a walking foot and measure out your straight lines, and follow the simple instructions for free-motion quilting the orange peels between the lines to finish up. I used a slightly contrasting thread color for a little pop, but I’m dying to make another in black canvas with black thread for subtle texture and style.
Amanda and Bill do a fantastic job of sharing some amazing antique quilts and their in depth knowledge of how to reproduce the motifs, and I highly recommend Inspired Free-Motion Quilting as a must have reference for quilters! Make sure you read below to enter the giveaway, and check out the other blog hop participants’ posts for more chances to win!
- January 7: C&T Publishing, Bill Volckening
- January 8: Amanda Murphy of Amanda Murphy Design, Kim Lapacek of Persimmon Dreams
- January 9: Teri Lucas, Lynn Harris, Debby Brown of Debby Brown Quilts
- January 10: Robin Koehler of NESTLINGS by Robin,
Mary Abreu ofConfessions of a Craft Addict , Patty Murphy of Patty Murphy Handmade - January 11: Joanna Marsh of Kustom Kwilts, and Amanda Leins of Mandalei Quilts
Giveaway Details
Here’s what you came for!! C&T Publishing has so generously allowed me to give away one PDF copy of Inspired Free-Motion Quilting. All you need to do to enter is like my Instagram post and tag a friend in the comments OR leave a comment on THIS blog post telling me why you’re excited to get a copy of this book! The giveaway is open internationally and will close Sunday, January 13, 2019 at 6:00 PM, CST. The winner will be notified by me soon thereafter. Good luck!!!