Posted on

DIY Starfish Tote – Sewing Camp with Janome

A pink bag with a starfish on it


Are you looking for some cute and quick Summer sewing projects? Then you’ve got to hop over to the 2018 Summer Sewing Camp with Janome! The first three weeks of projects are already available, and there’s even a cut file for a camp t-shirt. It’s all the fun and creativity of summer camp without the hefty price tag, so you really can’t go wrong :). Every Monday, through July 30, a new sewing project will be released that can be finished in a couple of hours with minimal supplies. You have to check out the DIY Starfish Tote tutorial!

My contribution was Week 3– A DIY starfish tote bag with the option to use an embroidery design (if you have an embroidery machine) and an option to applique the star with a regular sewing machine. If you want a really quick finish, you can purchase a ready-made tote bag or follow my simple instructions to make your own!

A pink bag with a star on it
Embroidered/Appliqued Starfish

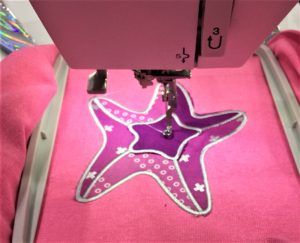
I used an embroidery/applique design from the Janome Embroidery website and it was so quick and easy to do, I was literally done in 30 minutes with the applique! I hope you enjoy this quick and easy FREE tutorial–you can download it from the Janome site linked above, or you can download the DIY Starfish Totehere as well 🙂

This is a great project to do with your kids to combat boredom and then load the bag up with some beach towels, sunscreen, and snacks and head over to your local watering hole. Or if you really want to score some points, gather up some of your kids’ friends and really create the camp feeling! If you participate in any of the projects, be sure to share what you make with the #janomecamp18 to be entered in the giveaway drawing that will end on August 13, 2018. They’re giving away a sewing machine AND some other awesome sewing related items, so you’ll definitely want to get in on this!

Happy sewing friends!


Posted on

Making it Fun Quilt – Spring Quilt Market 2018

A colorful quilt with the name of michael miller fabrics.


Guys!!! I’m so excited to finally be able to share my project for the Michael Miller Spring Quilt Market booth. They sent me fat quarters of their new has dot blenders and their marbled fabrics, along with some coordinating Cotton Couture solids and told me to make something fun and rainbow-y! Is that a dream assignment, or what?? I narrowed it down to 48 unique fabrics that I wanted to use in the quilt, and lined them up:

A table with many different colored fabrics on it
Holy cow!!! 48 different fabrics!

I numbered them and then numbered the design I had mocked up in EQ8, but it was starting to get a little crazy. I ended up having to make a smaller swatch card because some of the fabrics were so similar in color and shade that I was starting to go cross-eyed flipping through that stack.

A tile floor with many different colored squares of fabric.
Swatch Card

I very rarely make swatch cards, but I found it to be very necessary with this quilt. I designed a foundation paper piecing block in EQ8 and then rotated it slightly to complete the design. The piecing went really quickly and I just needed to double check that I had the correct fabric for each block before I started sewing. I’ll admit, there was a good amount of seam ripping to be had with this one!

A table with many different bags of paper
Foundation Paper Pieced Blocks stacked and ready to go!

I used my new Daylight Company light box to help with the foundation paper piecing, and I really love how thin and lightweight the unit is. I had a very bulky, cumbersome light box in the past and recently upgraded to this one. It’s been such a nice treat to have one that doesn’t take up all of my cutting mat. I also used Adobe Illustrator to help design the applique text in the right size and fonts, then tiled the pages to make a huge pattern. I hand cut each letter and symbol out, then used the paper as a template to trace onto the white fabric for the applique. I used Misty Fuse on the backside of the white Cotton Couture and then cut out each letter. It was pretty time and labor intensive, but I love how it turned out.

A person holding up two different colored paper
My EQ layout compared to the quilt top, prior to adding applique

I did come up with a slight problem in getting the applique on straight, centered, and spaced equally. Usually, I would just use a big window and tape the quilt in place or trace where the letters needed to be, but I decided to buy a cheap portable projector and project the original applique design onto the quilt while it hung, and then I positioned the letters in place with a small amount of glue from an Elmer’s glue stick. Once they were in position, I lightly fused them into place and then took the quilt top to my Janome MC9400 to complete the applique blanket stitching around each individual letter (that took about a day and a half!).

A picture of the michael miller fabrics logo.
Using the portable projector to project my applique design onto the quilt

Once I finished the applique, it was time to throw it on the longarm for quilting. I chose just a single layer of Quilter’s Dream Wool to maximize the quilting texture and also keep it fairly lightweight. Then I quilted some straight diagonal lines with rulers to finish it off. I opted to not bind the quilt traditionally, but I faced it to not take away from the overall punch of the quilt, and keep the focus on the applique. I really loved making this quilt and loved the new fabrics being released by Michael Miller Fabrics for Spring Quilt Market 2018. I can’t wait to get my hands on more of that fabric!

A colorful quilt with the name of michael miller fabrics.
Spring Quilt Market Quilt for Michael Miller

Posted on

Quilting applique and some modern maples

A close up of the pattern on a mattress


I just love some good free motion quilting! Last month, I quilted some amazing client quilts. One quilt was a BOM from a local quilt shop – Sew Special in San Antonio, TX, and another was pieced by Kasandra Lee from the SAMQG. The first quilt I mentioned was a quilt pieced by Katelen Postert that started as a traditional BOM using Moda’s Grunge line. Katelen added her own special touch and added some amazing animal appliques to really make this quilt special. Katelen is so talented, and that mini-parade of wildlife strolling down the center of the quilt is just perfection!

A colorful quilt with animals on it
Katelen’s Quilt

When I met with Katelen for her quilting consultation, we decided on some clean straight line quilting (not too dense), and outline the appliques with some stitch in the ditch and surround them with medium-sized swirls. I used Glide thread in a 50 wt. light teal color that matched the duck (along with a lighter cream color for the swirls), and used a single layer of Quilter’s Dream Wool batting.

A duck is sitting on top of the paper.
Duck Applique
A person sitting on the ground with a horse drawn carriage.
Longarm View

I was so in love with Katelen’s color choices and her addition of the applique was such an awesome touch. Here’s a portion of the finished quilt with the applique. Bravo Katelen!!!

A quilt with animals and birds on it.
Katelen’s quilt

Kasandra’s quilt was just as exciting for me to quilt. She did a great modern maple quilt with lots of negative space in a cool color palette.

A quilt with leaves on it is shown.
Kasandra’s Quilt

I did some diagonal straight line quilting within the maple leaves to follow the lines of the piecing, and then added some free flowing swirls to the background. The batting used was Quilter’s Dream Orient for a functional, soft, and drapey quilt that will be useful in a hot climate.

A quilt being made with the machine.
Longarm View

And these are the free-flowing swirls I did in the negative space. This is truly one of my favorite fills to do, and so relaxing to get lost in!

A close up of the pattern on a mattress
Swirls!

I’m so happy I can share these quilts made by some very talented women. I love mixing a little free motion quilting with ruler work and I think it makes the quilt really stand out without being overly done. Hope you’re getting to do some lovely sewing this week!

Posted on

Couching tutorial


Decorative stitches with a 3-way cording foot 

I had absolutely no idea what couching was when I first heard of it.  I saw a demonstration of couching on a longarm quilting machine, and then very quickly wrote it off (since I didn’t have a longarm at the time), thinking I would never have the means or opportunity to try couching.  You can use couching to emphasize a print on fabric, outline applique, doodle with it, and you can even quilt with it.  

Couching can add a little flair to regular fabric


Well, there are some ways that you can couch without buying a super expensive longarm quilting machine, and then also buying a super expensive couching attachment for said longarm.  You can actually couch by hand–but it takes a while.  And you can certainly try couching by using a domestic sewing machine.  You don’t even have to buy a special foot for it if you don’t want to.  As long as you have a free motion quilting foot that has some sort of round part that the needle goes through, you’re good!  I will say, that if the hole for the free motion foot is really big, you can easily modify it yourself by taking a small piece of scotch tape and covering a portion of the hole (not a portion the needle will travel through).  The smaller the hole on the free motion (or couching) foot, the easier it will be for the yarn to travel where you want it to go.

Make an art piece using couching techniques if that floats your boat!

I wrote a super easy to follow couching tutorial for Janome’s website that can be accessed HERE
So click it and check out how easy couching is!  There are seriously so many things you can do with couching to spice up existing projects.  

Posted on

Insert Harry Potter theme song here…


So…It pretty much seems like everyone I know is either pregnant or just had a baby here lately.  I am in that season of my life where the wedding invitations have stopped and the baby shower invitations are lining my mailbox!  That being said, I get a LOT of joy making things for people’s new babes.  While I work on it, I wonder if they’ll be curled up on the couch with it, playing outside and dragging it through the mud, becoming a couch fort in the living room…I love it!

 This was the appliqued fabric before I started quilting it.  


I had a close friend from college ask me to make a Harry Potter themed baby quilt for her brother’s first child.  She pretty much gave me free reign to come up with whatever (which is AWESOME!!!), so I thought I would applique the deathly hallows symbol, followed by “lways” so that it kind of looked like “always”-just google it, I’m sure there are examples!  I made a fun template out of poster board and traced it onto the fabric I wanted, used some Wonder Under and fused that bad boy to my background fabric to get ready to applique! 
I was really excited about the quilting process and wanted my free motion quilting to LOOK like MAGIC would look.  
Just pulled from the longarm frame!

I’m not really sure what that means, but I tried my best to quilt what I thought magic looked like in thread form.  And I loved the outcome. 

I used the Harry Potter-y chevron fabric that I think was really meant to be college colors for the backing and really love how it turned out.  I’m not usually a huge applique person, but I definitely will be trying it with more projects in the future!  And I really hope and pray that this kiddo is a Harry Potter fan!

Roughly crib sized finished baby quilt!

Posted on

Applique your way to a handmade Mother’s Day!


I’m always looking for creative gifts to make for holidays, birthdays, anniversaries, and it seems like it’s always the same kind of stuff that you could really do without…like, how many cosmetic bags do you really need?  

So I was trying to think about what kinds of gifts would be meaningful to me if I were a mother.  What kind of gift would I cherish and appreciate forever?  

Well, right off the bat, I think about things that represent my “imaginary kids”.  Handwriting samples, drawings, things that could be made more permanent.  But then, I thought not all kids are old enough to draw or write…so how could that stage be permanently captured in a cute way?  My answer was hand prints!  But the painted hand prints are kind of cheesy, and lots of those probably come home from school in the form of turkeys,  reindeer antlers, spiders, butterflies, etc.  

So how about making a functional patchwork pillow with traced hands of the kiddos appliqued on top of the patchwork?  

I got to team up with Janome for this super easy tutorial, and really loved the experience.  If you’re in the need for a super cute, but still functional Mother’s Day gift (or grandmother’s gift!), this is the project for you!  Follow this Link to access the full tutorial and supply list.  

The pillow features Karen Lewis’ awesome fabric range, Blueberry Park.  The back of the pillow is an easy envelope closure that takes minutes to make.

Hemming the envelope closures of the pillow


Sweet little blanket stitch on one of the hands prior to quilting

Selecting thread to go with each hand
For more details, check out Janome’s project page and access the complete, free tutorial!
Until next time, I hope you are able to get some good sewing in!