Posted on

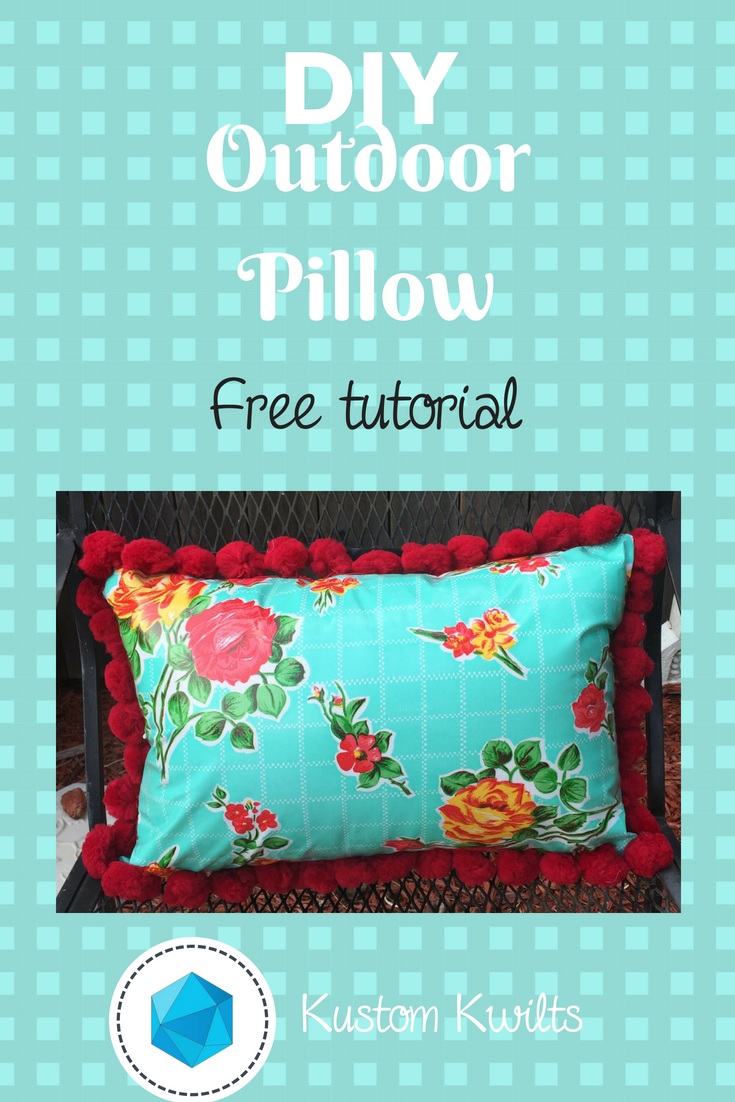
DIY Outdoor Pillow free tutorial

A pillow with red and yellow flowers on it.


DIY Outdoor Pillow tutorial

Are you looking for a way to brighten up your patio with some fun home dec pillows?  Make your own DIY outdoor pillow with this quick and easy tutorial to create a super cute oilcloth pillow with pom pom trim, and give your deck a cheery look!  I used my Janome Horizon Memory Craft 9400QCP and the Janome Ultra Glide Needle Plate and Ultra Glide Foot to stitch up this oilcloth pillow.  Start sewing with some new fabrics and try out a new foot attachment that will take your sewing projects to the next level. The Ultra Glide Needle Plate and Ultra Glide Foot set is perfect for working with fabrics that might not smoothly feed under the standard foot A, such as oilcloth and laminated cotton.  Also, check out my previous post on TOP TIPS FOR SEWING WITH OILCLOTH.  This is a great tutorial for beginners, and will take approximately 4 hours from start to finish.  The finished pillow size is 12″ x 18″.

Supplies: Sewing machine, Janome Ultra-Glide foot and Ultra Glide Needle Plate (Teflon foot for all other sewing machine brands), Zipper foot (Foot E for Janome), Needle, Pre-wound bobbin.

Fabric/notions required:

  • Circle Template printed at 100% and cut out
  • 1 yard Aqua Rose gall oilcloth (Fabric A) sub cut into:
    • (2) 6-3/4†x 19†(zippered back of pillow)
    • (1) 13†x 19†(front of pillow)
  • 3 yds. Jumbo Pom Pom Trim/ball fringe
  • 40 wt. Black sewing thread (or white for less contrast)
  • 20†zipper
  • 12†x 18†Weather proof pillow form/Outdoor pillow form
  • Marking pen
  • Rotary cutter/ruler/mat
  • Binding clips
  • Scissors
A collage of four photos showing how to make a quilt.
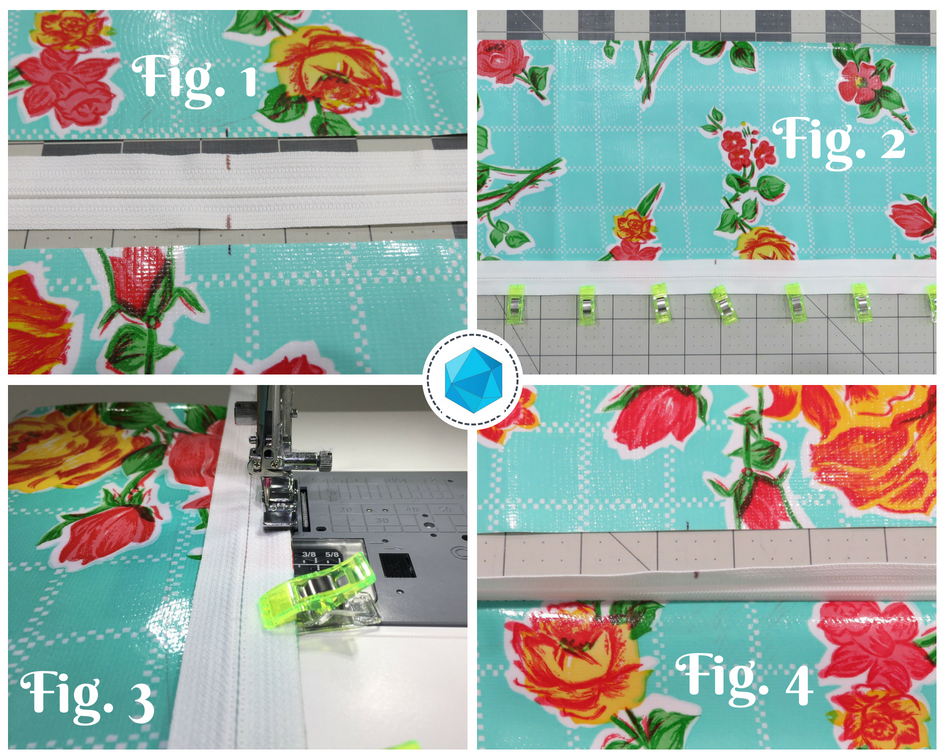
Figures 1-4

Prepare the back of the pillow and install the zipper

  1. Take the two 6-3/4†x 19†pieces of Fabric A and measure and mark the center of one 19†edge. Take the 20†zipper and measure and mark the center on both edges of the zipper tape (see figure 1).

Tip:  Use binding clips instead of pins when working with oilcloth.  The fabric does not heal when holes are made in the oilcloth.  Any holes made in the oilcloth will be permanent.  Also, use a slightly longer stitch length to minimize the amount of puncture holes made in the fabric when sewing.  Typically, adjusting the stitch length from the standard 2.4 to 3.0 is a good adjustment.  The raw edges of oilcloth don’t fray, so there isn’t a need to finish raw edges as there would be with a regular woven fabric.    

  1. Place one of the 6-3/4†x 19†pieces of fabric A RSU and align the zipper tape with the 19†raw edge, matching the marked centers of the zipper and the pillow back. The zipper and the fabric should be RST (see figure 2).  Use binding clips to secure the zipper in place.
  2. Remove the standard needle plate from the MC9400 and install the Ultra Glide Needle Plate. Using this needle plate with the Ultra Glide Foot will keep the oilcloth gliding smoothly under the presser foot.  Select a zipper sewing stitch to move the needle position to the left.  Lengthen the stitch length to 3.0.  Attach zipper foot E to the presser foot and sew the zipper to the fabric A with a 1/4″ seam allowance (see figure 3).  Finger press the seam allowance of the zipper away from the zipper teeth, under the oilcloth.  Fold the remaining edge of the zipper over (see figure 4).
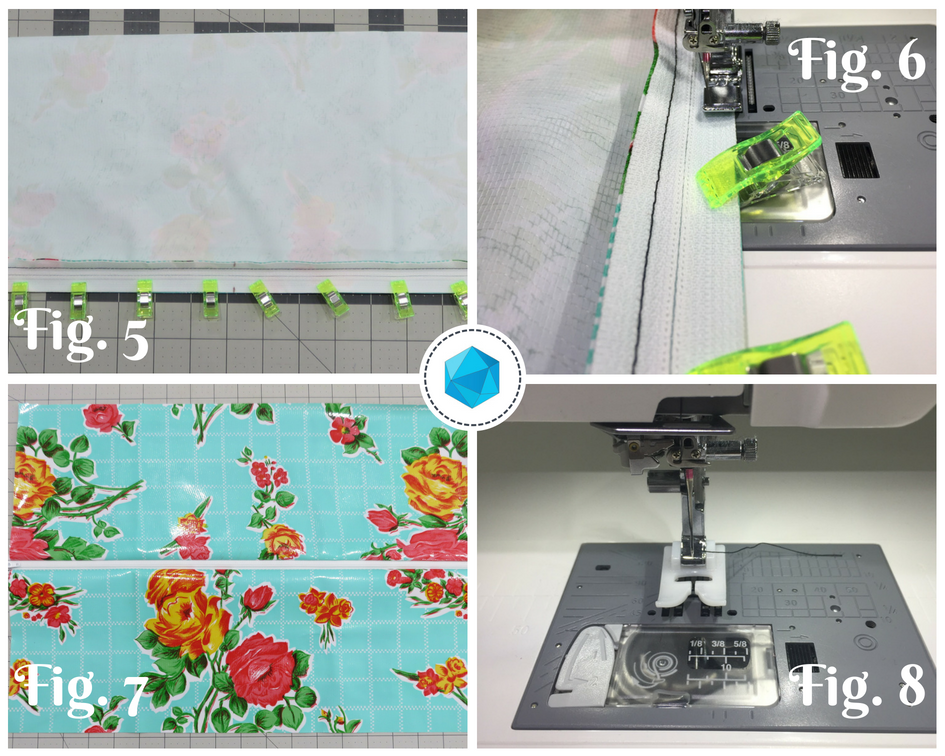
  3. Place the remaining 6-3/4†x 19†piece of fabric A RSU. Take the remaining side of the zipper tape and match the marks on the zipper tape edge and the pillow back edge, with the zipper right side down.  Line up the raw edges and clip in place with binding clips (see figure 5).  Sew the zipper in place with a 1/4†seam allowance (see figure 6).
  4. Once again, finger press the zipper tape seam allowance away from the zipper teeth so it is under the oilcloth pieces (see figure 7).
  5. Remove the zipper foot E from the presser foot and attach the Janome Ultra Glide Foot to the presser foot (see figure 8).
    A collage of photos showing how to use the sewing machine.
    Figures 5-8

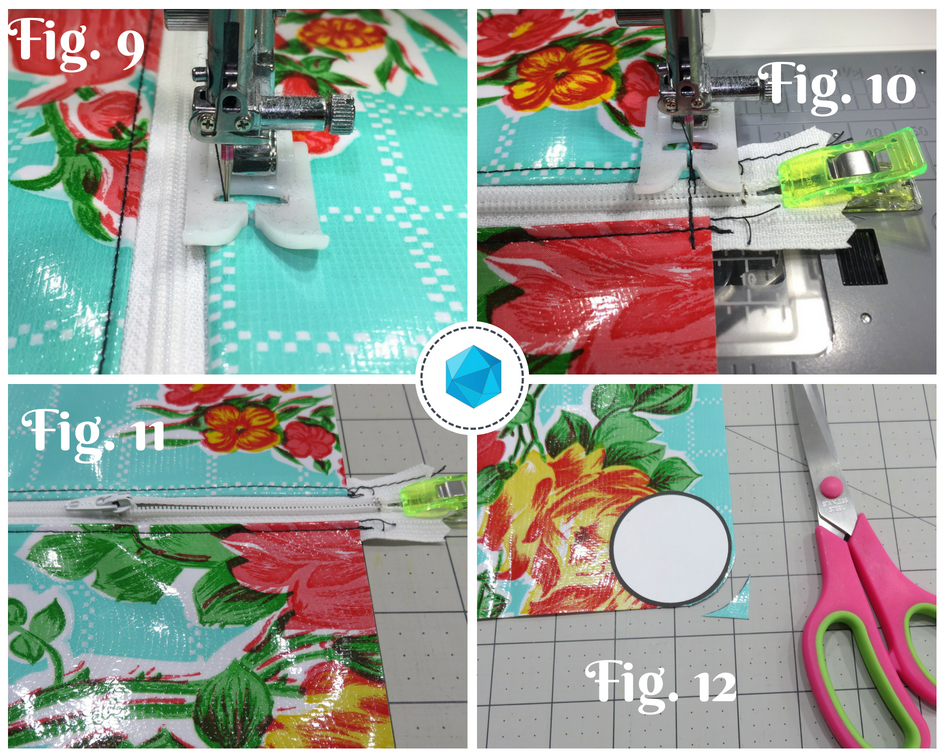
    Topstitch 1/8†away from the folded edge of the oilcloth (see figure 9).

  6. Select stitch #1 from the utility menu. Move the zipper head towards the middle of the zipper tape (see figure 11).  Use a binding clip to keep the ends of the zipper together.  Sew a few stitches and then backstitch to connect the zipper ends, about 1/8†away from the edge of the oilcloth fabric (see figure 10).  This will act as a zipper stop until the front and back of the pillow are sewn together.  Keep the zipper unzipped at least half way.

Round the corners and baste the pom pom trim

  1. Take the circle template that you printed and cut out, and place it with the edges touching the corner edges of the pillow. Trace around the curved edge of the circle with a marking pen.
  2. Cut the edge to round the corner (see figure 12).

    A collage of photos showing how to use the sewing machine.
    Figures 9-12
  3. Repeat steps 8 and 9 with the remaining corners of the back of the pillow and the four corners of the front of the pillow.
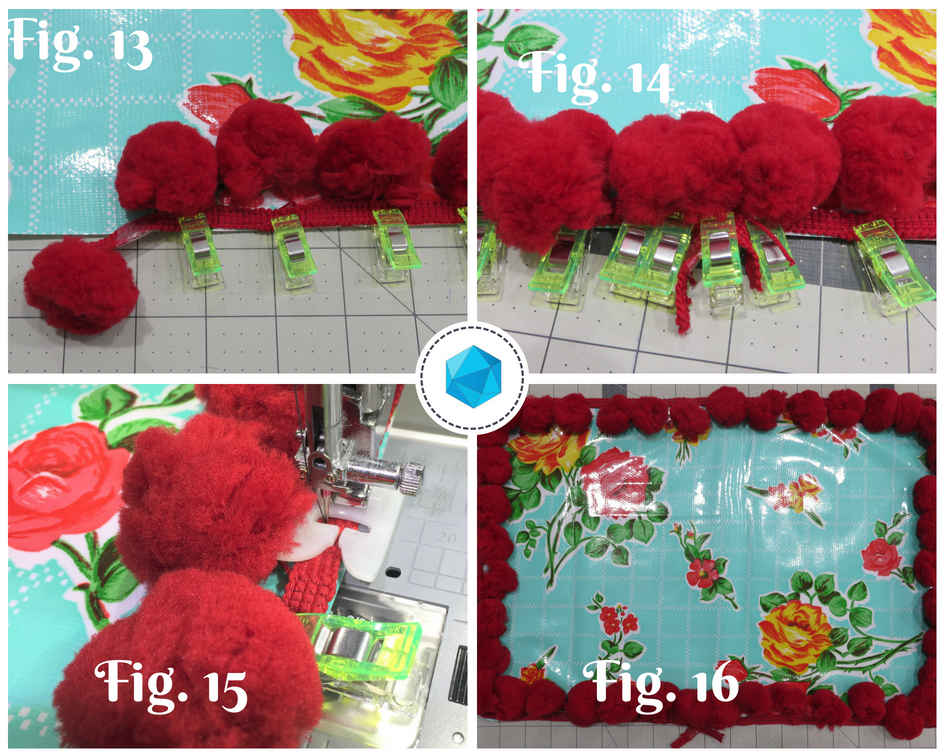
  4. Set aside the zippered back of the pillow. Take the 13†x 19†piece for the pillow front and the jumbo pom pom trim. Place the pillow front RSU.  Starting in the middle of one of the 19†edges of the pillow front, align the edge of the trim with the edge of the oilcloth.  Trail the end of the trim off the edge of the pillow by 2-3 inches figure (see figure 13).  The pom poms should be pointing inward towards the center of the pillow front.
  5. Align the edge of the trim and the edge of the pillow front all the way around the perimeter of the pillow. When you reach the point you started the trim at, overlap the trim and trail the end off by 2-3 inches, as you did to start (see figure 14). If the jumbo poms overlap, carefully trim one or two away to decrease the bulk.  Use binding clips to clip the trim in place.
  6. Move the needle position to the left. Lengthen the stitch length to 5.0 for a basting stitch. Baste the trim in place with a 1/8â€-1/4†seam allowance (see figure 15). 

Sew the pillow together and finish

  1. Place the basted pillow front RSU (see figure 16).

    A collage of photos showing how to use the sewing machine.
    Figures 13-16
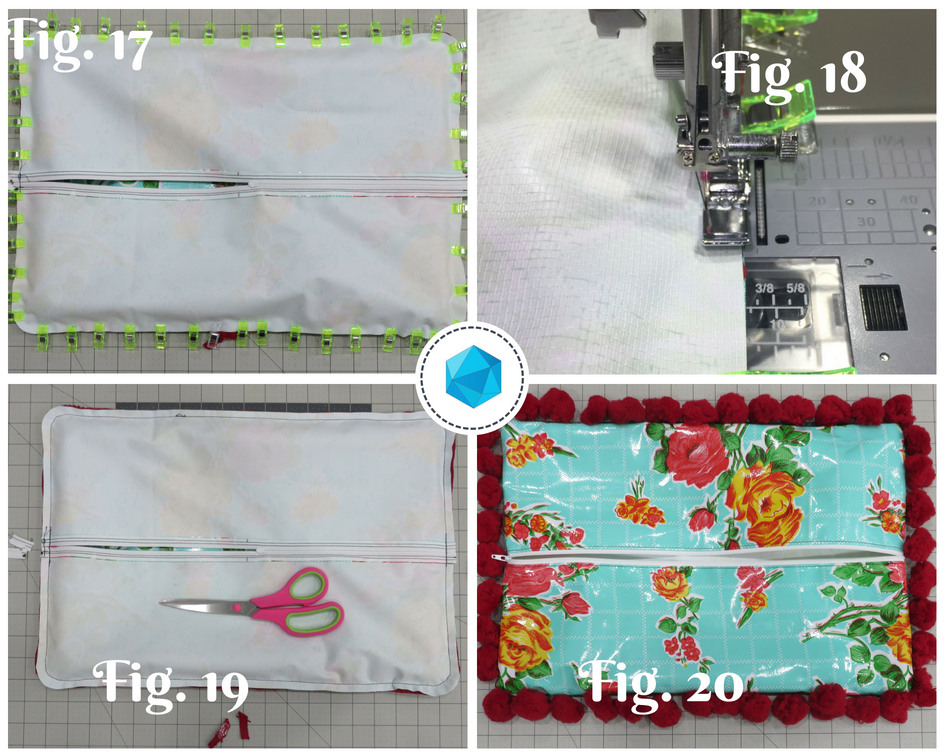
  2. Place the zippered back of the pillow right side down on top of the pillow front (see figure 17). Line up all the edges and make sure the pom poms are all facing in towards the center of the pillow. Double check to be sure the zipper is unzipped at least half way.  Use binding clips to secure all the edges together.
  3. Remove the Ultra Glide Foot and attach the zipper foot E to the presser foot. Keep the needle position moved to the left, as if you were sewing a zipper. Sew around the perimeter of the pillow using a 1/4†seam allowance (see figure 18).  Double check that none of the pom poms are getting caught in the seam allowance while you are sewing.
  4. Use a pair of scissors to trim away the excess ends of the zipper so the ends are flush with the pillow edges (see figure 19).
  5. Turn the pillow right side out and carefully push out all the curved edges (see figure 20).

    A collage of photos showing how to use the sewing machine.
    Figures 17-20

Tip:  Oilcloth has little to no stretch, unlike cotton fabrics you might be used to working with.  A zipper closure helps to keep seams sewn together versus using an envelope closure.  Be careful to not stretch the fabric when inserting the pillow form.  For a fully weather-resistant pillow, you can opt to sew this pillow without the ball fringe trim.

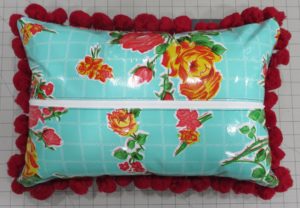
  1. Insert the 12†x 18†pillow form and use to liven up your patio!
    A pillow with red flowers and blue squares on it
    Finished Pillow!

    Now get out there and party with your new DIY outdoor pillow 😉

Posted on 1 Comment

Dresden Placemats tutorial


Do you need a little something special to liven up your table top decor?  How about whipping up some fabulous new place mats that easily reflect your awesome style?  I recently created a cute little tutorial with a free dresden template that can be downloaded HERE !  


There’s also a really cool-no bind technique that is explained in the tutorial that you’ll just have to try out!  I love this fabric by Sarah Jane Studios for Michael Miller fabrics, and think it’s perfect for spring and most of summer!  

I hope you’ll find some time to sew this week and play around with some cute dresdens!

Posted on

Applique your way to a handmade Mother’s Day!


I’m always looking for creative gifts to make for holidays, birthdays, anniversaries, and it seems like it’s always the same kind of stuff that you could really do without…like, how many cosmetic bags do you really need?  

So I was trying to think about what kinds of gifts would be meaningful to me if I were a mother.  What kind of gift would I cherish and appreciate forever?  

Well, right off the bat, I think about things that represent my “imaginary kids”.  Handwriting samples, drawings, things that could be made more permanent.  But then, I thought not all kids are old enough to draw or write…so how could that stage be permanently captured in a cute way?  My answer was hand prints!  But the painted hand prints are kind of cheesy, and lots of those probably come home from school in the form of turkeys,  reindeer antlers, spiders, butterflies, etc.  

So how about making a functional patchwork pillow with traced hands of the kiddos appliqued on top of the patchwork?  

I got to team up with Janome for this super easy tutorial, and really loved the experience.  If you’re in the need for a super cute, but still functional Mother’s Day gift (or grandmother’s gift!), this is the project for you!  Follow this Link to access the full tutorial and supply list.  

The pillow features Karen Lewis’ awesome fabric range, Blueberry Park.  The back of the pillow is an easy envelope closure that takes minutes to make.

Hemming the envelope closures of the pillow


Sweet little blanket stitch on one of the hands prior to quilting

Selecting thread to go with each hand
For more details, check out Janome’s project page and access the complete, free tutorial!
Until next time, I hope you are able to get some good sewing in!


Posted on

Free tutorial: Using chalk pounce and stencils to make gorgeous quilted pillow shams


Check out my newest tutorial for Janome on the AQS blog this week!  The tutoiral is for Quilted pillow shams that will really step up your bedroom decor and give an extra special touch.


Follow this LINK to see the full tutorial and add some new tools to your quilting toolbox!

I’ve always loved quilting, and was a little skeptical at the stencils.  Especially before I knew about the chalk pads.  I tried them when I first tried my hand at quilting, and used a water soluble pen to trace each stencil line.  And let me tell you…that will be a wonderful deterrent for anyone to never try stencils again.  Time consuming, inefficient, etc.  Then one of my friends had some of the chalk pounce and pads and so I thought I might just go ahead and try it again.  WAY better than tracing each line by hand.  What originally to hours literally changed to minutes.  So if you haven’t loved stencils, maybe try this and you’ll change your mind!

Posted on

I wish I may, I wish I might…


Have the sewing room I dream of TONIGHT!  Not really.  I wish is right.  Soon enough, though.

If you’ve read my previous post about painting over tacky wall paper, then you know my husband and I live in a pretty budget friendly house (that’s code for–NO ROOM for anything).  So, a little over a year ago, we started building our dream workshop to house our hobbies.  Brady drew up a big metal building and then we planned to frame off 1/4 of it on the interior to make that my sewing/quilting “studio”.  My awesome father-in-law got involved and literally has done more than my husband and I combined.  

The shop is basically done, and Brady has been working on my sewing room for the last 6 months.  

 This was the first picture I took of when we 
were prepping the foundation.  
After our huge delivery of fill dirt–I think it 
was something like 9 truck loads full.
After spreading the fill dirt…

I really don’t remember what this step was. 
 Something about keeping moisture in with the plastic…

And then, the magical day when the concrete was poured!
I wish I could go back in time and tell myself we were no
where near close to being done, like I thought we were…


My father-in-law, brother-in-law, and husband worked 
on putting the beams up for the building.

Next week, I’ll share pictures of the next step progress.  I will say that from the start of these pictures, through the one above took roughly 6 months.  It would have taken probably days, had we hired a crew of people to come out and do everything for us, but that isn’t the route we took.  Even though it’s much more time consuming, it really saved us a lot of money.

Posted on

Make your own Home Decor for cheap, with DIY tutorial included


Finally, I did a shortened version of my original tutorial  (since Blogspot doesn’t support PDF uploading–or I couldn’t figure it out!).

Above is the wall art that I made when I re-did our guest bathroom.  This is a very inexpensive way to make something to suit your taste and easily coordinate with your home decorations.  Just a heads up-this does take a good amount of time, and requires a little concentration-depending on how detailed your silhouette is.

First, you need to find a shape or silhouette that you like.  Keep in mind that you will be cutting this out AND sewing around the perimeter.  I suggest doing a practice one first with a circle or square–something simple and straightforward.  You might get really put out if you start with the deer!  

Print them out to the size you want them to be in your decor.


Now for your supply list-
Some kind of fusible stabilizer or interfacing that is thin to put behind your background fabric
Background Fabric (pictured in the next photo)
Fabric for your silhouette
Rotary ruler
Iron
Precise scissors
Sewing machine/needle and thred
HeatnBond Lite
Sewing pins or scotch tape
Photo frame with enough spaces to put what you want in it

So this photo shows the thin interfacing that you will be fusing to your background fabric.  If you don’t have any handy, this step is not mandatory, so don’t fret!  

You’re going to cut your background fabric to the size the picture frame you bought is.  Make sure you cut the pieces a little larger than the viewing window so you can easily secure them.

Cut your pieces of stabilizer to the same size as your background fabric pieces.  I have three in this picture because I had a 3-photo frame.  

Follow the manufacturer’s instructions for fusing the stabilizer to the fabric.  Now you can set these beauties aside, because you won’t need them for a while!

Now cut your silhouette down to the smallest you can get it without cutting on the lines.  You’re going to prep your silhouette fabric now…

Before you cut your fabric, lay your shape on top of it and make sure you have a good inch extra on all 4 sides.  It’s better to have a little extra to play with if you need it than having to go back and cut more if you make a mistake.  Once you measure, go ahead and cut the fabric to size.


Cut a piece of HeatnBond to just a LITTLE larger than your silhouette.  Place it shiny side down on the wrong side of your silhouette fabric.  Follow the manufacturer’s instructions for bonding.  Mine said not to use steam, so make sure you don’t!  


Once you’ve got your HeatnBond on the back of your silhouette fabric, flip your fabric over so it is right-side up.  You may want to choose a fabric that isn’t solid colored-sometimes it’s hard to determine which is the front or back.  I use scotch tape and pins to secure my silhouette shape to the fabric–make sure your shape is directly over the HeatNBond.  If you can’t tell, hold your fabric with the silhouette up to a light source and you should be able to see the HeatnBond with no problems.

Now you’re ready to get stitching!  You’re going to sew ON THE LINES of your silhouette.  
You don’t need a machine to do this, but it sure goes a Heck of a lot faster if you do.


After you have your outline sewn, you’re going to cut through all layers around the silhouette.  It’s a good idea to leave a 1/8″ space between the stitching line and your cuts.  If you cut too close, you risk cutting the thread, or having the fabric fray–which you definitely do not want!

Now you’re going to peel off the printer paper from the front of you shape, and the paper backing from the HeatNBond from the back of the shape.  You even have to peel off the measly little paper between the cuts you just made and your line of stitching.  Be careful to not fray the fabric.  This is why I told you to leave a 1/8″ space.  You can see that I did not.  I’ve done this a few times before and so I knew I could get away with that.  You might find that too.  But for now, leave 1/8″. 


After you remove the paper backing, you can go grab your background fabric and center your silhouette on it.  I think the easiest way to do this is with a rotary ruler or some kind of clear acrylic ruler.  Makes things move a little faster–but you can also use just a regular ruler.


Now, look at the manufacturer’s instructions on how to apply the HeatNBond, and follow the directions.  You will now fuse the silhouette to the background fabric.


Once you’ve done that, you’re ready to frame it!  Just remember to minimize the handling of the silhouette so the edges don’t fray.  If you have more than one, you’ll just repeat these steps with each other piece you have.

Please let me know if you have any questions, and good luck on your new wall decor!

Joanna

Posted on

Creating bags with no pattern (or making it up as you go)


For roughly the last week, I have been working on this duffle bag after I received my first shipment of Tula Pink fabrics.  I am absolutely NUTS about this fabric designer.  Her use of color is insane, and her patterns are awesomely fun.  I’ve had a duffle bag on my to do list for over a year now, and it was high time I kicked into high gear.
I browsed tons of websites looking for patterns for duffle bags, watching tutorials, and looking up travel bags on Pinterest.  I didn’t like any of the patterns, they all seemed either really juvenile, dorky looking, too small, or just not finished enough.  
So I made a list of all my “must haves” and decided to write my own pattern.  I had all my fabric out and ready to go, and got to work in my sketchbook drawing out measurements and the order of construction steps.  Turns out I didn’t even so much as cut a piece of fabric until 2 days later.  If you haven’t ever written a pattern before, you might take for granted how much time, trial and error, and re-writing goes into it.  
The project took me about 5 days start to finish (my husband’s family was in town for the weekend–I may have been able to shave one day off if I worked all the way through).  
The one thing I just really was not satisfied with was that I did not put any interfacing in the zipper panel that goes in the top.  In the picture, I have two huge sacks of fabric shoved inside to keep the middle from drooping.  I’m pretty confident that adding the interfacing would fix that.  Maybe there will be a duffle bag 2, but I’m thinking about naming this bag “The Body Bag”.  I could literally fit all three of our dogs inside and still zip it up (Border collie and 2 heelers).
This bag has all over free-motion quilting in four different thread colors, a three-section elasticized pocket on the interior, a 3-section pocket for shampoo, conditioner, body wash, another smaller elasticized pocket, and another 3-section pocket.  The exterior has two zipper pockets (one on each end), and 4 exterior pockets.  And enough room to pack for a week and a half without needing anything.  Those were my requirements, so I guess if the middle is a little saggy, I’ll get over it!