Posted on

Summer fun and a DIY first aid kit

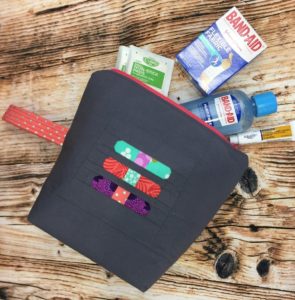
A black bag with some bandaids on it


A black bag with some bandaids on it
DIY first aid kit
Now that summer is here, many people are planning day outings or vacations with the kiddos.  It’s a good idea to have a first aid kit with you in case something happens, and I know I haven’t even kept one in my car (I’m learning, though!).  So this pattern has a free zipper pouch tutorial and a free foundation paper piecing tutorial in it.  Two for the price of one! But not really, because they’re both free 😉  Head over to the AQS Blog and get your free tutorial HERE!
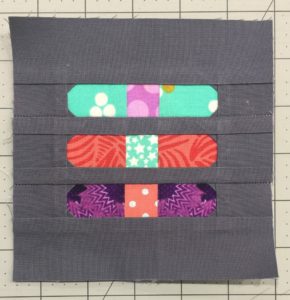
A quilt block with three different colored bandaids on it.
finished foundation block

If you don’t feel like messing around with the band aid block and the paper piecing, you can totally skip that part and just cut two slid pieces of fabric for the front and back.  But those little band aids are so cute!  

I filled my little kit up with band aids, some antiseptic spray and wipes, bandage tape, gauze, and antibiotic ointment.  You can personalize yours however you’d like and maybe sew up an extra one for a friend (or for dad’s car).  The little band aids are a great way to use up small scraps of fabric.  I know I have a hard time throwing any fabric away, so I’ll keep this block pattern close at hand for teacher gifts or whatever!  Happy sewing until next time!

Posted on 1 Comment

Dresden Placemats tutorial


Do you need a little something special to liven up your table top decor?  How about whipping up some fabulous new place mats that easily reflect your awesome style?  I recently created a cute little tutorial with a free dresden template that can be downloaded HERE !  


There’s also a really cool-no bind technique that is explained in the tutorial that you’ll just have to try out!  I love this fabric by Sarah Jane Studios for Michael Miller fabrics, and think it’s perfect for spring and most of summer!  

I hope you’ll find some time to sew this week and play around with some cute dresdens!

Posted on

Quilting is my first love, but garments have wooed me!


This summer I had the amazing opportunity to do some work for Janome.  I made a few garments and a bag for them to use in a photo shoot, and even though it was stressful, seeing the finished products come to life on other people was maybe the best feeling in the world!  

I can’t post the video yet, as they haven’t released the advertised equipment yet, but I did screenshot some of the items I made to share with you.  I never thought I would have an opportunity to do something like this, and it was a blast!  I only recently started my trek into clothing, even though I’ve dabbled in bags since the beginning.  I must say I’m smitten and sometimes so in awe of the pattern designers.  

I can’t wait to continue my journey into exploring different garment fabrics, and even incorporating some into the quilts I make.  Even though I adore quilting and the process that goes into it, sometimes trying things you aren’t comfortable with are really refreshing and have the ability to breathe new life into your work.  Now that the school year has started, I’m back at quilting, but it’s really nice to know that garments will be on the sidelines waiting for me the next time I want to stray away and try something new 🙂

This bag.  I could barely let it go!  Love those colors so much 🙂
Sorry for the blurry picture on this one, but those are 2 
of the 3 pairs of shorts I made for the photo shoot.
And the top.  My pattern and the embroidery was
 all new embroidery designs from the sewing 
machine company that come stock with the machine.

 Then this little guy.  Literally.  He was 17.  31 year-old me had to 
dance with him.  It’s okay…I left my walker on the side 
of the dance floor 😉  That denim jacket was embroidered by 
my friend Danielle who does such beautiful work–the girl has got mad skills!

These are the two other girls from my guild that were in the
photo shoot I was in with the denim jackets.  We had so much fun.
I couldn’t seem to get a good paused part of the video with Toni…

Posted on

Make your own Home Decor for cheap, with DIY tutorial included


Finally, I did a shortened version of my original tutorial  (since Blogspot doesn’t support PDF uploading–or I couldn’t figure it out!).

Above is the wall art that I made when I re-did our guest bathroom.  This is a very inexpensive way to make something to suit your taste and easily coordinate with your home decorations.  Just a heads up-this does take a good amount of time, and requires a little concentration-depending on how detailed your silhouette is.

First, you need to find a shape or silhouette that you like.  Keep in mind that you will be cutting this out AND sewing around the perimeter.  I suggest doing a practice one first with a circle or square–something simple and straightforward.  You might get really put out if you start with the deer!  

Print them out to the size you want them to be in your decor.


Now for your supply list-
Some kind of fusible stabilizer or interfacing that is thin to put behind your background fabric
Background Fabric (pictured in the next photo)
Fabric for your silhouette
Rotary ruler
Iron
Precise scissors
Sewing machine/needle and thred
HeatnBond Lite
Sewing pins or scotch tape
Photo frame with enough spaces to put what you want in it

So this photo shows the thin interfacing that you will be fusing to your background fabric.  If you don’t have any handy, this step is not mandatory, so don’t fret!  

You’re going to cut your background fabric to the size the picture frame you bought is.  Make sure you cut the pieces a little larger than the viewing window so you can easily secure them.

Cut your pieces of stabilizer to the same size as your background fabric pieces.  I have three in this picture because I had a 3-photo frame.  

Follow the manufacturer’s instructions for fusing the stabilizer to the fabric.  Now you can set these beauties aside, because you won’t need them for a while!

Now cut your silhouette down to the smallest you can get it without cutting on the lines.  You’re going to prep your silhouette fabric now…

Before you cut your fabric, lay your shape on top of it and make sure you have a good inch extra on all 4 sides.  It’s better to have a little extra to play with if you need it than having to go back and cut more if you make a mistake.  Once you measure, go ahead and cut the fabric to size.


Cut a piece of HeatnBond to just a LITTLE larger than your silhouette.  Place it shiny side down on the wrong side of your silhouette fabric.  Follow the manufacturer’s instructions for bonding.  Mine said not to use steam, so make sure you don’t!  


Once you’ve got your HeatnBond on the back of your silhouette fabric, flip your fabric over so it is right-side up.  You may want to choose a fabric that isn’t solid colored-sometimes it’s hard to determine which is the front or back.  I use scotch tape and pins to secure my silhouette shape to the fabric–make sure your shape is directly over the HeatNBond.  If you can’t tell, hold your fabric with the silhouette up to a light source and you should be able to see the HeatnBond with no problems.

Now you’re ready to get stitching!  You’re going to sew ON THE LINES of your silhouette.  
You don’t need a machine to do this, but it sure goes a Heck of a lot faster if you do.


After you have your outline sewn, you’re going to cut through all layers around the silhouette.  It’s a good idea to leave a 1/8″ space between the stitching line and your cuts.  If you cut too close, you risk cutting the thread, or having the fabric fray–which you definitely do not want!

Now you’re going to peel off the printer paper from the front of you shape, and the paper backing from the HeatNBond from the back of the shape.  You even have to peel off the measly little paper between the cuts you just made and your line of stitching.  Be careful to not fray the fabric.  This is why I told you to leave a 1/8″ space.  You can see that I did not.  I’ve done this a few times before and so I knew I could get away with that.  You might find that too.  But for now, leave 1/8″. 


After you remove the paper backing, you can go grab your background fabric and center your silhouette on it.  I think the easiest way to do this is with a rotary ruler or some kind of clear acrylic ruler.  Makes things move a little faster–but you can also use just a regular ruler.


Now, look at the manufacturer’s instructions on how to apply the HeatNBond, and follow the directions.  You will now fuse the silhouette to the background fabric.


Once you’ve done that, you’re ready to frame it!  Just remember to minimize the handling of the silhouette so the edges don’t fray.  If you have more than one, you’ll just repeat these steps with each other piece you have.

Please let me know if you have any questions, and good luck on your new wall decor!

Joanna